Installation Instructions - EPiServer CMO 1.0
|
Product version: |
EPiServer CMO 1.0 |
|---|---|
|
Document version: |
1.0 |
|
Document last saved: |
Installation of EPiServer CMO 1.0 for EPiServer CMS 5.2 SP1 and EPiServer CMS 5.2 SP2 is done with EPiServer Deployment Center, which is used to handle installation of EPiServer products. This document describes how to install, upgrade and delete EPiServer CMO 1.0 for EPiServer CMS 5.2.375.133 and 5.2.375.236.
» Read more about EPiServer Deployment Center
|
Note - Installation of EPiServer CMO for 5.1 SP3 (5.1.422.267) and 5.2 (5.2.375.7) is not done according to these instructions. Read more about installing EPiServer CMO for EPiServer CMS R1 SP3 and R2. |
Table of Contents
Prerequisites
The following presquisites exist for EPiServer CMO:
-
System requirements for EPiServer CMO 1.0 on EPiServer CMS 5.2.375.133 (EPiServer CMS 5 R2 SP1)
-
System requirements for EPiServer CMO 1.0 on EPiServer CMS 5.2.375.236 (EPiServer CMS 5 R2 SP2)
Note: Statistics collecting requires the Friendly URL Rewriter module as the injection is done by the handler of this event.
Does your site have multiple bindings? Read more about how to configure Live Monitor for websites with multiple bindings.
Installation
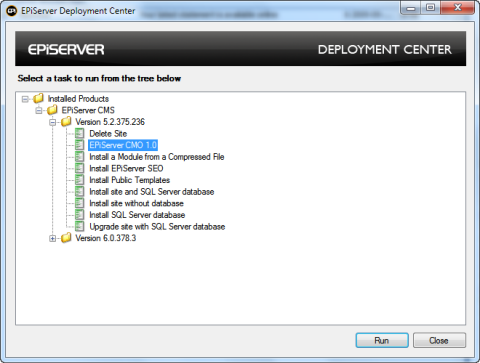
- Download and run the EPiServerCMO.msi file that you have downloaded from EPiServer World (http://world.episerver.com/en/Download).
- Open EPiServer Deployment Center. Expand the relevant EPiServer CMS version, select EPiServer CMO 1.0 line and click Run.
- Select the features you need to be installed. By default they all are chosen. Click Next.
- Campaign Monitor and Optimization Core – represents core files of module (database, pages, logic etc). It is mandatory and therefore cannot be unchecked.
- Statistics Handler – HTTP web handler which is used to gather statistics. You could uncheck this item if you plan to install it manually afterwards (see also step 6 below).
- Aggregation Service – it is windows system service which will be used to aggregate gathered statistics. You could uncheck it if you plan to install it afterwards or just want to control all features on your operation system.
- Thumbnail Service - a windows service application used for page thumbnail generation
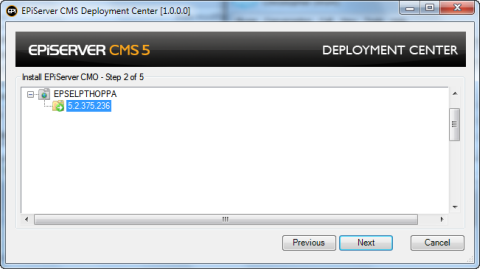
Note: The aggregation service can write logs during the aggregation process. To enable log writing, you need to grant the modify permission on the aggregation service folder (by default C:\Program Files\ EPiServer\ Shared\ Services\ CMO Aggregation Service\) to users who will be running the aggregation service (by default Local service). - Select the website on which you want to install EPiServer CMO and click Next. Only sites controlled by EPiServer CMS are shown by default.
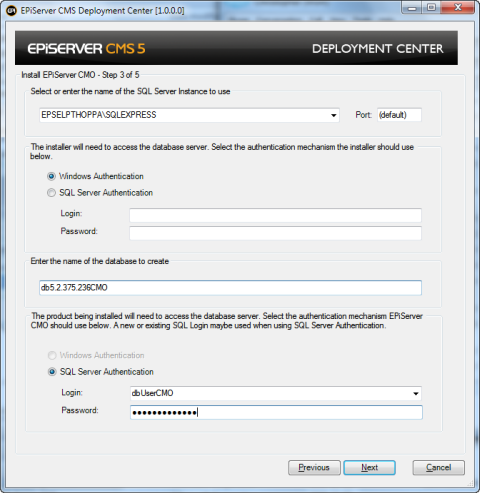
- EPiServer CMO needs to install its database for work. Specify the connection for the database server, as well as database name and also user name and password which will be used to connect. Click Next.
- Configure the settings that are used for EPiServer CMO and click Next.
Editor Roles – EPiServer CMS user groups (roles) which will be able to create, edit and delete campaigns and landing page optimization tests.
Viewer Roles - EPiServer CMS user groups (roles) which will be able to create, edit and delete campaigns and view landing page optimization tests.
Statistics Handler URL – URL to the HTTP web handler, which will be used to gather statistics if it is installed separately. If you have not selected the statistics handler item on step 3, you will have this item enabled.
Thumbnail Service URL – URL to the web-based service, which will be used to create thumbnails of EPiServer CMS pages included in campaigns and/or landing pages optimization tests.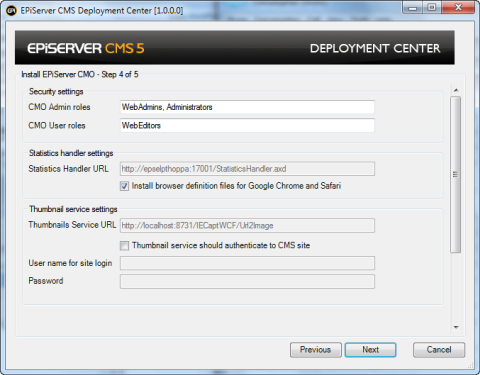
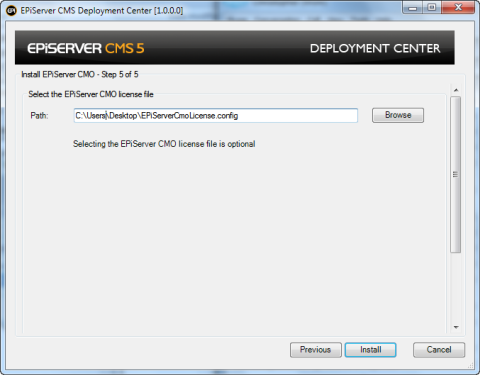
- Select the EPiServer CMO license file to be used. This step can be skipped, if you plan to copy it to the site manually afterwards. Click Install.
Post Installation Configuration
After installation, there is some post-installation configuration which should be done regarding scheduled database jobs (for the EPiServer CMO database) and for the Silverlight MIME type.
Scheduled Database Jobs
-
The stored procedure "epitraceMaintenance" needs to be set up to run at least every 24 hours. The stored procedure removes information about old visits and rebuilds indexes on the "epitraceHits" table.
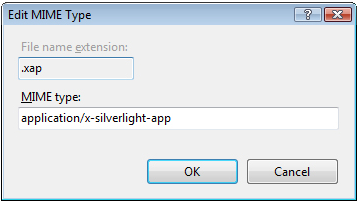
Register Silverlight MIME Type to Make the Live Monitor Work Correctly
Check that MIME type .xap is registered for the website:
-
Open IIS Manager and the website properties
-
Open Edit MIME Types. If the file name extension .xap is not given, add the new MIME type application/x-silverlight-app and click OK.
Logging Configuration
Check the logging configuration for EPiServer CMO, Aggregation service and thumbnail service. Make sure that the applications will have the required permissions to create log files in the destination folders. The EPiServer CMO logging settings can be added to the common EPiServer CMS logging settings file EPiServerLog.config. Aggregation service logging settings are contained in the EPiServer.Cmo.AggregationService.exe.config file in folder where aggregation service is installed. Thumbnail service logging settings are defined in IECaptSvc.exe.config file in the folder where the service is installed.
Deploying the CMS Website to the Production Environment
Change the website URL. After changing the website URL, the URLs to the Thumbnail service and Statistics handler should be updated on the CMO Admin page.