Don't miss out Virtual Happy Hour this Friday (April 26).
Try our conversational search powered by Generative AI!
AI OnAI Off
Don't miss out Virtual Happy Hour this Friday (April 26).
This document describes a first time installation of the EPiServer 7.5 platform and EPiServer Mail. Installation of EPiServer Mail to the EPiServer Deployment Center is done through the EPiServer Relate installation package. From Deployment Center, you can then install an EPiServer CMS site with the Mail component.
When installing EPiServer 7.5 in the previous step, you select the Install Relate option when running the Setup.exe file. This will install the EPiServer Mail components in Deployment Center. As certain components are shared between Mail and the Relate community module, a new separate database with required tables and stored procedures will automatically be installed for Mail, if the community module is not already installed.
Install Mail as follows:
1. Open EPiServer Deployment Center and select the website to which you want to install Mail.
2. Select EPiServer Mail and expand the appropriate version to see the options.
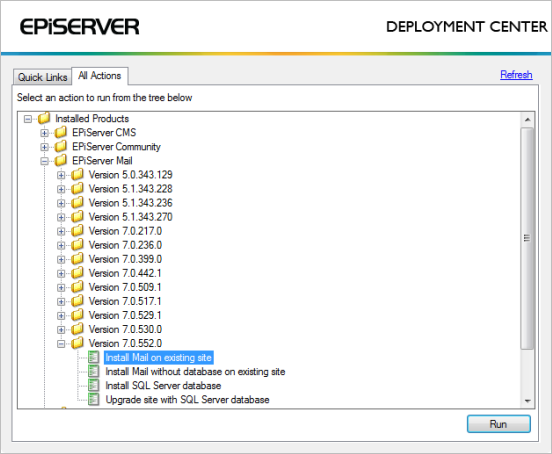
3. Select Install Mail on existing site and click Run to start the installation.
4. Select the desired site on which to install EPiServer Mail, and click Next to continue.
5. Select the authentication mechanism the installer should use. The Windows Authentication option (default) will use the credentials of the user running EPiServer Deployment Center. The SQL Server Authentication option is used when SQL Server is located on a different machine. Selecting this option you can specify a login and password to be used. Click Next to continue.
6. Create a user and the password that will have the role of Administrator for the EPiServer Mail database. If you do not use the WindowsRoleProvider to authenticate logging in to EPiServer CMS, then the user created here will need to be used. Enter Administration account username/password. Click Next to continue. Note that the credentials created here are only valid using the EPiServer Common membership provider.
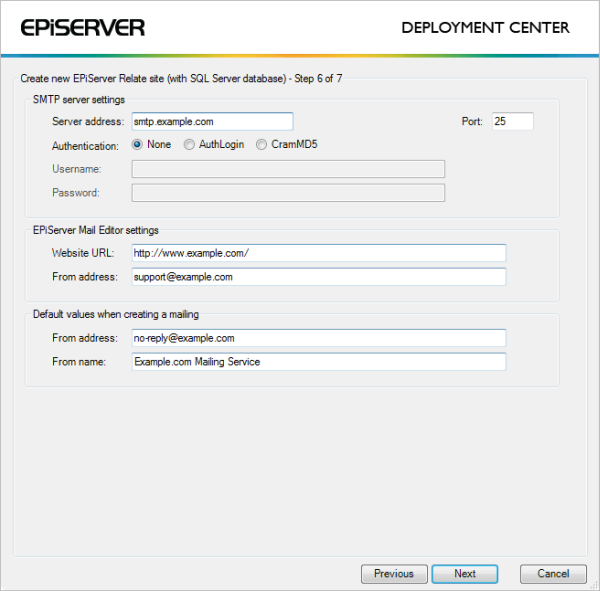
7. In the next step you will configure the SMTP server settings, and here it is important that the SMTP server you configure allows relaying from this server. Click OK to confirm the message displayed. Enter values as follows:
8. A summary page for the installation will be displayed where it is possible to return to previous steps to change the setup. Click Install to start the installation and let it finalize.
9. When the installation has finalized, open the website in a browser and verify the installation of EPiServer Mail.
You need to create the groups MailAdmins and MailEditors in the EPiServer CMS administration interface to be able to set access rights for EPiServer Mail users. Refer to the user documentation for EPiServer CMS for more information on access right management.
This section describes how to prevent mailings distributed by EPiServer Mail to be caught in SPAM filters. If you have an SPF record in DNS for the domain of your sender e-mail address (From address), add include:_cluster1.episervermail.episerver.com to that record. For example, if no-reply @example.com is used as your sender e-mail address the DNS for example.com is subject for this addition.
If you do not yet have an SPF record it is still advisable to add one, allowing your regular SMTP servers as well as the include directive for the EPiServer Mail cluster. See http://www.openspf.net/ for further information.
Choose this option if you want to install EPiServer 7 Mail without a database. Except for step 5 and 6, the installation procedure is identical to the one for installing EPiServer Mail on an existing website, described above.
Target platform is EPiServer with load balanced environments, with a single database with tables and stored procedures which support the needs of EPiServer Mail. This installs all components required for an EPiServer Mail instance to work, but installs no databases and makes no database changes.
Choose this option if you want to install a database for EPiServer Mail. For the SQL Server part, refer to the installation instructions for CMS. This option is suitable when using multiple instances of EPiServer Mail in a load balanced environment (without a suitably configured database). The procedure installs the database, along with database tables and stored procedures supporting the needs of one or more EPiServer Mail instances.
To run EPiServer Mail you need an EPiServer Mail account. Accounts can be activated for either a development environment, or a production environment. Refer to Activating EPiServer Mail for more information. You also need a license for EPiServer CMS.
For instructions on breaking changes and how to upgrade between versions, refer to the Upgrading section of the SDK for EPiServer Mail.
Last updated: November 30, 2012