Installation Instructions EPiServer Mail 4.4 SP1
|
Product version: |
EPiServer Mail 4.4 SP1 |
|---|---|
|
Document version: |
1.2 |
|
Document last saved: |
Introduction
This document describes the necessary steps to install the EPiServer Mail package. Installing EPiServer Mail is completed through the EPiServer Deployment Center. All the EPiServer Mail installation steps are described in this document.
Content
Prerequisites
See the EPiServer Mail 4.4 SP1 system requirements specification. Download and unzip the contents of the EPiServer Mail zip file onto your machine.
Installing EPiServer Mail onto EPiServer Deployment Center
Download and unpack the EPiServer Mail 4.4 SP1 zip file. Run the EPiServerMail.msi file to start the installation. After installation is complete the installation window will be closed automatically. To install EPiServer Mail on a Web site see the instructions below under EPiServer Deployment Center.
EPiServer Deployment Center
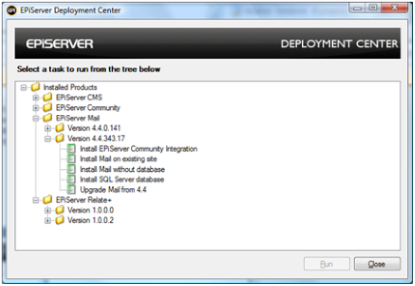
When opening the EPiServer Deployment Center the different versions of EPiServer Mail currently installed on your machine will be listed. Select the task you wish to perform under EPiServer Mail and click on the Run button. For further information regarding the EPiServer Deployment Center see the Installation Instructions document.
-
Install EPiServer Community Integration
-
Install Mail on existing site
-
Install EPiServer Mail without database
-
Install SQL Server Database
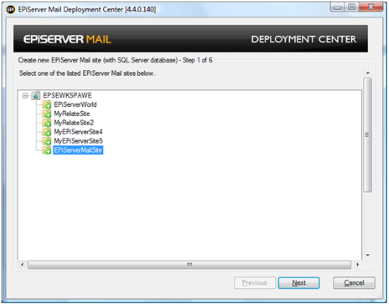
Choosing this option installs EPiServer Mail on a Web site with a SQL Server database.
Target platform EPiServer - CMS (5.1.422.256 or later) with or without Community Module. Important: EPiMail 4.3 or earlier must be uninstalled before choosing this installation (see Uninstalling EPiServerMail 4.3).
This installs all components required for EPiServerMail to work. As certain components are shared between EPiServerMail and the Community Module, a new separate database with required tables and stored procedures will automatically be installed for EPiServerMail if the Community Module is not already installed.
See the instructions below:
- Select the Web site which you want to install EPiServer Mail on.
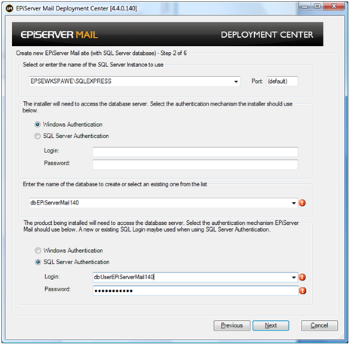
- In this step information shall be entered about the EPiServer Mail database that will be created/used. In most cases creating a new database for EPiServer Mail is recommended. Although selecting an existing database should not be problematic.
- Select or Enter the name of the Server instance to use and the Port number (default) in the Port field defines the database server's default port. If you wish to install to another database server port, change the value to the desired port number.
- Select the authentication mechanism to use when accessing the server
- Select the name of the database you intend using from the Existing Database list or enter the name of a new database.
- Either create a new user/login and password or select an existing user that has owner rights to the database (passwords must include lower and upper case, a digit and a non-alphanumeric character). In the Password box type the password associated with the specified user. Note that the user running EPiServer Deployment Center must have owner access rights to access the database.
Click Next.
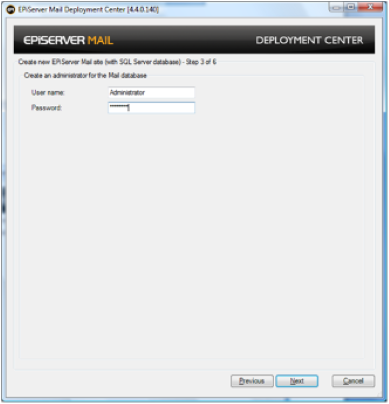
- Create a user and the password that will have the role of Administrator for the EPiServer Mail database. If you do not use the WindowsRoleProvider to authenticate logging onto EPiServer CMS then the user created here will need to be used.
- User name - The username of the administrator user.
- Password - The password of the administrator user.
- Enter the correct information in the form below - the settings are described below.
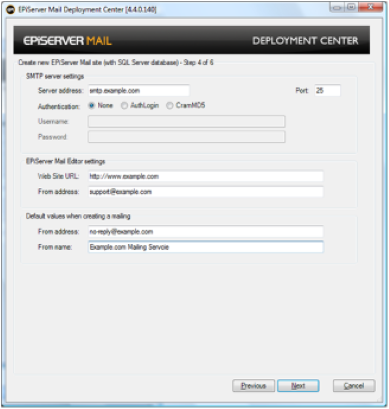
- SMTP Server settings
Server Address
Enter the name of the SMTP Server instance to use and the Port number. This is the mail server from where the e-mail messages will be sent - if it is the same server as where the EPiServer CMS Web site resides entering localhost should be sufficient.
Authentification None, AuthLogin, CramMD5
Determines the connection Authentication
Username
If required add the username
Password
If required add the password - EPiServer Mail Editor Settings
Web Site URL
Web address of the site you will be running EPiServer Mail from.
From address
E-mail address from where the e-mail messages are sent. - Default values when creating a e-mail messages
From address
The e-mail address that is visible in the sent e-mail messages (can be used to mask the e-mail address from where the e-mail messages are sent - see above).
From name
name of the sender of the e-mail messages
Please Note! If you have an SPF record in DNS for the domain of your sender email address ("From address") you should add "include:_cluster1.episervermail.episerver.com" to that record.
E.g. if no-reply@example.com is used as "From address" the DNS for example.com is subject for this addition.
If you do not yet have an SPF record it is still advisable to add one, allowing your regular SMTP servers as well as the include directive for the EPiServer Mail cluster.
See http://www.openspf.org/ for further information.
- SMTP Server settings
- Select the Optional Modules to Install with EPiServer Mail:
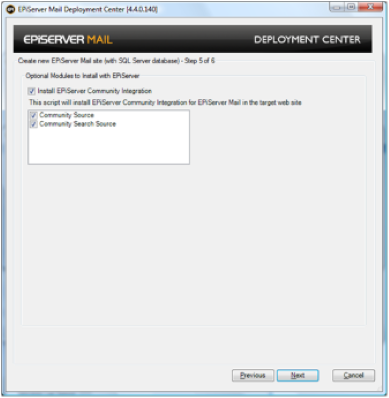
- If desired select Install EPiServer Community Integration and the following options Community Source Community Search Source.
Community Source
The package will add integration files and settings to your EPiServer Community installation. Select this option if you are installing onto an EPiServer Community installation
Community Search Source
The package will add search integration files and settings to your EPiServer Community installation. Select this option if you are installing onto an EPiServer Community installation.
- If desired select Install EPiServer Community Integration and the following options Community Source Community Search Source.
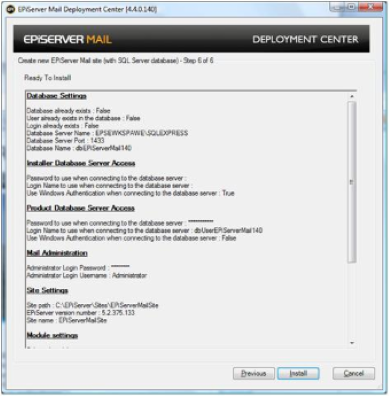
- The last step is a summary of all the steps that will be taken by the installation wizard. If the actions are correct, click Next to start the installation on the Web site.
Install EPiServer Community Integration
Choose this option if you wish to install EPiServer Community components.
This installs components which allows EPiServerMail to interact with the EPiServer Community Module. It provides support for:
- sending mail to users in EPiServer Community with a specific set of attributes; and
- sending mail to users in EPiServer Community selected by a User Search.
It installs no databases and makes no database changes.
Install EPiServer Mail without database (When you are mirroring)
Choose this option if you wish to install EPiServer Mail without a database. The steps are identical to those described above in Install EPiServer Mail on Existing Site except for step 2.
Target platform EPiServer - Load balanced environments, with a single database with tables and stored procedures which support the needs of EPiServerMail.
This installs all components required for an EPiServerMail instance to work. By itself it installs no databases and makes no database changes.
Install SQL Server Database
Choose this option if you wish to install a database for EPiServer Mail. The steps are identical to step 2, 3 and 6 described above in Install EPiServer Mail and SQL Server database.
Could be a suitable option when using multiple instances of EPiServerMail in a load balanced environment (without a suitably configured database).
This installs the database, along with database tables and stored procedures which support the needs of one or more EPiServerMail instances
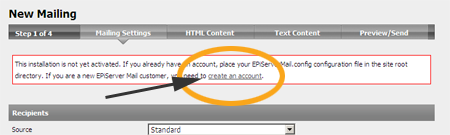
Account Activation
After installing EPiServer Mail 4.4 SP1 you are required to activate the EPiServer Mail account.
Activate the EPiServer Mail account by entering the EPiServer CMS 5 Edit Mode
- Select the Mail tab.
- Select the New Mailing option and click on the create an account link.
- Follow the steps by filling the form for activation.
Developer License Required?
There are no 'traditional' developer licenses for the EPiServer Mail product, instead developers need to create an account (see above Account Activation section above) with EPiServer. In order to create an account the Web site must have one of the following licenses (Developer or Commercial): EPiServer CMS, Create+ and Relate+. Currently, the developer restrictions are 10 recipients per order mail, max 60 orde rmails a minute and a total of 1000 recipients.
It is possible to start using EPiServer mail through the account activation procedure described above. Please note that if you are using a developer license for a specific end project, please fill in the form accordingly if the same broker account configuration will be used at deployment.
The information you supply will be associated with any additional licenses that will be installed on the configured environment. As soon as a commercial license is found, all developer restrictions will be removed. To view what restrictions apply to your planned mailing, after setting "now" or scheduled time for sending, select "View restriction" in the last step of your mailing creation.
Membership Provider - Creating Groups
Using a membership provider other than EPiServer.Common.Web.Authorization.MembershipProvider? (such as SqlServerMembershipProvider in combination with EPiServer.Common.Web.Authorization.IntegrationMembershipProvider or EPiServer.Common.Web.Authorization.Multiplexing.IntegrationMultiplexingMembershipProvider)?
Then you will need to create the groups MailAdmins / MailEditors in the EPiServer CMS Admin system in order to distribute appropriate access rights to the users that should have permission to use EPiServer Mail.
Configuring Windows Authentification
See the post Configuring Windows authentification in EPiServer Mail.
EPiServer Mail Developers Guide
For Information regarding developing EPiServer Mail 4.4 SP1, see the EPiServer Mail 4.4.1 Developers Guide.