Security in EPiServer CMS
|
Product version: |
EPiServer CMS 4.62 |
|
Document version: |
1.0 |
|
Document creation date: |
07-06-2006 |
|
Document last saved: |
10-10-2007 |
Purpose
ASP.NET includes a number of functions for managing and improving security in Web applications. This technical note describes the different logon mechanisms available in EPiServer CMS and .NET.
Table of Contents
Logon Methods
- Form Logons
- Basic Authentication
- Windows Integrated Logon
Authentication Methods
- Windows Account
- Extranet Account
- LDAP Database
- Other Sources
Recommendations
- Windows Integrated Security
- Basic Authentication with Windows Accounts
- Basic Authentication with Extranet Accounts
- Form Logon with Extranet Accounts
Introduction
The purpose of this document is to describe the different logon mechanisms available in EPiServer CMS and .NET.
ASP.NET includes a large number of functions for managing and improving security in Web applications. Using the mechanisms in .NET, it is possible to authenticate users against a wide range of data sources such as XML files, domain servers, databases and customer-specific systems.
The EPiSEC functionality, that is the authentication of users stored in a database table, is fully covered by .NET. For this reason, EPiSEC has been replaced by integrated functions in .NET Framework. However, the users are stored in the same table structure as in EPiServer CMS 3 for reasons of compatibility with previous systems.
Logon Methods
.NET and EPiServer CMS offer many different ways of asking users for their identity and authorizing the logon with a password. .NET also gives the option of logging on via Microsoft .NET Passport. This is not currently supported in EPiServer, but you can find out more by visiting http://www.microsoft.com/netservices/passport/.
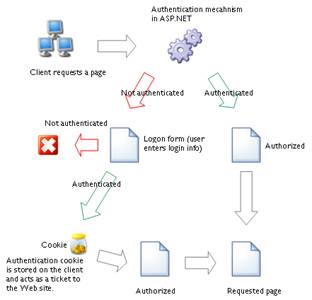
Form Logons
EPiServer CMS has a Web-based logon form for users to complete. The information is validated against one of the user databases that are compatible with EPiServer CMS.
Basic Authentication
If the client's Web browser returns the message "HTTP status 401 / Access denied", a standard logon box from the client's operating system will be displayed. Internet Explorer can display two different types of logon box depending on whether the user is logging on to a Windows domain (see Windows Integrated Logon).
Windows Integrated Logon
This logon method is also initiated by an "Access denied" message. If Internet Explorer is being used, the logon may take place automatically or the user may have to enter a user name, password and domain.
Whether or not the user logs on automatically depends on the Web server and Web browser settings. The important thing to note is that this type of logon is not supported by all Web browsers.
Authentication Methods
There are many different ways of checking a user's identity in Windows and .NET. It is also possible to develop new methods for doing this.
Windows Account
The user is checked against Windows’ own account databases:
- Local account
- Domain account
- Active Directory
This method is used primarily in the development of intranets, because the user data must be stored in Windows. However, this involves license costs and an extranet. If there is a large amount of users, this can be costly and difficult for network administrators to manage.
Extranet Account
In the case of a large extranet, it is a good idea to store all user data in tables in SQL Server. Storing extranet users in this way has a number of advantages; no license costs are incurred and extranet users are kept separate from other users on the Windows network.
LDAP Database
The look-up takes place on a defined LDAP server, which can be Active Directory or NDS/Netware 6. The aim is to make this support more general, so that you can connect and authenticate users against any LDAP database.
| Note: Unless you have some very specific demands, you should use Windows authentication against Active Directory. See the "Appendix – Active Directory Authentication" chapter. |
Other Sources
EPiServer CMS includes functions that allow integration with any user authentication source. This is an excellent solution for intranets, as there is already an existing data source for user authentication. If you want to support other Internet-based protocols, you can develop your own http modules and integrate support for these modules in your solution.
Form Logons in EPiServer CMS
If Windows 2000 is used as the Web server, you must allow the ASPNET user account to act as part of the operating system. If you do not do this, it will only be possible to validate against extranet accounts and not Windows accounts. If you assign this right to ASPNET, this will lower the security level on the server, because the purpose of ASPNET is that it is an account with as few rights as possible.
To do this, follow the instructions below:
1. Start Local Security Policy from Administrative Tools.
2. Open Local Security Settings > Local Policies > User Rights Assignments.
3. Open Act as part of the operating system.
4. Add the ASPNET user account to this policy.
5. Restart the Web Service by running the command iisreset from the command prompt.
Recommendations
Windows Integrated Security
This authentication method only functions with Windows accounts that have Internet Explorer as the Web browser. It is often a useful solution for intranets, where a Windows account database is already available.
Advantages: Automatic logon, password not transferred in plain text.
Disadvantages: A Windows account and Internet Explorer are needed. Often does not function across the Internet.
Basic Authentication with Windows Accounts
Advantages: Supported by almost all Web browsers.
Disadvantages: The password is transferred in plain text. To improve security, SSL, or something similar, is needed. Automatic logon is not possible.
Basic Authentication with Extranet Accounts
EPiServer can be configured in such a way that basic authentication is controlled entirely by EPiServer CMS and ASP.NET. This also requires Internet Information Server to be configured.
Advantages: Supported by almost all Web browsers. A Windows account is not needed.
Disadvantages: Security breaches can occur if the configuration is incorrect.
Form Logon with Extranet Accounts
Advantages: The logon page can be designed to fit in neatly with the other parts of the Web site. Support for logging off and inactivity timeout. Supported by almost all Web browsers and operating systems. A Windows account is not needed. Can be configured for automatic logon.
Disadvantages: The password is transferred in plain text. To improve security, SSL, or something similar is needed.
Appendix – Active Directory Authentication
Using the LDAP support in EPiServer for connecting to Active Directory (AD) is no longer the recommended way to do Active Directory integration. The primary reason for this is performance – using Windows Authentication against AD is much faster than doing LDAP authentication.
You should use the LDAP authentication support only if you need to set access rights based on OUs (i.e. structural information in AD).
Follow the instructions below to improve performance by implementing Windows Authentication for AD integration.
1. Configure EPiServer CMS for normal logon without LDAP support. Forms and basic logon and integrated Windows logon works.
2. List the AD groups that you want to use in EPiServer CMS.
3. Check the groups' pre-Windows 2000 group name and write it down.
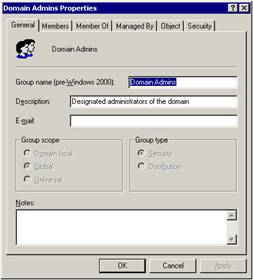
4. Check the AD domain's pre-Windows 2000 domain name.

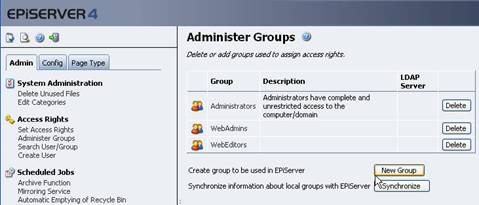
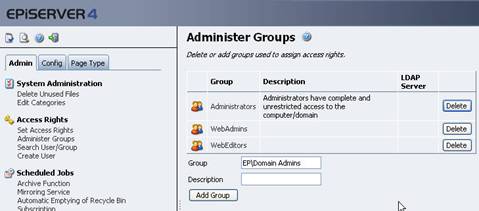
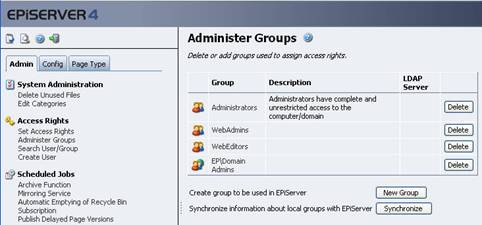
5. Create these groups in EPiServer CMS as "DomainName\group" in Admin mode under Administer Groups. The above example would be EP\Domain Admins.) Note that the icon for the created groups (see the last image) contain a globe to indicate the domain group.
6. Continue to set access rights in EPiServer CMS and your web.config file based on the imported groups to properly secure your Web site.
7. The configuration is now finished.