


Stride on SaaS CMS and Frontend Hosting, with Claude Code
This post shows how I set up the Optimizely Stride sample site on a new Optimizely CMS (SaaS) instance. The front end is on Optimizely Frontend Hosting. It deploys from the CLI and from GitHub Actions. I used Claude Code to do most of the work.
Stride is a Next.js sample site from Optimizely. Optimizely announced it in the CMS (SaaS) release notes on 23/07/2026. It uses the Content JS SDK, Visual Builder compositions and Tailwind CSS.
The Stride README gives the basic steps. On a new instance, I found seven problems that the README does not cover. This post gives each problem, its cause and the fix. At the end, there is a prompt that you can give to Claude Code to do the same setup.
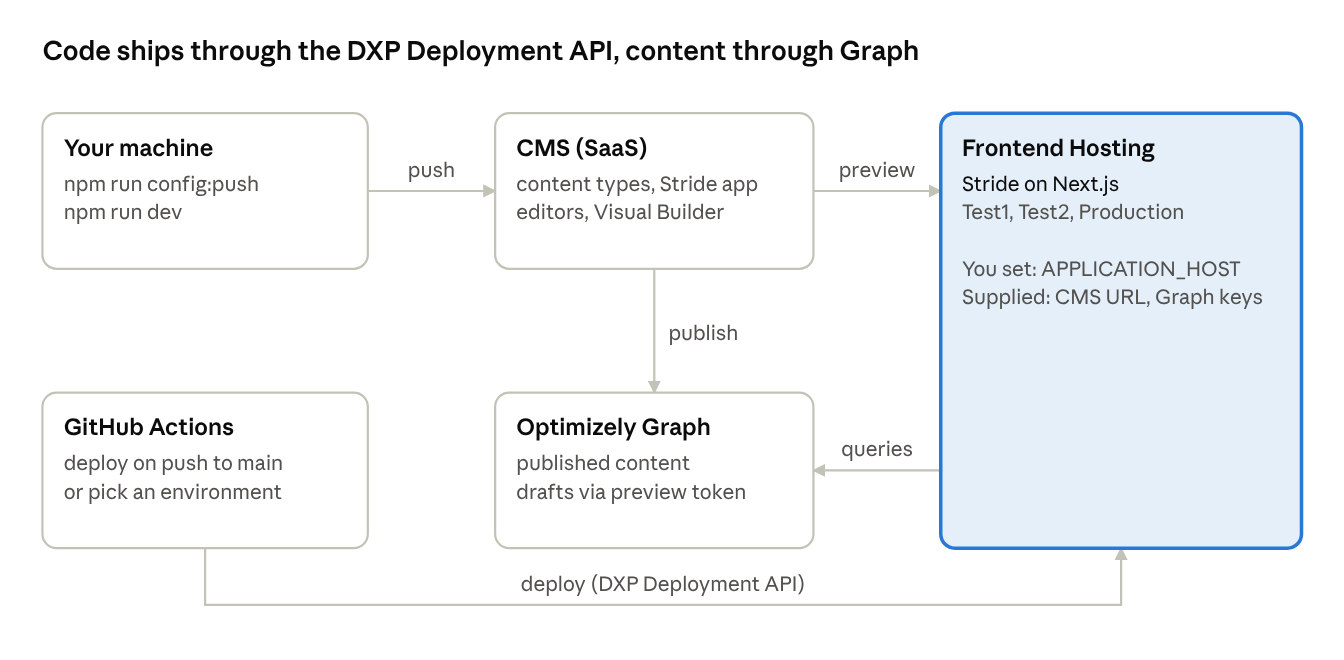
Content goes from the CMS to Graph when you publish it. The site reads the content from Graph. Code goes from your computer or GitHub Actions to Frontend Hosting.
What you need
- A CMS (SaaS) instance with Optimizely Graph. You need admin access to create API keys and import data.
- A Frontend Hosting project in the DXP management portal. The plan shows as "SaaS Frontend Host". It has Test1, Test2 and Production environments.
- Node.js 22 or 24. Stride asks for ^22.23.4 || ^24.22.1. I used 22.22.3. The install gave a warning, and the build worked.
- npm or yarn. Do not use pnpm. Frontend Hosting accepts only package-lock.json or yarn.lock.
- A GitHub repository, if you want to deploy from GitHub Actions.
1. Create the project with cms-create-app
Use the @optimizely/cms-create-app package to create the project. Do not copy the templates/stride folder from the content-js-sdk repository. In that repository, the SDK and the CLI are workspace:* dependencies. The Frontend Hosting deploy does not accept these. The package changes them to the latest published versions.
npx @optimizely/cms-create-app@1.1.0 stride-saas --template nextjs-stride --pm npm --ci noneThis gave me @optimizely/cms-sdk 3.1.0, @optimizely/cms-cli 3.1.0 and Next.js 16.3.6. Version 1.1.0 of the package was published on 03/11/2026.
The package does not include two files. Add them before your first commit:
- .gitignore. Copy it from the template. Add /node_modules/. Add !.env.example, because the .env* rule also hides that file.
- .env.example. Copy it from the template. It lists all the variables that Stride and the CLI use.
I also added a .gitattributes file with * text=auto eol=lf. I work on Windows, and the platform builds on Linux.
2. Connect the project to the CMS
In the CMS, go to Settings → API Keys. Copy the Graph single key. Create an API key for the CLI. Put these values in .env:
| Variable | Value |
|---|---|
| OPTIMIZELY_CMS_URL | The URL of your instance |
| OPTIMIZELY_GRAPH_SINGLE_KEY | Settings → API Keys |
| OPTIMIZELY_CMS_CLIENT_ID, OPTIMIZELY_CMS_CLIENT_SECRET | The API key that you created |
| APPLICATION_HOST | The URL of the site (see step 6) |
Give the API key access rights before you push the configuration:
- Go to Settings → Set Access Rights.
- Select the root.
- Select Apply settings for all subitems.
- Give the API key full permissions.
Note: I did not do this the first time. The push sent the content types and display templates. Then it stopped with a 403 error ("Required access is 'create'") when it tried to create the start page.
Push the configuration:
npm run config:pushThis command sends the content types and display templates to the CMS. It also creates the Stride application and an empty Home page. The empty Home page becomes the start page. Step 3 shows why this is a problem.
3. Import the content and fix the start page
- Go to Settings → Import Data.
- Upload stride_content.episerverdata.
- Select the root as the destination.
- Select Update existing content items with matching ID.
- Start the import.
Note: The README gives the file name ExportedFile.episerverdata. The file in the template is stride_content.episerverdata.
My import showed "Import failed". But the summary showed that all 34 content items, 26 content types and 6 style settings were imported. The three errors were all about the Validators property of one form. Step 4 gives the cause.
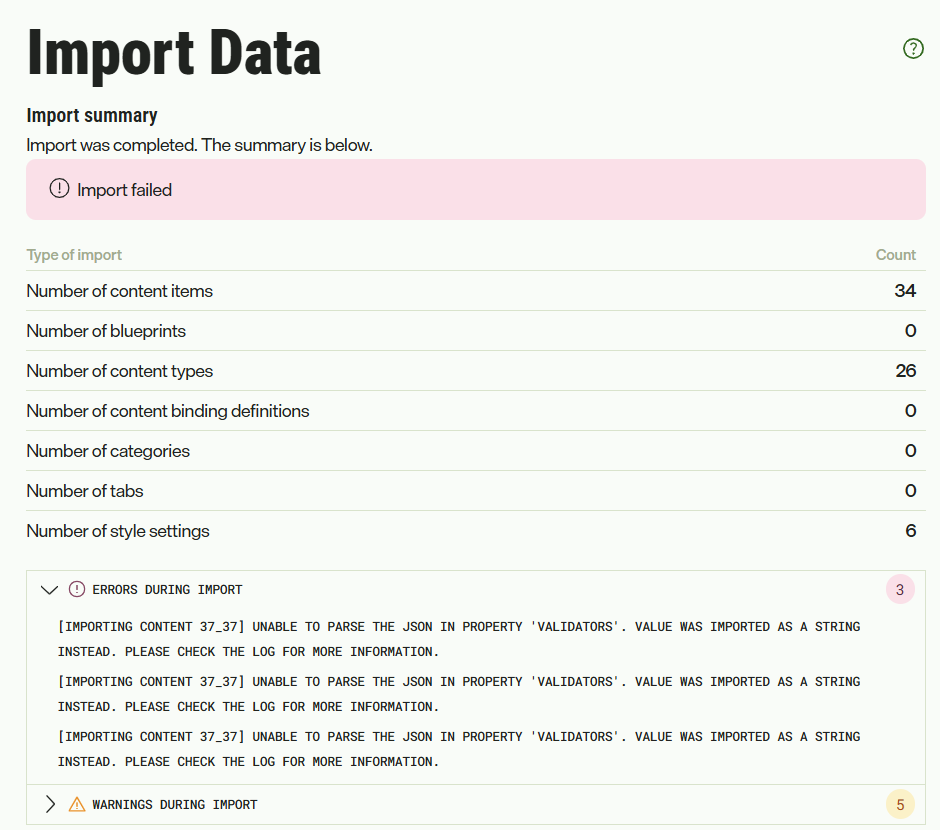
Problem: The site shows a 404 error for /en.
Cause: config:push created an empty Home page and made it the start page. The import does not replace this page. The imported Home page gets the name "Home(2)", and all the pages go under /en/home2/. The empty Home page is not published, so Graph has no page at /en.
Fix:
- Go to Settings → Applications → Stride.
- Change the start page to Home(2).
- Delete the empty Home page.
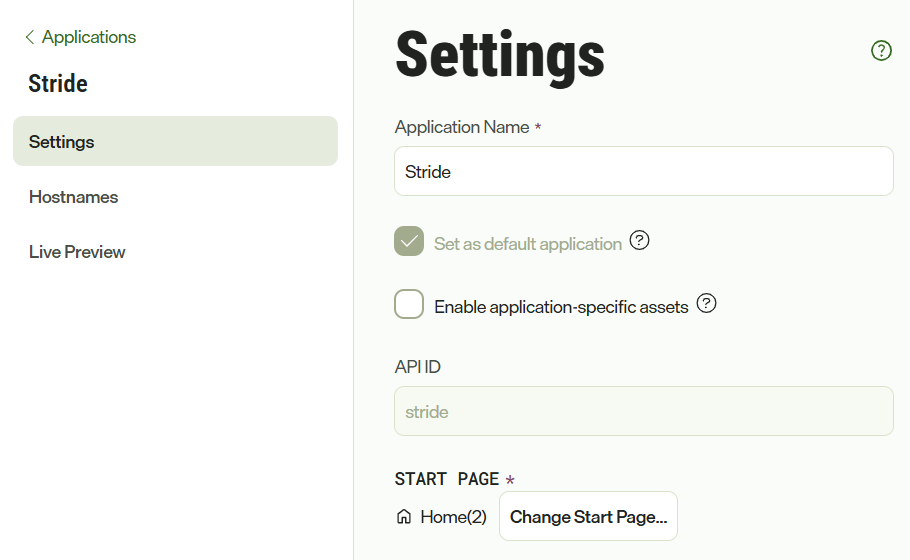
When I checked Graph again, the pages had the correct URLs.
Then change optimizely.config.mjs. If you do not, the next config:push sets the start page back to the empty Home page. Remove the content array. Set entryPoint to the imported Home page:
applications: [
  {
    key: 'stride',
    // The imported Stride start page, not the empty "home" that the template creates
    entryPoint: 'cms://content/a8ff42c351e74f65a2f26223950c54ab',
    // ...
  },
],
This GUID is the Home page in stride_content.episerverdata, so it is the same on all instances.
4. Register only the Forms elements that your instance has
Problem: The home page works, but most other pages show a 500 error. Graph returns six errors, for example:
Unknown type "OptiFormsNumberElement". Did you mean "OptiFormsSubmitElement", ...Cause: Stride calls initForms() in lib/initialization.ts. This function registers all ten Optimizely Forms element types. The SDK then puts all ten types in the query for each page that can contain a form. My instance had only four of them: the form container, Textbox, Textarea and Submit. If one type is unknown, Graph rejects the full query.
To see the types that your instance has, run npx optimizely-cms-cli config pull -r -j. This difference in Forms versions is also the probable cause of the Validators errors in step 3.
Fix: Do not call initForms(). Register only the types that your instance has:
initContentTypeRegistry([
  // ...Stride's own types
  OptiFormsContainerDataContentType,
  OptiFormsTextboxElementContentType,
  OptiFormsTextareaElementContentType,
  OptiFormsSubmitElementContentType,
  OptiFormsDependencyRuleContentType,
  OptiFormsConditionContentType,
]);

initReactComponentRegistry({
  resolver: {
    // ...Stride's own components
    OptiFormsContainerData: FormContainer,
    OptiFormsTextboxElement: FormInput,
    OptiFormsTextareaElement: FormTextarea,
    OptiFormsSubmitElement: FormSubmit,
  },
});
Restart the dev server after this change. The registry is set one time, when the server starts. After the restart, all 16 Stride pages returned status 200, and the Contact Us form showed correctly. When your instance gets the other Forms elements, use initForms() again.
5. Preview and drafts do not need the Graph app key
The setup asks only for the Graph single key. The single key gives only published content. Older headless builds used the Graph app key and secret to get drafts.
The SDK uses preview tokens. The Stride application has usePreviewTokens: true. When an editor opens a page in edit mode or in Visual Builder, the CMS opens the /preview route of the site. The URL contains a preview_token that is valid for a short time. getPreviewContent() sends this token to Graph, and Graph returns the draft. When the editor saves, the CMS sends a new token, and the SDK uses it.
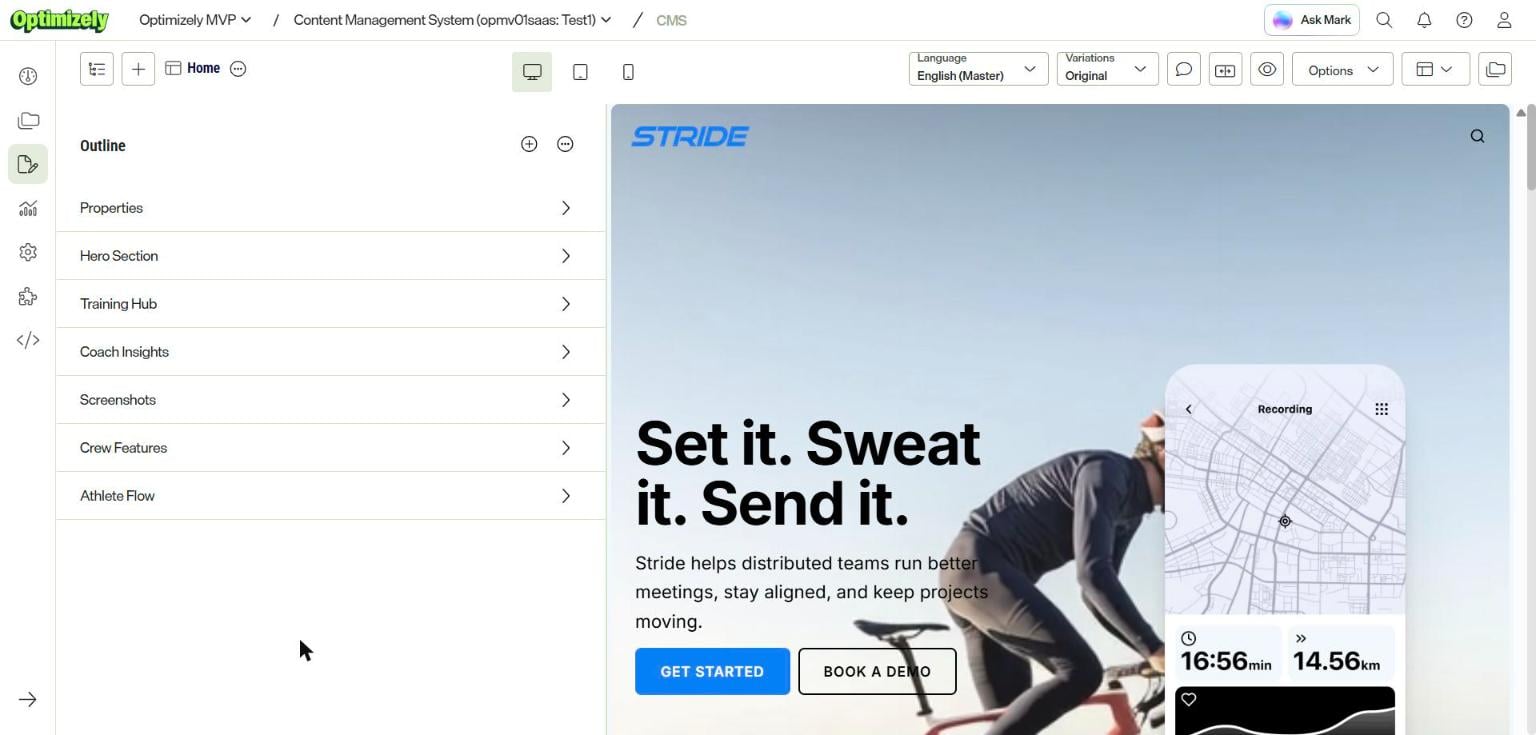
Visual Builder in the CMS test environment. The preview on the right is the Stride site on Frontend Hosting Test1.
You need the app key and secret only for server-side requests outside an editor session, with the SDK option auth: { type: 'hmac' }. Examples are restricted content, deleted or expired items, and search that includes drafts. Stride does not need these. The app key and secret can read all content in Graph. Do not put them in a public site unless a feature needs them.
6. Deploy to Frontend Hosting from the CLI
CLI 3.1.0 has a deploy command. In the Frontend Hosting beta, you made a zip file with the name <name>.head.app.<version>.zip. Then you uploaded it with the EpiCloud PowerShell module. Now you use one command:
npm run deploy -- --env Test1The command does these steps:
- It checks the project.
- It runs next build on your computer. A build error stops the deploy before the upload.
- It makes the zip file. The zip file does not include build output, node_modules, .env files or the content export.
- It uploads the zip file with the DXP Deployment API.
- It starts the deployment, waits for it, and completes it.
Get the credentials from the API tab in the DXP management portal. Put them in .env as OPTIMIZELY_DXP_PROJECT_ID, OPTIMIZELY_DXP_CLIENT_KEY and OPTIMIZELY_DXP_CLIENT_SECRET.
To check the zip file before you upload it, run npx optimizely-cms-cli deploy --output ./out. This command writes the zip file to a local folder. It does not upload it.
Use the front-end environment that matches your CMS environment
Problem: The deploy to Test1 was successful, but all published pages showed a 404 error. Visual Builder preview on Test1 worked.
Cause: Each Frontend Hosting environment is linked to a CMS environment. The platform gives each front-end environment the CMS URL and the Graph keys of its linked CMS environment. My Test1 was linked to the CMS test environment. I set up Stride in the CMS Production environment, so Graph on Test1 had no Stride pages. Preview worked because the CMS sends its own preview token with each preview request.
I found this with a temporary API route. The route showed the CMS URL that the site received, and a short hash of the Graph key. Both were different from the values in my .env.
Fix: Put the content in the CMS environment that is linked to your front-end environment. You can deploy to the front-end environment that is linked to the CMS environment with your content, or copy the content to the other CMS environments. I copied the content to the CMS test environment, which is linked to Test1.
Copy the content to the other CMS environments
Do these steps in each CMS environment that does not have the content. I did them in the CMS test environment, which is linked to Test1.
- Create an API key for the CLI, and give it full access rights on the root.
- Import stride_content.episerverdata at the root. Do this before the first config:push.
- Push the configuration with the CMS URL, the API key and the APPLICATION_HOST of that environment.
I keep the values for the test environment in a second file, .env.cms-test, and use a second script:
"config:push:test": "node --env-file=.env.cms-test node_modules/@optimizely/cms-cli/bin/run.js config push optimizely.config.mjs"The CLI loads .env with dotenv, which does not replace variables that are already set. So the values from .env.cms-test are used. In optimizely.config.mjs, the primary host comes from APPLICATION_HOST, so one file works for all environments:
const host = new URL(process.env.APPLICATION_HOST.trim()).host;
// ...
hosts: [{ authority: host, type: 'primary', preferredUrlScheme: 'https' }],
If you import before the first push, the empty Home page from step 3 does not occur. The push creates the application with the imported Home page as the start page. Graph showed the new URLs a few minutes later. Test1 then returned status 200 for all pages, without a new deploy, because the site reads Graph at request time.
Set the hostname and APPLICATION_HOST
Graph makes all page URLs from the primary host of the application. The SDK finds a page only when APPLICATION_HOST is the same as that host. If they are different, all pages show a 404 error.
- Get the hostname of the front-end environment from the Hostnames tab in the DXP management portal.
- In optimizely.config.mjs, set this hostname as the only host, with the type primary.
- Run npm run config:push.
- In your local .env, set APPLICATION_HOST to https://<hostname>.
Local development still works, because APPLICATION_HOST is only a filter for Graph. CMS preview now opens on this front-end environment.
Note: Do not add localhost:3000 as a second host. Headless applications accept only Primary, Preview and Media hosts. The CMS rejects other types.
Add APPLICATION_HOST as an App Setting
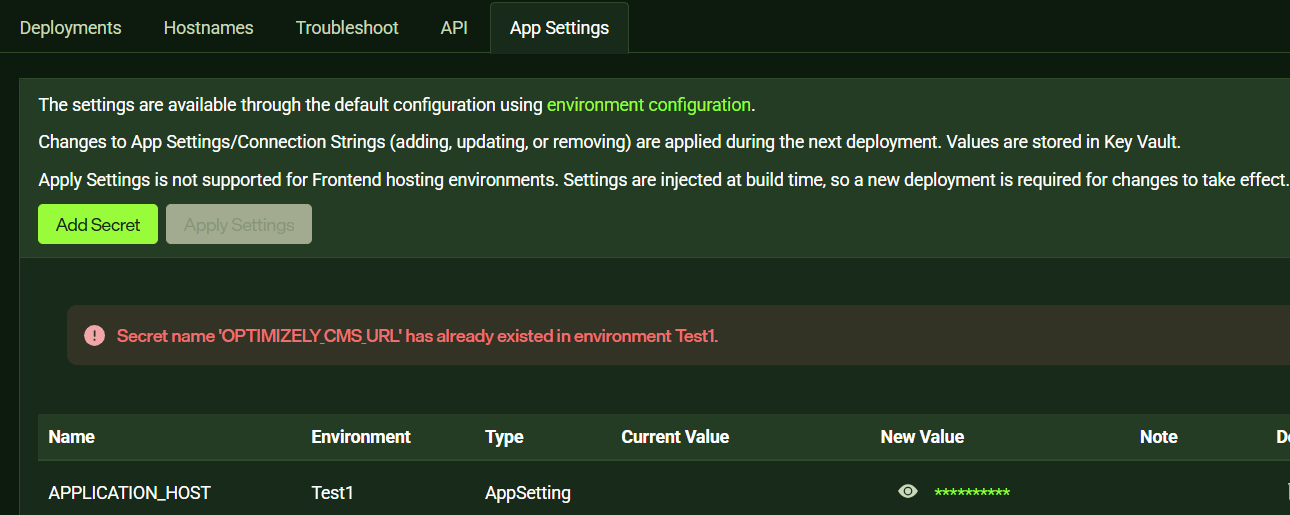
In the DXP management portal, open the App Settings tab. Add APPLICATION_HOST for each environment, with the hostname of that environment. App Settings apply at the next deployment, so add them before you deploy.
Do not add the CMS URL or the Graph keys. The platform gives these five variables to the build and to the site (Frontend Hosting documentation):
- OPTIMIZELY_CMS_URL
- OPTIMIZELY_GRAPH_GATEWAY
- OPTIMIZELY_GRAPH_SINGLE_KEY
- OPTIMIZELY_GRAPH_APP_KEY
- OPTIMIZELY_GRAPH_SECRET
The App Settings list does not show these variables. When I tried to add OPTIMIZELY_CMS_URL, the portal said that the name already exists.
7. Deploy from GitHub Actions
The cms-create-app package can make a workflow with the --ci github option. I added my workflow later. It uses the same file, with two changes. It does not deploy when a commit changes only Markdown files. A manual run lets you select the environment.
name: Deploy to Optimizely

on:
  push:
    branches: [main]
    paths-ignore: ['**.md', '*.episerverdata']
  workflow_dispatch:
    inputs:
      environment:
        type: choice
        options: [Test1, Test2, Production1]
        default: Test1

concurrency:
  group: optimizely-deploy-${{ inputs.environment || 'Test1' }}
  cancel-in-progress: false

jobs:
  deploy:
    runs-on: ubuntu-latest
    env:
      DEPLOY_ENVIRONMENT: ${{ inputs.environment || 'Test1' }}
      OPTIMIZELY_DXP_PROJECT_ID: ${{ secrets.OPTIMIZELY_DXP_PROJECT_ID }}
      OPTIMIZELY_DXP_CLIENT_KEY: ${{ secrets.OPTIMIZELY_DXP_CLIENT_KEY }}
      OPTIMIZELY_DXP_CLIENT_SECRET: ${{ secrets.OPTIMIZELY_DXP_CLIENT_SECRET }}
    steps:
      - uses: actions/checkout@v4
      - uses: actions/setup-node@v4
        with:
          node-version: 22
          cache: npm
      - run: npm ci
      - run: npx optimizely-cms-cli deploy --env "$DEPLOY_ENVIRONMENT" --yes
Add the three OPTIMIZELY_DXP_* values as repository secrets. Keep cancel-in-progress: false. If you cancel the job, the deployment on the platform does not stop.
I do not run config:push in CI. It needs the CMS client secret in GitHub, and it changes the content model at each merge. I run it myself when a content type changes.
The prompt
Use this prompt with Claude Code to do the same setup. It contains all the fixes in this post. It has two rules. The agent does not handle your secrets, and it stops for you at each step in a portal. Change the folder and repository names. Then start Claude Code in an empty folder and paste the prompt.
Set up the Optimizely Stride sample site on a new Optimizely CMS (SaaS) instance.
Deploy the front end to Optimizely Frontend Hosting. Do one step at a time. Stop for
me at each step that needs the CMS UI, the DXP management portal or a secret.

Rules
- Do not ask me to paste keys, secrets or tokens into the chat. I put them in .env,
  in the portal or in GitHub. Do not print .env values. Only check that each one is set.
- Read the current sources before you use what you remember: the Stride template and
  @optimizely/cms-create-app in github.com/episerver/content-js-sdk, and the source of
  the CLI deploy command. Tell me if a step below does not agree with them.
- Commit after each step. Do not commit .env.

1. Create the project
   - Run: npx @optimizely/cms-create-app <folder> --template nextjs-stride --pm npm --ci none
   - Use npm. Frontend Hosting accepts only package-lock.json or yarn.lock.
   - If .gitignore or .env.example is missing, copy it from templates/stride.
     Make sure that .gitignore includes /node_modules/ and does not hide .env.example.
   - Add .gitattributes with "* text=auto eol=lf".
   - Create a private GitHub repository <owner>/<name> and push.

2. Connect to the CMS
   - Create .env from .env.example. Tell me which values to add.
   - Tell me to give the CLI API key full access rights on the root (Settings >
     Set Access Rights, apply settings for all subitems).
   - Run npm run config:push.

3. Import the content
   - Tell me to import stride_content.episerverdata at Settings > Import Data. Use the
     root as the destination. Select "Update existing content items with matching ID".
   - Errors about the "Validators" property of one form are not a problem.
   - Tell me to set the start page of the Stride application to the imported Home(2)
     page (Settings > Applications > Stride) and to delete the empty Home page.
   - In optimizely.config.mjs, remove the "content" array. Set the Stride entryPoint to
     the imported start page: 'cms://content/a8ff42c351e74f65a2f26223950c54ab'. First
     make sure this GUID is the start page in stride_content.episerverdata.
   - Send a query to Graph with the single key. Make sure the pages are published and
     the URLs start with /en/ and not /en/home2/.

4. Run the site and check all pages
   - Start the dev server. If HTTPS needs "mkcert -install", do not run it. Use http
     and tell me.
   - Get all page URLs from Graph. Request each page and show me the status codes.
   - If Graph reports unknown OptiForms*Element types, compare the types on the
     instance (npx optimizely-cms-cli config pull -r -j) with the types that
     initForms() registers. Replace initForms() with registration of only the Forms
     types that the instance has. Restart the dev server after the change.

5. Frontend Hosting
   - First do a test: npx optimizely-cms-cli deploy --output <temporary folder>.
     Make sure the zip file has no .env file and no node_modules folder.
   - Ask me which front-end environment is linked to the CMS environment that has
     the content, and for its hostname (Hostnames tab in the portal). In
     optimizely.config.mjs, make it the only host, with the type primary. Headless
     applications accept only Primary, Preview and Media hosts. Run config:push.
     Set APPLICATION_HOST in .env to https://<that hostname>.
   - Tell me to add APPLICATION_HOST as an App Setting for that environment. The platform
     gives OPTIMIZELY_CMS_URL and the Graph keys.
   - Run npm run deploy -- --env <that environment>. Then check the live pages and the preview
     from the CMS. If the published pages show 404 but preview works, the front-end
     environment is linked to a CMS environment that does not have the content.

6. GitHub Actions
   - Add a workflow that runs npx optimizely-cms-cli deploy when I push to main
     (Test1), and on a manual run (I select the environment). Set cancel-in-progress
     to false. Tell me to add the three OPTIMIZELY_DXP_* repository secrets.
     Do not run config:push in CI.

At the end, give me a short list: what is done, what you checked, and what is not done.
Lessons
- Change optimizely.config.mjs after the import. Each config:push writes the start page and the hosts from this file.
- If one page works and the other pages show a 500 error, read the GraphQL errors. One unknown type stops the full query.
- Find out which CMS environment each front-end environment is linked to before you deploy. The platform supplies the CMS URL and the Graph keys, and you cannot change them in App Settings.
- Make APPLICATION_HOST and the primary host the same.
- The deploy is fast on your computer and slow on the platform. The build, zip and upload took a few minutes. Most of the time is the build on the platform.
Claude Code read the SDK and CLI source in node_modules to find the cause of each problem: the Forms registration, the preview tokens and the start page in config:push. It sent queries to Graph to see which pages were published. It stopped at each step that needed me in a portal or needed a secret.
Comments