ASP.NET 2.0 Web Parts in EPiServer CMS 4
|
Product version: |
EPiServer CMS 4.62 |
|
Document version: |
1.0 |
|
Document creation date: |
05-06-2006 |
|
Document last saved: |
04-10-2007 |
Purpose
ASP.NET 2.0 introduces Web Parts as a set of controls for building portal-like pages. EPiServer CMS 4 makes use of this support from version 4.60 and extends it in a number of ways. This document describes the setup requirements and outlines the features that are built into the Web Part support in EPiServer CMS 4.
Table of Contents
Templates
- Portal.aspx
- Mixed.aspx
Configuration
- Install ASP.NET 2.0
- Sample Package
- web.config
- Configuring the Database
- Importing the Sample Templates
Administration
- Web Part Registration
Example 1 – Displaying Content from EPiServer CMS in a Web Part
- Derive from a Web Part?
- Markup
- Code-Behind File
Example 2 – Displaying EPiServer CMS Page Listings in a Web Part
- Markup
- Code-Behind
- The Result
Example 3 – Implement a Connection between Web Parts
- Connection Interface
- Connection Provider
- Connection Consumer
- The Web Parts in Action
Introduction
Web Parts is a framework for building portal-like, highly personalized pages in ASP.NET 2.0. The technology is known from the Microsoft SharePoint product family, where it has been available for a number of years. The release of .NET 2.0 made this technology available to ASP.NET developers not specifically targeted to SharePoint environments. In EPiServer CMS 4.60 and later we use Web Parts for our portal templates.
Overview
Web Parts are typically used for building portal-like Web applications. The framework has built-in support for various types of customization of the user interface (personalization) and provides a number of controls to back this up. All controls and classes defined in the framework are designed with extensibility in mind, so there are a lot of opportunities to plug in your own code for altering things like rendering and behavior.
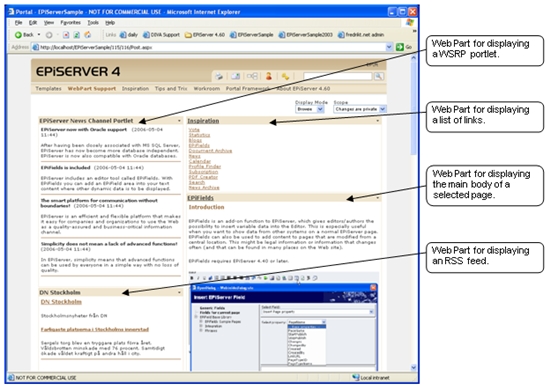
The image above displays what a Web Parts page looks like when a couple of Web Parts have been applied. The example shows a Web Part displaying an RSS feed and a WSRP portlet in the left zone, and two Web Parts, one for displaying a page list and one for the contents of a page in the right zone.
The Web Parts in the right zone are connected, i.e. clicking a link in the list of pages in the upper Web Part will automatically update the Web Part below to display the content for the selected page. This view can be “private”, where the user that is logged specifies what should be displayed on the page, or it can be a view that is shared for all users (including anonymous users).
The page shows the Portal.aspx template, which is included in the EPiServer CMS 4 installation package for the Web Part support. The installation package also includes a template for displaying a combination of traditional content and Web Part content.
Templates
The EPiServer CMS 4 installation includes two templates that exemplify how to use the Web Parts features in general and the EPiServer CMS extensions in particular.
Portal.aspx
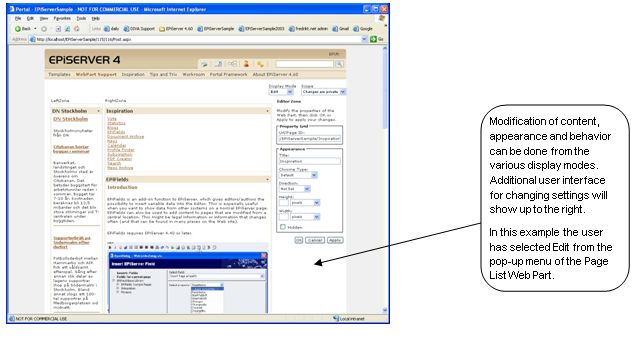
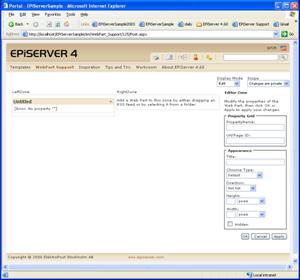
The portal template is used for traditional portal scenarios where all content is viewed using Web Parts. This template supports most of the various display modes that are available on a Web Part page. The page contains controls for switching between the different displays modes and for switching between private and shared personalization scope.
The image below displays the portal template displaying the Web Part Edit user interface for the Page List Web Part.
Mixed.aspx
In situations where you want a traditional Web page look, but want to expose a Web Part in a section of the page, you can make the WebPartProperty property of the ExtendedWebPartZone point to an EPiServer CMS page property of type WebPart. With this configuration the editor will be able to define which Web Part should be displayed in the zone.
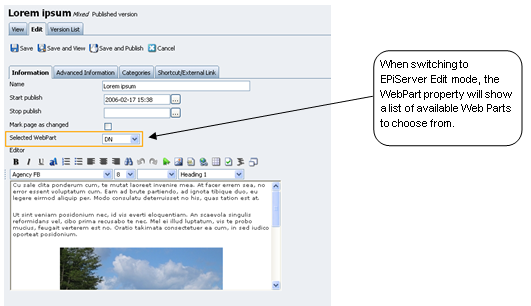
This feature is implemented in the Mixed.aspx template, which basically replaces the right content placeholder with an ExtendedWebPartZone. The template expects a WebPart property named “SelectedWebPart” and a XHTML property named “MainBody” to be defined for the page type.
The image below displays the Edit tab of Edit mode for the "Mixed" content template. The SelectedWebPart property is displayed as a drop-down list of available Web Parts. The set of available Web Parts are defined in Admin mode.
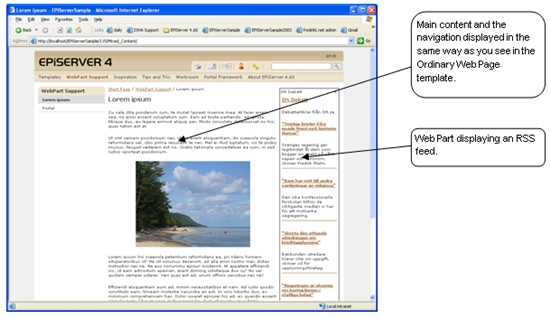
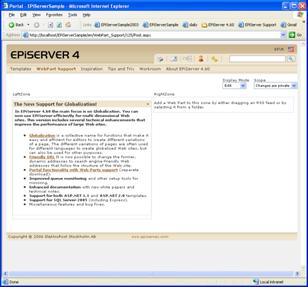
The image below displays the "Mixed" content template showing the page tree in the left column, the main body in the main content area and a Web Part in the right column.
Configuration
This chapter outlines the various aspects concerning the configuration of Web Parts support.
Install ASP.NET 2.0
In order to use and develop pages with Web Part support in EPiServer CMS 4, the site must be running on .NET 2.0. The steps required to set this up are described in the technical note "WSRP Configuration".
Sample Package
There are two options if you want to use Web Parts in your site.
- Install the entire template package for ASP.NET 2.0.
- If you are upgrading an existing site, you may want to manually install the files required just for Web Parts. See a list of the files below.
The sample templates for ASP.NET 2.0 contain the following crucial files that must exist for Web Parts to work.
- /admin/webpartadmin.aspx
- /admin/webpartadminedit.aspx
- /bin/episerver.webparts.dll
- /templates/masterpages/masterpage.master
- /templates/webparts/mixed.aspx
- /templates/webparts/mixed.aspx.cs
- /templates/webparts/portal.aspx
- /templates/webparts/portal.aspx.cs
- /templates/webparts/portal.aspx.designer.cs
- /templates/webparts/scripts/rss.js
- /templates/webparts/units/rsscontrol.ascx
- /templates/webparts/units/rsscontrol.ascx.cs
- /templates/webparts/units/rsscontrol.ascx.designer.cs
- /templates/webparts/webcontrols/rsszone.cs
web.config
In order to make the database available for the Web Parts framework, the database connection string needs to be published in the ASP.NET 2.0 connectionsStrings element. Follow the instructions below to configure web.config.
- Add the following element as a child element to the configuration element.
- Replace SERVER, DATABASE, USER and PASSWORD with your values.
- Make sure that the Web Parts tag prefix is registered in the pages element.
<pages validateRequest="false" enableEventValidation="false">
<controls>
<add tagPrefix="EPiServer" namespace="EPiServer.WebControls" assembly="EPiServer" />
<add tagPrefix="WebParts" namespace="EPiServer.WebParts.WebControls" assembly="EPiServer.WebParts" />
<add tagPrefix="WebParts" namespace="EPiServer.WebParts.WebControls.Wsrp" assembly="EPiServer.WebParts" />
</controls>
</pages>
- The personalization default engine used for extracting and persisting personalized data is the SqlPersonalizationProvider. EPiServer CMS 4 uses an altered version of the SqlPersonalizationProvider named EPiServerPersonalizationProvider which handles the multiple pages per page template model used in EPiServer CMS. You enable this personalization provider by adding the following element somewhere inside the system.web element.
- Make sure to point out the correct connection string in the connectionStringName attribute of the add element. The section above also sets the permission for entering shared scope to only allow WebAdmins and WebEditors.
<connectionStrings>
<add name="EPiServerDB"
connectionString="Data Source=SERVER;
Database=DATABASE;
User Id=USER;
Password=PASSWORD;
Network Library=DBMSSOCN;"
providerName="System.Data.SqlClient" />
</connectionStrings>
<webParts>
<personalization defaultProvider="EPiServerPersonalizationProvider">
<providers>
<add name="EPiServerPersonalizationProvider" type="EPiServer.WebParts.Core.EPiServerPersonalizationProvider" connectionStringName="EPiServerDB" />
</providers>
<authorization>
<allow verbs="enterSharedScope" roles="WebAdmins, WebEditors, Administrators" />
</authorization>
</personalization>
</webParts>
Configuring the Database
The personalization provider relies on a specific database schema. This schema can easily be set using the aspnet_regsql command line tool found in %windir%\Microsoft.NET\Framework\v2.0.50727\. This tool can be used to set up specific parts or the entire database schema necessary for the available ASP.NET 2.0 providers (membership, roles, personalization, profiles and Web events).
The following command enables the entire ASP.NET 2.0 scheme using SQL authentication:
aspnet_regsql /S SERVER /d DATABASE /U USER /P PASSWORD /A all
The following command does the same thing using integrated security:
aspnet_regsql /S SERVER /d DATABASE /E /A all
The following command installs the minimum parts necessary for the Web Parts support, i.e. personalization and membership. The example uses integrated security:
aspnet_regsql /S SERVER /d DATABASE /E /A mc
Importing the Sample Templates
Sample templates can be imported from <EPiServerSample dir>\Util\Setup\PortalTemplates.epi4.
Administration
Web Part Registration
In order to make it possible to change the set of available Web Parts in a live site, there is a new administration page for registering and altering Web Parts. Web Parts that have been registered are available from the custom WebPart property that can be added to a page type. It is also available from the RegisteredWebPartsCatalog that can be added to any catalog zone in the EPiServer CMS site. The registration process makes it possible to extend the available services of the site without having to recompile or even change any markup files.
Register a Web Part
- From the Config tab in Admin mode, click Web Parts and Install Web Part.
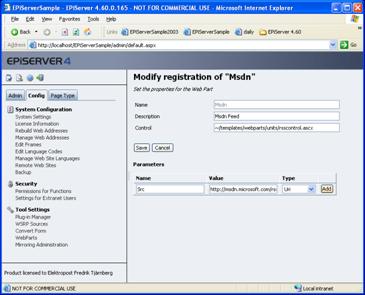
- Enter a name, description and specify the control to be used by entering its physical path relative to the application root. You specify the application root using the tilde character (~). Enter "~/templates/webparts/units/rsscontrol.ascx" in the Control field to point to the RSS control available in the sample package. Click Save.
- You can specify properties of the Web Part by selecting its name.
- In the properties table, enter values for the properties you need to specify.
- The Src property of the RssControl in the above example is set to point to the MSDN feed at http://msdn.microsoft.com/rss.xml.
- Click Add to define the property.
- Remove any property by selecting Delete in the table.
If you need to expose WSRP portlets, you can make them available by registering them in a similar way.
- From the WebParts page in Admin mode, select Consume Portlet.
- Enter a name and a description. Select one of the producers registered in the WSRP Sources section of Admin mode in the Producer field.
- Select one of the available portlets for the selected producer. Click Save.
Example 1 – Displaying Content from EPiServer CMS in a Web Part
This example shows how to build a simple Web Part for displaying content from EPiServer CMS. The idea is to display a configurable property from a configurable page.
Derive from a Web Part?
In ASP.NET 2.0 there are three main choices when selecting a base class for a Web Part control.
- Deriving from System.Web.UI.WebControls.WebParts.WebPart will give you a tight integration with the Web Part framework. The (major) drawback is that you must provide the markup of your control using code.
- Deriving from System.Web.UI.WebControls.UserControl gives you the possibility to separate code and layout, but you will not have all the features of Web Part deriving control. Most of the features can be “re-engineered”.
- Derive from any other member of the System.Web.UI.WebControls namespace, or any other Web control. You do this to extend or customize an existing control.
The example uses markup to define the layout, so we create a new user control and name it PropertyPart.ascx.
Markup
The markup for the control is trivial.
<%@ Control Language="C#" AutoEventWireup="true" CodeBehind="PropertyPart.ascx.cs" Inherits="EPiServerSample.WebParts.PropertyPart" %>
<asp:Label runat="server" ID="Message" Visible="false" Font-Bold="true" />
<EPiServer:Property runat="server" PropertyName="" ID="PropertyControl" />
Note that the @Control declaration still contains a code-behind file, although the code is targeted for ASP.NET 2.0. This is because the control is created in a Web Application Project which is how the sample project for ASP.NET 2.0 is packaged.
In the markup we simply add two control declarations; a Label for displaying messages and a Property control for displaying the EPiServer content.
Code-Behind File
Code view will look something like this:
using System;
using System.Data;
using System.Configuration;
using System.Collections;
using System.Web;
using System.Web.Security;
using System.Web.UI;
using System.Web.UI.WebControls;
using System.Web.UI.WebControls.WebParts;
using System.Web.UI.HtmlControls;
namespace WebApplication1
{
public partial class _Default : System.Web.UI.Page
{
protected void Page_Load(object sender, EventArgs e)
{
}
}
}
to specify which page and property to display. There are two new properties for this: Url and PropertyName.
[Personalizable]
[WebBrowsable]
[WebDisplayName("Url/Page ID")]
public string Url
{
get { return _url; }
set
{
_url = value;
}
}
[Personalizable]
[WebBrowsable]
public string PropertyName
{
get { return PropertyControl.PropertyName; }
set { PropertyControl.PropertyName = value; }
}
In the code above, the Personalizable attribute is used to let the Web Part framework know that the data in this property should be persisted in the personalization for the page where the Web Part is used. The WebBrowsable attribute makes the property available for user editing when the page is displayed in Web Part Edit mode. The WebDisplayName sets the caption of the property when displayed in Edit mode.
The default behavior displays the property name. The declaration of the WebDisplayName requires a constant expression for the DisplayName argument, but what if you want to provide a translated text? To do this you need to extend the WebDisplayName by deriving from it and provide an overridden version of the DisplayName property that returns a translated text.
The PropertyName property just wraps the PropertyName property of the contained EPiServer CMS Property control in order to hook up the personalization engine with its value. The URL is stored in a field since it needs some extra attention before we can use it.
The Property control we added in the markup expects a PageReference in order to display any content. For this we need a way to transform the URL provided by the user into a PageReference object. This is done by adding another read-only property named PageData.
public EPiServer.Core.PageData PageData
{
get
{
if (_pageData == null && Url != null)
{
try
{
int id;
if (Int32.TryParse(Url, out id))
{
_pageData =
EPiServer.Global.EPDataFactory.GetPage(
new EPiServer.Core.PageReference(id));
}
else
{
_pageData =
EPiServer.Global.EPDataFactory.GetPageByURL(Url);
}
}
catch (EPiServer.Core.PageNotFoundException x)
{
/* Error processing */
}
}
return _pageData;
}
}
This property uses a field, _pageData, to cache its calculated value, so if the field is set to anything other than null, the field value is returned. If however the field is null, we need to create an instance based on the value given by Url. In our case we accept the value to be a relative URL to a page in the site or an integer representing the page ID. So when calculating the _pageData value, we first make an attempt to parse it as an integer using the new convenient TryParse method. If this succeeds, we simply retrieve a reference to the page using the GetPage API. If the URL was not in numeric format, we use GetPageByUrl to look up the page using its relative URL. We skip the error handling code that is needed to handle lookup failures.
Now everything is set up to feed the Property control with a page reference. We do this by overriding the OnPreRender method.
protected override void OnPreRender(EventArgs e)
{
if (PageData != null)
{
PropertyControl.PageLink = PageData.PageLink;
}
base.OnPreRender(e);
}
The simplest way to expose this Web Part in your site is to register it in Admin mode. By doing this, the Web Part will be available from the Registered Web Parts catalog in the Portal template. Registration is done by entering "~/WebParts/PropertyPart.ascx" in the Control field in the Install Web Part window in Admin mode.
When you browse a page that uses the Portal template and switch display mode to Catalog mode, you will see the EPiServer Property under the Registered Web Parts as follows. When it is added to the LeftZone, it will look something like this:

If you switch to Edit mode and select Edit from the pop-up control menu of the Web Part, you will see the user interface for modifying the Web Part.
Enter a property name (MainBody in this case), the path to a page in your site, e.g. /EPiServerSample/Inspiration/News/The_New_Support_for_Globalisation/, click OK and the Web Part will render the main body of the specified page.
You might notice that the result you get differs slightly from the page shown above. Instead of getting the name of the page in the Web Part title bar, you get the less informative “Untitled”. This is because in the example above the control implements the IWebPart interface, which gives the Web Part framework some additional information on how to render standard elements as icons and titles. The implementation is very simple.
In your class add the following to the class declaration.
…
public partial class PropertyPart : System.Web.UI.UserControl, IWebPart
{
…
If this is done in Visual Studio 2005, you will receive a smart tag giving you the option to implement the interface you just added.
A typical implementation will look something like this.
// IWebPart backing variables
private string _title;
private string _catalogIconImageUrl;
private string _description;
private string _subtitle;
private string _titleIconImageUrl;
private string _titleUrl;
#region IWebPart Members
public string CatalogIconImageUrl
{
get { return _catalogIconImageUrl; }
set { _catalogIconImageUrl = value; }
}
public string Description
{
get { return _description; }
set { _description = value; }
}
public string Subtitle
{
get { return _subtitle; }
set { _subtitle = value; }
}
[Personalizable]
public string Title
{
get
{
if (_title == null && PageData != null)
return PageData.PageName;
else
return _title;
}
set
{
if (value == string.Empty)
_title = null;
else if (PageData != null && value != PageData.PageName)
_title = value;
}
}
public string TitleIconImageUrl
{
get { return _titleIconImageUrl; }
set { _titleIconImageUrl = value; }
}
public string TitleUrl
{
get
{
if (PageData == null) return _titleUrl;
return PageData.LinkURL;
}
set { _titleUrl = value; }
}
#endregion
The only thing that we treat differently than just getting and setting the value of a field variable is the implementation of Title and TitleUrl. Title checks its corresponding field variable for null and if that is the case attempts to retrieve the page name from the PageData property. Likewise, TitleUrl is simply the LinkUrl property of the PageData property.
Example 2 – Displaying EPiServer CMS Page Listings in a Web Part
In this example we will build a Web Part that lists pages from a specified location of the site tree. Each page will be represented with a link to the page.
First add a new Web User Control to your project named PageListPart.ascx.
Markup
In the markup, add a PageList control that puts out link buttons as follows.
<EPiServer:PageList runat="server" ID="PageList">
<ItemTemplate>
<asp:LinkButton runat="server"
ID="LinkButton"
OnCommand="PageClick_Command"
CommandArgument="<%# Container.CurrentPage.PageLink.ID %>">
<%# Container.CurrentPage.PageName %>
</asp:LinkButton><br />
</ItemTemplate>
</EPiServer:PageList>
In this code we could have replaced the LinkButton with a standard HTML anchor element, but in the next example we will add extra processing in the event handler. This means that we are dependent on a postback, so we use the slightly more complicated LinkButton server control.
Code-Behind
The markup will require a collection of pages as a data source and it will also need an event handler for the PageClick_Command.
In the code-behind we add the following members.
private string _url;
private EPiServer.Core.PageData _pageData;
private string _pageDataUrl;
private string _boundUrl;
[Personalizable]
[WebBrowsable]
[WebDisplayName("Url/Page ID")]
public string Url
{
get { return _url; }
set { _url = value; }
}
public EPiServer.Core.PageData PageData
{
get
{
if (IsDirty && Url != null)
{
try
{
int id;
if (Int32.TryParse(Url, out id)) {
_pageData = EPiServer.Global.EPDataFactory.GetPage(
new EPiServer.Core.PageReference(id));
}
else {
_pageData =
EPiServer.Global.EPDataFactory.GetPageByURL(Url);
}
_pageDataUrl = Url;
}
catch (EPiServer.Core.PageNotFoundException x)
{
/* Handle the error! */
}
}
return _pageData;
}
}
As you can see, we use (almost) the same properties as in the previous example for Url and PageData. The only difference is in PageData, where we need “dirty”-handling of the provided Url. In the previous example it was ok to bind the data to the property control as late as in the OnPreRender override, where we could be certain that the data available was the correct data.
In this case we must bind the data earlier since the rendered control will contain server controls that should cause event handlers to execute. In order for these postbacks to work, the controls must be recreated prior to where the postback handling occurs. The thing is that when a user changes the Url from the edit user interface, the change happens after the data is bound. In case this happens we need to rebind before rendering the content.
Below is the IsDirty property, the override of OnLoad, where the initial data binding occurs, and the OnPreRender override, where we make a conditional rebind.
private bool IsDirty
{
get { return _pageDataUrl != Url; }
}
protected override void OnLoad(EventArgs e)
{
// need to bind data before any event handling takes place
// ... or it will never take place.
BindData();
base.OnLoad(e);
}
protected override void OnPreRender(EventArgs e)
{
// if the url has changed after the control
// was initially bound we need to rebind.
if (_boundUrl != Url)
{
BindData();
}
base.OnPreRender(e);
}
private void BindData()
{
if (PageData != null)
{
PageList.DataSource =
EPiServer.Global.EPDataFactory.GetChildren(PageData.PageLink);
PageList.DataBind();
_boundUrl = Url;
}
}
Finally we have the event handler for the LinkButton postback. In this version we just construct a PageData object to retrieve its LinkUrl property. We use this URL to redirect the client.
protected void PageClick_Command(object sender, CommandEventArgs e)
{
EPiServer.Core.PageData child =
EPiServer.Global.EPDataFactory.GetPage(new
EPiServer.Core.PageReference(_selectedPageId));
Response.Redirect(child.LinkURL, true);
}
Compile the code and add and register the Web Part as described in the previous example. When added to the page and given a URL using the Edit mode, the Web Part should look something like this:

Example 3 – Implement a Connection between Web Parts
In a sense the previous examples show master/detail view of page information from EPiServer CMS. It would be useful if these two Web Parts could interact so that selecting a link in the page list Web Part will update the property Web Part with a new page reference. There is a mechanism called Web Part Connections that can help you accomplish this functionality.
This example shows you how to implement a connection between the Web Parts created in the previous examples. The idea is to let the content Web Part created in the first example be fed with its page context by the page list, so that when a user selects a link in the page list Web Part, the content Web Part is updated to display new content.
Connection Interface
Connections are implemented by defining a provider and a consumer of a common connection interface. The connection interface defines the methods that the consumer can call in order to retrieve data from the connection. In our case the interface is very simple, since its only purpose is to serve a page ID of the page that was selected in the page list.
public interface IPageProvider
{
int GetPageId();
}
The implementation of PageProvider is very simple and only acts as an information carrier.
public class PageProvider : IPageProvider
{
private int _pageId;
public PageProvider(int id)
{
_pageId = id;
}
public int GetPageId()
{
return _pageId;
}
}
In the page list we need to add a connection provider method that looks like this.
[ConnectionProvider("Page Connection")]
public IPageProvider GetProvider()
{
return new PageProvider(_selectedPageId);
}
The purpose of the provider method is to serve an instance of an object that implements the connection interface whenever the Web Part framework asks for it. This method must be tagged with the ConnectionProviderAttibute attribute for the framework to know which method to call. The display name argument of the attribute is only used for rendering the user interface.
We also need to add code that sets the _selectedPageId that is used to instantiate the PageProvider instance and we do that by changing the event handler for the LinkButton control to look like this.
protected void PageClick_Command(object sender, CommandEventArgs e)
{
_selectedPageId = Int32.Parse((string)e.CommandArgument);
if (! IsConnected)
{
EPiServer.Core.PageData child =
EPiServer.Global.EPDataFactory.GetPage(new
EPiServer.Core.PageReference(_selectedPageId));
Response.Redirect(child.LinkURL, true);
}
}
We simply store the selected ID in a field for use in the connection provider method. We also need to put a condition on the redirect statement, so that it only occurs if the Web Part not is connected. The IsConnected property iterates through all existing connections to see if the current Web Part is part of any connection by checking the ID of the provider.
private bool IsConnected
{
get
{
WebPartManager manager =
WebPartManager.GetCurrentWebPartManager(this.Page);
foreach (WebPartConnection connection in manager.Connections)
{
if (connection.ProviderID == this.ID) return true;
}
return false;
}
}
That is all we need to do on the provider side.
Connection Consumer
In the consumer Web Part we need to add a connection consumer method in order to be fed with data from a connection. The consumer method must be tagged with the ConnectionConsumerAttribute attribute to make it visible for the Web Part framework. This is the implementation.
[ConnectionConsumer("Page Connection")]
public void SetProvider(IPageProvider provider)
{
_pageProvider = provider;
}
We simply store the passed page provider for later use.
In order to make the control render the correct information, we need to update the PageData property to also handle the case, where we receive information from a connection. The changed PageData property looks like this.
public EPiServer.Core.PageData PageData
{
get
{
if (IsDirty)
{
if (IsConnected &&
_pageProvider.GetPageId() != 0 &&
(_pageData == null ||
_pageData.PageLink.ID != _pageProvider.GetPageId()))
{
_pageData =
EPiServer.Global.EPDataFactory.GetPage(new EPiServer.Core.PageReference(_pageProvider.GetPageId()));
_pageDataUrl = _pageProvider.GetPageId().ToString();
Url = _pageDataUrl;
}
else if (Url != null)
{
try
{
int id;
if (Int32.TryParse(Url, out id))
{
_pageData =
EPiServer.Global.EPDataFactory.GetPage(
new EPiServer.Core.PageReference(id));
}
else
{
_pageData =
EPiServer.Global.EPDataFactory.GetPageByURL(
_url);
}
_pageDataUrl = Url;
}
catch (EPiServer.Core.PageNotFoundException x)
{
/* Handle the error! */
}
}
}
return _pageData;
}
}
In the above code, we firstly do a dirty check similar to the one we have in the page list Web Part. If the page data is dirty, we need to update it.
First of all we check to see if there is an active connection to get page information from. If that is the case, we retrieve a PageData object from EPiServer CMS given the page ID provided by the PageProvider implementation. If the Web Part is unconnected, the processing proceeds as with the code that we had before, where we look up the page using GetPage or GetPageByUrl. The dirty handling requires an update of the _pageDataUrl field that is supposed to be synchronized with the currently available page data object.
The IsDirty property looks like this.
private bool IsDirty
{
get
{
return
_pageData == null ||
(_pageDataUrl != Url) ||
(IsConnected && _pageProvider.GetPageId() != _pageData.PageLink.ID);
}
}
Here we consider the data to be dirty if the data is missing, if the URL for the current data is different than the provided URL, or if there is an active connection and the page ID given by that connection is different from the page ID of the current page data.
That is all we need to change on the consumer side.
The Web Parts in Action
Compile this code and browse the portal page. If you have done the two first examples you will not need to do any new registration.
In the portal page you can now select Connect in the display mode drop-down list and then Connect from the control menu in the page list Web Part. (A connection can be initiated from the consumer or the provider side.) The connection zone will appear giving you the option to create a connection for the Web Part by selecting a link. After this a select box will appear that lists all Web Parts that can provide data for you or all Web Parts that can consume data that you provide. In this case the list will only contain the property part represented by its title caption. Select the Web Part and then select Connect and the connection should be activated. Test it by selecting a link in the page list.
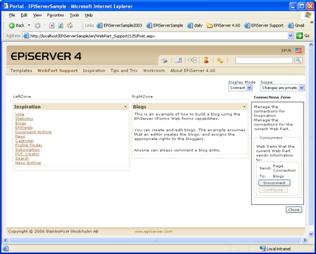
The above image shows how the page will appear after the connection has been initiated and the “Blogs” link has been selected.