Don't miss out Virtual Happy Hour this Friday (April 26).
Configuring EPiServer CMS 5 Enterprise
|
Product version: |
EPiServer CMS 5 SP1 |
|---|---|
|
Document version: |
1.2 |
|
Document creation date: |
27-06-2007 |
|
Document last saved: |
11-03-2008 |
Introduction
EPiServer CMS 5 Enterprise is a solution that shares the same file structure and can store different types of information on the website in the same database. The tech notes, Configuring EPiServer CMS 5 Enterprise describes the configuration and the technology behind EPiServer CMS 5 Enterprise.
Table of Contents
- Information
- License Requirements
- Supported Enterprise Scenarios
» Multiple Stand-Alone Sites
» Sharing Information Between Web Sites
» Configuration Restrictions - Installation
» Install the First Enterprise Web Site
» Install Multiple Enterprise Web Sites
» Configuration Restrictions - Configuration
» Start Page Setup - Technical Details
» Web.Config
» Load Balancing
» Local Cache Update - Additional Information
» Security
Information
EPiServer CMS 5 Enterprise is intended for environments that have several similar Web sites set up that want to share information. It is possible to link information from one Web site to another and edit every Web site in Edit mode.
License Requirements
To enable Enterprise functions, an EPiServer CMS 5 Enterprise license is required. There are two different types of licenses:
- Single Enterprise License - All Web sites that have purchased a single Enterprise license must run on one server.
NOTE: A valid single license must be purchased before running the "master" Enterprise license. - Enterprise CMS 5 Enterprise License - With the purchase of an EPiServer CMS 5 Enterprise license you can request up to three load-balancing licenses. Each Web site running a "master" Enterprise license can be deployed on up to three additional load-balancing servers.
NOTE: The load-balancing licenses are only valid for sites running on a "master" enterprise license.
Supported Enterprise Scenarios
Multiple Stand-Alone Sites
The Enterprise license can be used to run a number of different Web sites on the same server without sharing information between the sites, for example, the Enterprise license is used to purchase multiple EPiServer CMS 5 licenses. This does not require extra administration and will not be mentioned in this document.
Sharing Information Between Web Sites
This is the actual Enterprise configuration. Its purpose is to allow files and information to be shared between Web sites. This means that the Web sites will share the same database and set of files. In the Internet Information Server each site's home directory will be mapped to the same directory on the local hard drive.
Configuration Restrictions
This configuration has the following restrictions:
- Each EPiServer CMS 5 Enterprise site must be installed at the root level of its own IIS site. This means that setting up two sites is not supported, such as: www.company.com/division1 and www.company.com/division2.
- The sites must be installed on the same computer. Running sites on a different computer is regarded as load-balancing from an EPiServer CMS 5 Enterprise standpoint. See load balancing configuration for more details.
- The sites must use the same start page template file (default.aspx in the site's root folder). This limitation can be overcome by overriding the method GetDefaultDocuments in your global.asax.cs file. See documentation for EPiServer.SiteBase.GetDefaultDocuments for more details.
- Each EPiServer CMS 5 Enterprise site must have a unique Start page ID.
- Each EPiServer CMS 5 Enterprise site must use the same Wastebasket page ID and Root page ID.
Installation
To install EPiServer CMS 5 Enterprise a few extra steps need to be performed when compared to the EPiServer Professional installation.
Install the First Enterprise Web Site
This is a regular EPiServer CMS 5 installation using an Enterprise license file. For installation instructions, see the technical note, "EPiServer CMS 5 Installation Instructions."
Install Multiple Enterprise Web Sites
To set up multiple Web sites follow the instructions below:
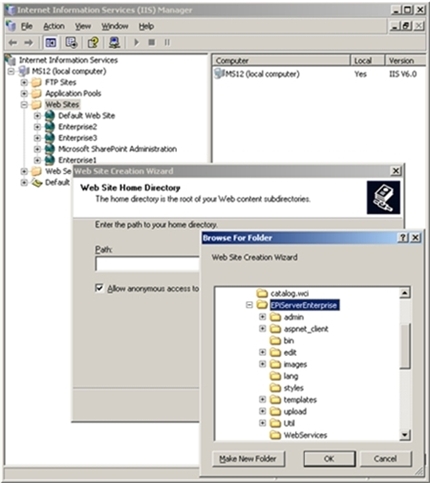
- Create a new Web site in Internet Information Services Manager (IIS Manager).
- Configure the home directory to point to the same home directory as your first Enterprise Web site.

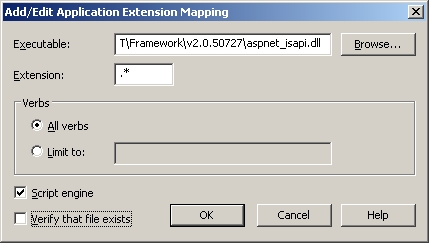
- In the Properties dialog box, go to the Home Directory tab and click on the Configuration… button.
Windows Server 2000
Click the Add button to add a new mapping to a wildcard that points to the aspnet_isapi.dll file (the path to this file can be copied from the .aspx extension map). Do not select the "Verify that the file exists" checkbox.
Windows Server 2003
Click the Insert... button to add a new mapping to a wildcard that points to the aspnet_isapi.dll file (the path to this file can be copied from the .aspx extension mapping). Do not select the "Verify that the file exists" checkbox.
- Make a new site section in the <sites> block of your site's Web.config file. To distinguish between the sites, you must supply an applicationId attribute for each site. Leave the applicationId out temporarily. The user will receive a path. Add the required settings in the Web.config file. For further information see the technote Configuration in EPiServer CMS 5 under the Required Settings section. It will appear later on in step 6. See the following example of a site's section with two sites.
<site applicationId="/LM/W3SVC/123/ROOT" description="Example Site 1">
<siteSettings
siteShortName="ExampleSite1"
enableScheduler="true"
enableEvents="true"
enableRemoteEvents="true"
eventSubscriberUrl="net.pipe://PublicContentMaster1/
EventSubscriber"
pageStartId="0"
siteUrl=http://enterprise1/
uiUrl=http://enterprise1/yourUI/
utilUrl=http://enterprise1/Util/
pageWastebasketId="3"
pageRootId="2"
pagecategoryId="5"
siteDisplayName="Example Site 1" /></site>
<site applicationId="" description="Example Site 2">
<siteSettings
siteShortName="ExampleSite2"
enableScheduler="true"
enableEvents="true"
enableRemoteEvents="true"
eventSubscriberUrl="net.pipe://PublicContentMaster2/
EventSubscriber"
pageStartId="0"
siteUrl=http://enterprise2/
uiUrl=http://enterprise2/yourUI/
utilUrl=http://enterprise2/Util/
pageWastebasketId="3"
pageRootId="2"
pagecategoryId="5"
siteDisplayName="Example Site 2" /></site>
Add a <siteHosts> section in each <site> section. It is used to determine which <site> section to use based on the host name of the incoming request.
NOTE: One site must have a name="*". This is used to indicate the default site which will receive requests not mapped to any other host names. Also a host name may only appear once.
NOTE: The current EPiServer CMS 5 release does not make use of the host names to determine the <site> section to use. The applicationId currently controls this. This behavior will change in the next release. To avoid web.config schema changes we will enforce the use of <siteHosts> from the start. The <siteHosts> section is also used to control default language mapping for a host. See the EPiServer CMS Globalization tech note for more information on language mapping. -
<site applicationId="/LM/W3SVC/123/ROOT" description="Example Site 1">
<siteHosts>
<add name="www.company.com" />
<add name="www.company.net" />
</siteHosts>
<siteSettings ... />
</site>
<site applicationId="" description="Example Site 2">
<siteHosts>
<add name="*" />
</siteHosts>
<siteSettings ... /></site>
- Browsing to the second site will produce an error message, in this message you can see the applicationId of the site. Enter the ID into web.config.
- In the <siteSettings> section, ensure the siteShortName attribute is unique for each site in the enterprise. Refer to the Event Management System Specification tech note.
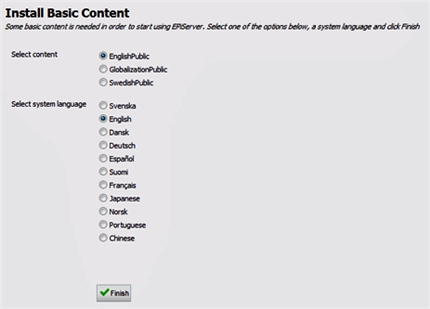
- Open the start page on the new Web site and you will see the Install basic content page. Templates can be installed on the new Web site. There are two options:
- If you want to create a start page and do not want to install any content, log into Edit Mode, create the start page, get the ID number from the start page and enter it into the web.config file for pageStartId.
- Import the content and system language that you want to start with for your new site and click on the Finish button.

Configuration
Start Page Setup
If you want to use a different page template for the start page of a new Enterprise Web site, this is not supported through configuration. It can be addressed by overriding the method GetDefaultDocuments in your global.asax.cs file. You need to return a different set of default documents based on the current settings section.
Technical Details
web.config
The unique site configuration information for each site will be stored in a section in the web.config file under <Sites>. For example, the site running under IIS instance 1 could have a section similar to the one below:
<episerver>
<sites>
<site
applicationId="/LM/W3SVC/1097029768/Root"
description="Example Site">
<siteSettings
siteShortName="ExampleSite"
siteUrl="http://enterprise2/"
uiUrl="http://enterprise2/yourui/"
utilUrl="http://enterprise2/Util/"
siteDisplayName="Enterprise2"
uploadDir="~/upload/"
pageFolderVirtualPathProvider="EPiServerPageVPP"
uiTheme=""
pageWastebasketId="2"
pageOfficeStartId="0"
uiMaxVersions="0"
uiVersionMerging="true"
pageValidateTemplate="false"
uiKeepUserLoggedOn="true"
...=""
/>
</site>
</sites>
</episerver>
NOTE: Each Web site specifies all of it’s parameters independently of others.
Load Balancing
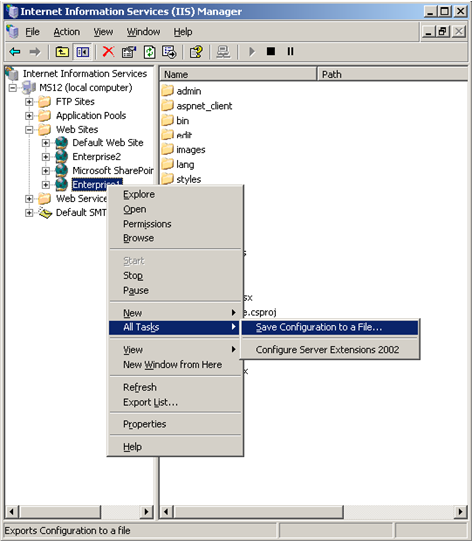
If you are running in a load-balanced scenario, you need to make sure that the load-balanced sites receive the same application ID and site short name (applicationID and siteShortName attributes are shown above) as the master Web site. If you are running Windows Server 2003, the easiest way to accomplish this is to use the Save Configuration to a File menu option in IIS Manager from the master site, and then create the slave site with the function New > Web Site (from file).

If you are running Windows 2000, you may need to use MetaEdit or a similar tool. MetaEdit can be downloaded from www.microsoft.com.
Local Cache Update
A feature that the Enterprise edition has introduced is intelligent local cache updates. From a .NET viewpoint, all your enterprise Web sites are completely separate applications, running in their own appDomains. Since all sites share the same database and may be affected by page updates on other sites, the system needs to be able to update page information between all the enterprise Web sites.
Prior to EPiServer 4.40, you needed to configure remote web sites in EPiServer to let these Web sites update cache information between sites. This process is still needed if you need to communicate with Web sites running on another server, but for local updates, the new local cache update feature takes care of this without requiring further configuration.
This update process is handled by the EPiServer Scheduler Service. The main purpose of this service is to handle jobs that are scheduled to run at a specific time without manual intervention. Now it is also used to notify sites of cache updates.
When a site starts, it registers its site short name in the database (if it's not already there). It then reads all site short names back from the database and registers an interest with the Scheduler Service in receiving cache notifications for each one.
If the cache update mechanism does not appear to work, the cause is most likely that the EPiServer Scheduler Service has not started or that the enableEvents or enableRemoteEvents attributes are set to false in the web.config file on one or more of the Web sites.
Additional Information
Security
A possible misconception regarding authentication in Enterprise solutions is that logging out on one site while being logged in on other sites would log you out from these Web sites as well. This is not the case. When logging out from an Enterprise site, for example, to leave the computer, make sure to log out from other Web sites.
