ARCHIVED This content is retired and no longer maintained. See the version selector for other versions of this topic.
Creating a gift card payment provider [Legacy]
This topic explains how to create a payment provider for purchasing gift cards in Episerver Commerce.
Note: Functionality to deduct from or add to the gift card balance is not included here - that must be added.
You also create a new Business Foundation object and tie that to the existing Contact object. With this in place, you can create a gift card and assign it to a contact (customer). To use the gift card payment provider, you create classes and user controls. You must also complete a back-end customization and set it up.
Classes in this topic are available in the Mediachase.Commerce.Orders namespace.
Note: To use the payment gateway in serializable cart mode, it must implement IPaymentPlugin, which is similiar to IPaymentGateway. However, IPaymentPlugin takes an IShipment instead of a Shipment.
It is possible to implement both IPaymentPlugin and IPaymentGateway in one class.
Creating classes
Create a class that implements the IPaymentGateway interface.
In Visual Studio, create a new project named GiftCardPaymentProvider.
Delete the app.data folder, the web.config, and the Default.aspx files, since they are not required.
From the site root, create the folder structure: this adheres to Commerce Manager.
Create a new class, GiftGateway.cs, which does the following:
Returns the configuration data associated with a gateway.
Sets the configuration gateway data. This data typically includes information like gateway URL, account info, and so on.
To the class, add using Mediachase.Commerce.Orders; Resides in Mediachase.Commerce.Orders.IPaymentGateway.
Add a reference to the Mediachase.Commerce.dll assembly.
Implement the interface IPaymentGateway.
public class GiftGateway : IPaymentGateway
  {
    IDictionary<string, string> _configData;

    public bool ProcessPayment(Payment payment, ref string message)
      {
        OtherPayment p = (OtherPayment)payment;
        if (!String.IsNullOrEmpty(p.ValidationCode))
          {
            GiftManager.DeactivateGiftCard(Settings["GiftCardMetaClass"], PrimaryKeyId.Parse(p.ValidationCode));
            p.Status = "Processed";
          }
        return true;
      }

    /// <summary>
    /// Returns the configuration data associated with a gateway.
    /// Sets the configuration gateway data. This data typically includes
    /// information like gateway URL, account info and so on.
    /// </summary>
    /// <value>The settings.</value>
    /// <returns></returns>
    public virtual IDictionary<string, string> Settings
      {
        get
          {
            return _configData;
          }
        set
          {
            _configData = value;
          }
      }
  }
Note : You can ignore error messages that occur at this step.
Create a new class called GiftManager.cs (public static class GiftManager). See the following code comments.
public static class GiftManager
  {
    public const string ContactIdFieldName = "ContactId";
    public const string AmountFieldName = "Amount";
    public const string BalanceFieldName = "Balance";
    public const string ContactFieldName = "Contact";
    public const string IsActiveFieldName = "IsActive";
    public const string RedemptionCodeFieldName = "RedemptionCode";
    public const string TitleFieldName = "Title";

    public static EntityObject[] GetClientGiftCards(string giftCardMetaClass, PrimaryKeyId contactId)
      {
        return BusinessManager.List(giftCardMetaClass,
          new FilterElement[]
            {
              FilterElement.EqualElement(ContactIdFieldName, contactId),
              FilterElement.EqualElement(IsActiveFieldName, true)
            });
      }

    public static void DeactivateGiftCard(string giftCardMetaClass, PrimaryKeyId giftCardId)
      {
        // Load Gift Card
        EntityObject giftCard = BusinessManager.Load(giftCardMetaClass, giftCardId);
        // Update field
        giftCard[IsActiveFieldName] = false;
        // Save Changes
        BusinessManager.Update(giftCard);
      }
  }
9. Build the project.
Creating user controls
Create the user controls needed for the gift card payment provider.
ConfigurePayment
Create a user control called ConfigurePayment.ascx. This user control needs to inherit from System.Web.UI.UserControl, IGatewayControl. See the code comments in the examples.
<%@ Control Language="C#" AutoEventWireup="true" CodeBehind="ConfigurePayment.ascx.cs"
	Inherits="GiftCardPaymentProvider.ConfigurePayment" %>
	<div id="DataForm">
          <table cellpadding="0" cellspacing="2">
	    <tr>
	      <td class="FormLabelCell" colspan="2"><b>Configure Gift Card</b></td>
	    </tr>
          </table>
	  <br />
	  <table class="DataForm">
	    <tr>
	      <td class="FormLabelCell"><asp:Literal ID="Literal4" runat="server" Text="MetaClass name" />:</td>
	      <td class="FormFieldCell">
                <asp:TextBox
                  Runat="server"
                  ID="MetaClassName"
                  Width="230">
                </asp:TextBox>
                <br />
                <asp:RequiredFieldValidator
                  ControlToValidate="MetaClassName"
                  Display="dynamic"
                  Font-Name="verdana"
                  Font-Size="9pt"
                  ErrorMessage="'MetaClass name' must not be left blank."
                  runat="server"
                  id="RequiredFieldValidator2">
                </asp:RequiredFieldValidator>
              </td>
            </tr>
	  </table>
	</div>
public partial class ConfigurePayment : System.Web.UI.UserControl, IGatewayControl
  {
    string _validationGroup = string.Empty;
    private PaymentMethodDto _paymentMethodDto = null;
    private const string _metaClassParameterName = "GiftCardMetaClass";

    /// <summary>
    /// Handles the Load event of the Page control.
    /// </summary>
    /// <param name="sender">The source of the event.</param>
    /// <param name="e">The <see cref="System.EventArgs"/> instance containing the event data.</param>
    protected void Page_Load(object sender, System.EventArgs e)
      {
        BindData();
      }

    /// <summary>
    /// Binds a data source to the invoked server control and all its child controls.
    /// </summary>
    public override void DataBind()
      {
        BindData();
        base.DataBind();
      }

    /// <summary>
    /// Binds the data.
    /// </summary>
    public void BindData()
      {
        // fill in the form fields
        if (_paymentMethodDto != null && _paymentMethodDto.PaymentMethodParameter != null)
          {
            var param = GetParameterByName(_metaClassParameterName);
            if (param != null)
              {
                MetaClassName.Text = param.Value;
              }
          }
        else
          {
            this.Visible = false;
          }
      }

    /// <summary>
    /// Saves the object changes.
    /// </summary>
    /// <param name="dto">The dto.</param>
    public void SaveChanges(object dto)
      {
        if (this.Visible)
          {
            _paymentMethodDto = dto as PaymentMethodDto;
            if (_paymentMethodDto != null && _paymentMethodDto.PaymentMethodParameter != null)
              {
                var paymentMethodId = Guid.Empty;
                if (_paymentMethodDto.PaymentMethod.Count > 0)
                  {
                    paymentMethodId = _paymentMethodDto.PaymentMethod[0].PaymentMethodId;
                  }

                var param = GetParameterByName(_metaClassParameterName);
                if (param != null)
                  {
                    param.Value = MetaClassName.Text;
                  }
                else
                  {
                    CreateParameter(_paymentMethodDto, _metaClassParameterName, MetaClassName.Text, paymentMethodId);
                  }
              }
          }
      }

    /// <summary>
    /// Gets the name of the parameter by.
    /// </summary>
    /// <param name="name">The name.</param>
    private PaymentMethodDto.PaymentMethodParameterRow GetParameterByName(string name)
      {
        var rows = (PaymentMethodDto.PaymentMethodParameterRow[])_paymentMethodDto.PaymentMethodParameter.Select(String.Format("Parameter = '{0}'", name));
        if (rows != null && rows.Length > 0)
          {
            return rows[0];
          }
        else
          {
            return null;
          }
      }

    /// <summary>
    /// Creates the parameter.
    /// </summary>
    /// <param name="dto">The dto.</param>
    /// <param name="name">The name.</param>
    /// <param name="value">The value.</param>
    /// <param name="paymentMethodId">The payment method id.</param>
    private void CreateParameter(PaymentMethodDto dto,
        string name, string value, Guid paymentMethodId)
      {
        var newRow = dto.PaymentMethodParameter.NewPaymentMethodParameterRow();
        newRow.PaymentMethodId = paymentMethodId;
        newRow.Parameter = name;
        newRow.Value = value;
        // add the row to the dtoif (newRow.RowState == DataRowState.Detached)
        dto.PaymentMethodParameter.Rows.Add(newRow);
      }

    /// <summary>
    /// Loads the object.
    /// </summary>
    /// <param name="dto">The dto.</param>
    public void LoadObject(object dto)
      {
        _paymentMethodDto = dto as PaymentMethodDto;
      }

    /// <summary>
    /// Gets or sets the validation group.
    /// </summary>
    public string ValidationGroup
      {
        get
          {
            return _validationGroup;
          }
        set
          {
            _validationGroup = value;
          }
      }
  }
Deployment
Deploy the GiftCardPaymentProvider assembly to the Commerce Manager and the Episerver Commerce sites. We also deploy the user controls into specific folders.
Deploy files by copying the GiftCardPaymentProvider to the sample project website and Commerce Manager website.
The configured system keyword of the payment provide is GiftCard. Therefore, folders with that name must be created in the Payment\Plugins folder of the Commerce Manager and front end website.
Create a folder in the Commerce Manager payment plugin folder with the name GiftCard. Put the ConfigurePayment.ascx there. The path resolves to [~CommerceManagerSite]\Apps\Order\Payments\Plugins\GiftCard\
Create a folder in sample site payment plugin folder with the name GiftCard. Put the PaymentMethod.ascx there. That path resolves to [~Commerce SampleSite]\Templates\Sample\Units\CartCheckout\GiftCard\.
Adding the gift card in Commerce Manager
Adding a business object
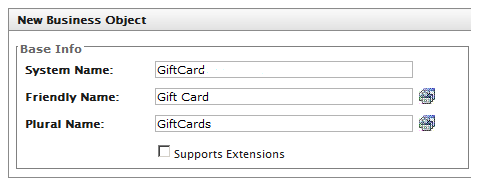
Go to Commerce Manager> Administration > Business Foundation > Create New > New Business Object.
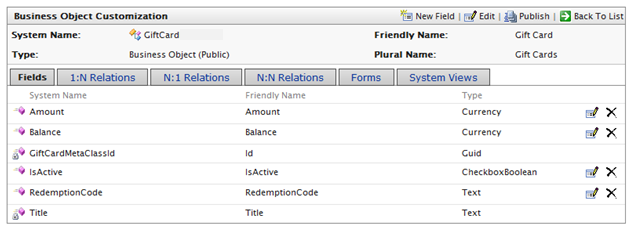
Name the new object Gift Card, and notice the Plural Name. Leave the field info section entries to their defaults.
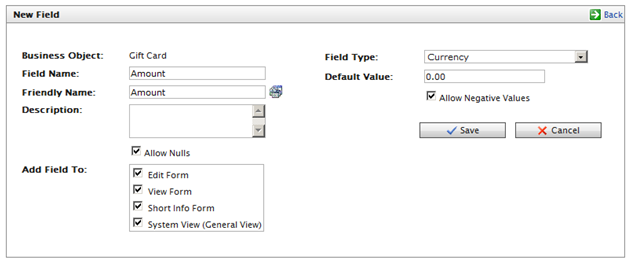
Add a new field to the Gift Card object called Amount. Note that the data type is Currency.
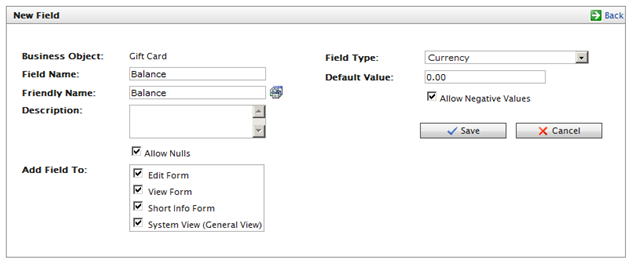
Add a new field to the Gift Card object called Balance, data type Currency.
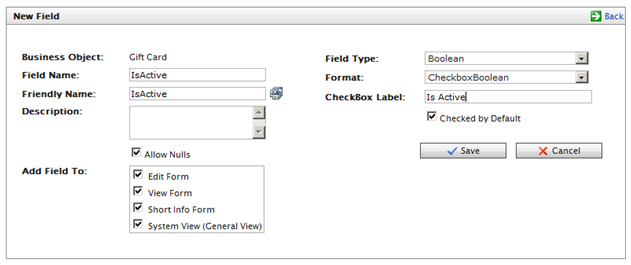
Add a new field to the Gift Card object called IsActive, data type Boolean.
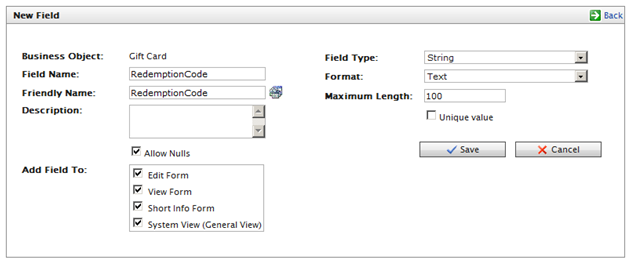
Add a new field to the Gift Card object called RedemptionCode.
Your Gift Card object should look like this.
Making the gift card available
To make the gift card available to customers and create easy management from the back-end, use the Business Foundation (BF) Relationship feature. To track and record relevant data, business objects must be related to other objects, whether they are 1-to-many, many-to-1, or many-to-many.
Note: The Related Object has the Primary Object appear under the opposite relationship (N:1) on its configuration form.
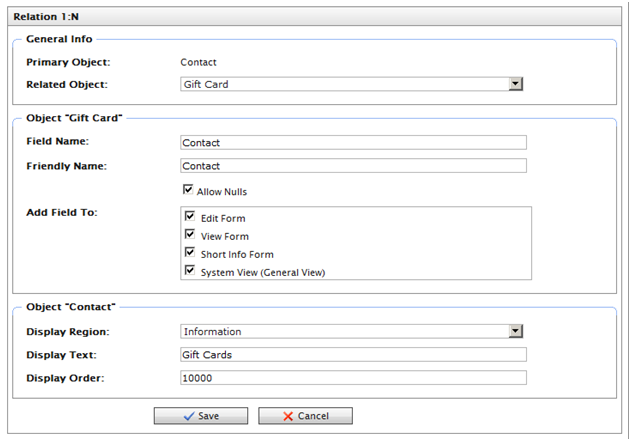
From the main BF menu, select the Contact object, click the tab for 1:N Relations, then click the New Relation link in the right area of the screen.
Fill in the information.
Click the dropdown Related Object, select Gift Card.
Set Display Region to Information.
Save your settings.
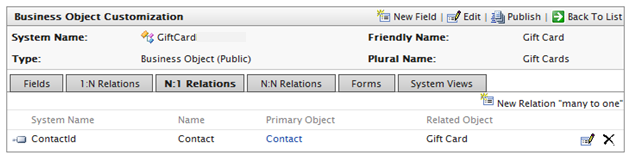
Click Back To List and select the Gift Card object. The N:1 tab should look like this.
Creating a payment method
Create a new payment method by using the Gift Card object.
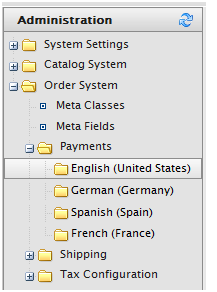
In Commerce Manager/Administration, navigate to the folder for the language of choice, such as English (United States).
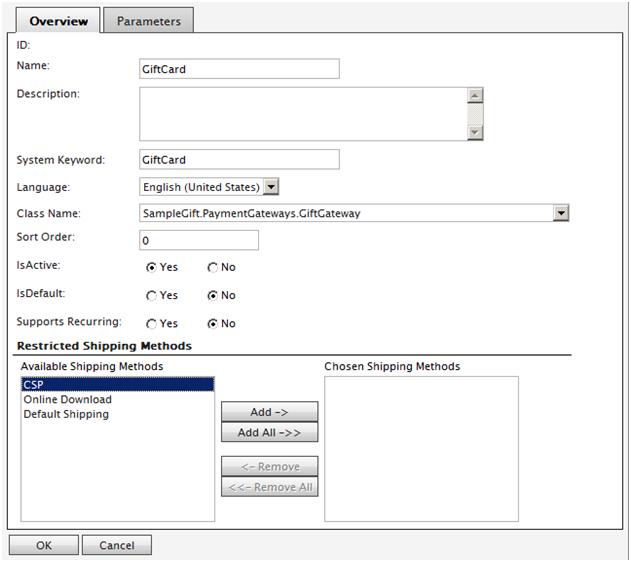
Click New and enter information as follows. (Remember to switch to the Markets tab, then select markets for which this payment should be available).
When done, click OK.
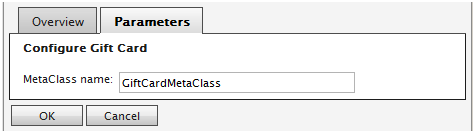
Open the new Payment Method again, go to the Parameters tab, and enter GiftCard.
Click OK.
Go to the customer management section and select Contacts.
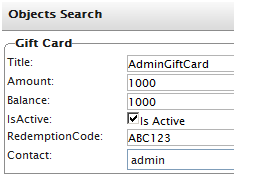
Open up the contact admin and give admin an instance of the newly created Gift Card. The Gift Card is found under the Information section. (You chose that during the setup of the relation between Contact and Gift Card objects.)
Click Add Items then New. Enter values as shown below
Verifying the result
Browse to the Episerver Commerce site and log in as an admin.
Purchase an item.
When you reach the Checkout wizard Payment Page, select Gift Card payment. Also, select the child instance radio button.