
Customizations of EPiServer Commerce Manager
This article regarding EPiServer Commerce is about some customizations of Commerce Manager that partners and customers have showed interest in at some of the courses I have delivered regarding EPiServer Commerce. My plan is to write additional articles on the subject and EPiServer Commerce in general.
There are many facets of the EPiServer e-commerce platform, as well as the back-end management console Commerce Manager. The platform and the management console are loaded with features and abilities in the default installation. The complete set of abilities of the platform and in the back-end management application are however not visible out of the box, although they are there in the behind. A complete functional setup for all possible businesses scenarios is impossible to foresee, and to try implementing everything every customer would like to do with the platform is hard to achieve in a generic installation. Because of this our e-commerce platform and Commerce Manager are built on openness, flexibility and customizability.
Background
Due to the fact that neither the optional sample site delivered with the installer nor the back-end console reveals the full potential of all ready-to-use features of our e-commerce platform, a couple of articles on the subject could be a starter for further investigation of the product.
Commerce Manager; the back-end business application delivered with EPiServer Commerce is a fully fledged management console for the EPiServer e-commerce platform. However, some interesting features and functions could be added without too much work.
In this article the pattern for customization is the important message, not the added functionality. What abilities that can be achieved or what added capabilities in terms of functionality in the platform is not the scope here, just a starter and some enlightening on how an approach could look.
The basics of customization
Configuration of functionality in the Commerce Manager application is governed by a strict pattern. If you follow that pattern it will be rather easy to change, add, remove and keep track of added features in the Commerce Manager and of the platform itself.
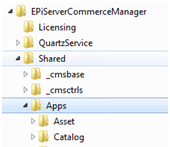
Every subsystem of the platform is more or less represented in Commerce Manager in a very straight forward manner. The out-of-the-box included subsystems are loosely tied to each other, meaning that implementation choices govern how the different subsystems are connected. Although some deviations exist in the setup for customization of individual subsystems the general file structure is the following:
Description, general structure and file layout:
In the file system where you installed the Commerce Manager application the path...\Shared\Apps\... contains the major part of Commerce Manager front-end components.
Here each specific node contains what drives the individual Commerce Manager subsystem functionality. Some folder names are self-describing, others are not so obvious, but after some investigation most of them are clear and understandable.
For example:
"Core" contains a lot of the Administration sub system."MetaDataBase" contains some Business Foundation features related to alteration of the management forms and work with the Business Foundation classes and fields."Content" refers to the default CMS included, but is sparsely used because EPiServer CMS is used instead.
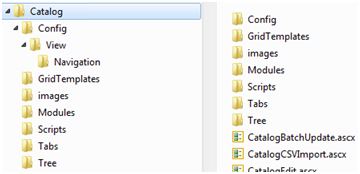
Catalog Management specific file structure
 For the Catalog subsystem, for example, the following structure defines included Commerce Manager components. The first configuration change in this article will be in the Catalog subsystem.
The "Config" folder is of primary interest here. This folder defines much of the look and feel of the Catalog system in Commerce Manager.
In the "Navigation" folder there is an XML file outlining the top-left navigation item-tree in Commerce Manager. This defines the tabs (nodes) and the links (views) along with the command types that are connected to the navigational items and nodes.
There are a few commands types, for example "OpenFrameModalPopup", "ClientAction" and "ServerAction". "ClientAction" points to the subsystem folder structure which contains a definition of a view in XML format. This view, in turn, points most often to a user control where the actual functionality is represented. The "ServerAction" command type points to a library and a specific class. We will take a look at Server and Client command types in this article.
A minor but convenient alteration
An example of a minor "ClientAction" customization is the Build/ReBuild Search Index dialog in the Administration subsystem in the default installation of Commerce Manager. We will make this node appears also in the Catalog subsystem so that users can avoid additional mouse clicks when they need to rebuild indexes after working with the catalogs. This alteration is not so advanced; it just shows the pattern of adding, turning off or moving things around in the top left menu of Commerce Manager.
How to
In the file system navigate to the ...\Shared\Apps\Core\Config\View\Navigation and copy the following part of the LeftMenu.xml file and paste it into the Catalog subsystem LeftMenu.xml file (\Shared\Apps\Catalog\Config\View\Navigation) at a suitable place.
<Link id="Core_Search"
   text="{SharedStrings:Search_Index}"
   order="50"
   iconUrl=""
   iconCss=""
   command="cmdSearch"
   permissions="core:mng:search" />
This piece of code point to a "ClientAction" command, accompanying the link.Complete the task and add the following command to the LeftMenu.xml file of the Catalog subsystem.
<Command id="cmdSearch">
    <CommandType>ClientAction</CommandType>
    <ClientScript>CSManagementClient.ChangeView('Core', 'Search')</ClientScript>
    <EnableHandler type="Mediachase.Commerce.Manager.CommandHandlers.
    PermissionEnableHandler, Mediachase.ConsoleManager" />
</Command>
The CSManagementClient.ChangeView method point to the "Search" view in the "Core" subsystem (aka. Administration). The view is expected to be found at ...\Shared\Apps\Core\Config\View\. Reviewing the Search.xml view definition file reveals that it contains the "controlUrl" attribute which defines the location of the user control. From this entry point additional user controls may be nested.
<View xmlns="http://schemas.mediachase.com/ecf/view">
    <ViewConfig>
      <setAttributes id="Search"
                     name="{SharedStrings:Search_Manager}"
                     controlUrl="Core/Search/SearchManager.ascx"
                     permissions="core:mng:search"
                     help="System+Settings"/>
.
.
.
    </ViewConfig>
</View>
After alteration, release the browser cache and the node appears in the Catalog subsystem top-left node structure.
Summary of this example:
- The LeftMenu.xml defines the navigational node structure and points to some sort of command. The defined command points to a view. The view points to a user control.
- This pattern is common in Commerce Manager, but deviations exist. All ingredients of this example can have different content and different structure, but the basics are the same.
An added ServerAction
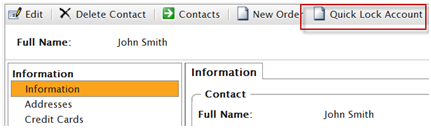
Another example is how to add a new "ServerAction" into the Customer subsystem. As there is a slight difference between a security account's "Locked Out" and "Approved" properties, a site owner might be able to convince a developer to create a manual lock-out-button for accounts. This is not something that is recommended to implement, but this is done in this article for illustration of the "ServerAction" concept.
The first step will be to add a new button at the top menu in the Contact information screen as the following image displays. Later that button will be connected to a command that in turn will point to a class.
This is done by adding something like the following code into the ...\Shared\Apps\Customer\Config\View\ EntityView.Contact.xml file. Note the "commandName" attribute in the code.
<Button id="CustomButton"
    text="Quick Lock Account"
    imageUrl="~/Apps/Shell/styles/Images/new.png"
    tooltip="Click Me"
    commandName="cmdLockAccount"
    permissions=" businessfoundation:contact:edit:permission "></Button>
A "ServerAction" command that points to the type created is by this also needed in the EntityView.Contact.xml file.
Command id="cmdLockAccount">
    <CommandType>ServerAction</CommandType>
    <Handler type="ComManAdditions.Customers.ContactAccountLock, ComManAdditions" />
</Command>
The class
The class ContactAccountLock must implement the public interface ICommand in the Mediachase.BusinessFoundation namespace. One interesting part in the following code snippet is the second argument (element) that carries an object of type Mediachase.BusinessFoundation.CommandParameters that contains "CommandName" and "CommandArguments" (such as permissions).
void ICommand.Invoke(object sender, object element)
{
    object fromContext = CHelper.GetFromContext("ObjectId");
    if (fromContext != null)
    {
        PrimaryKeyId primaryKeyId = (PrimaryKeyId)fromContext;
        string className = "Contact";
        ContactEntity target = (ContactEntity)BusinessManager.Load(className, primaryKeyId);

        MembershipUser someUser = CustomerContext.Current.GetUserForContact(target);
    .
    .
    }
.
.
}
Another interesting entity in the code snippet above is the public class CHelper in the namespace Mediachase.Ibn.Web.UI. This class contains several methods, among them the following method "GetFromContext" that lets us retrieve an object and cast it to the public struct PrimaryKeyId in the code snippet. The struct can be found in the namespace Mediachase.BusinessFoundation.Data for further investigation. By this key the Business Foundation contact (a registered customer) is loaded for further processing.
public static object GetFromContext(string key)
{
    if (HttpContext.Current.Items.Contains(key))
    {
        return HttpContext.Current.Items[key];
    }
    return null;
}
The rest is more or less standard Business Foundation and Customer subsystem code to find the membership user and then lock out the security account. The following and final part below (not very elegant in this example, but okay for illustration) is the use of the "GetResFileString" method to send a message to Commerce Manager.
LockUser(someUser);
((CommandManager)sender).InfoMessage = CHelper.GetResFileString("Account Locked");
The result
The effect of the "ServerAction" class is the following:

A final example
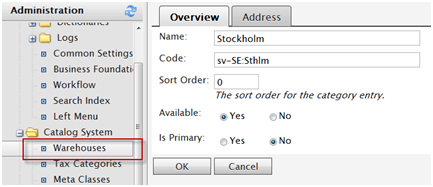
A final example in this article of Commerce Manager customizations is an alteration of the default system that could come in handy when several different warehouses at different locations are needed. The message here is once again the pattern of alteration in the back-end console, not the feature itself.
The example below makes the following alteration in the screen for editing a specific SKU (highlighted in red squares):

(Click to view larger image)
The tab "Custom Warehouses" is added to the Catalog subsystem UI and can later be used to manage a many-to-many relationship between SKUs and Warehouses. The current default implementation has a one-to-one relationship between SKUs and warehouses which could be a constraint to a site owner.
From a transactional database point of view this example is just a starter. More work and several additional capabilities need to be implemented to maintain integrity in the system. As stated before, the pattern showed here is not a complete solution.
Instead of creating a completely new setup to manage multiple warehouses, the existing warehouse management in MetaDataPlus will be used. See the following image for an example of one of these warehouses.
This gives a well-known and predefined pattern with data storage for addresses and contact information in the form of a WarehouseDto.
This DTO is then connected to a custom object in Business Foundation by code in a user control (the new Warehouse tab).
Data storage regarding the many-to-many relationship is handled by straightforward Business Foundation calls to a custom object that keeps track of the inventory in each warehouse.
How to add the tab
In the ...\EPiServerCommerceManager\Shared\Apps\Catalog\Config\View\Variation-Edit.xml file the following addition is done in the <Tabs> section:
<Tab name="Custom Warehouses"
    controlUrl="catalog/tabs/TestTab.ascx">
</Tab>
This path, as the "controlUrl" attribute reveals, points to a custom user control where a couple of interfaces needs to be implemented along with a specific inheritance.
- Inherit the CatalogBaseUserControl that in turn inherits the BaseUserControl that is specialized for Commerce Manager
- Implement the IAdminTabControl that provides the SaveChanges() method
- Implement the IDynamicParamControl that provides the NameValueCollection Parameters property
- Implement the IAdminContextControl that provides the LoadContext() method.
The LoadContext() and SaveChanges() are called by the framework. In the LoadContext method the Entry object which is edited is loaded by the following code added to the method:
public void LoadContext(IDictionary context)
{
    var entry = ((CatalogEntryDto)context["CatalogEntryDto"]).CatalogEntry;
    CatalogEntryDto.CatalogEntryRow er = (CatalogEntryDto.CatalogEntryRow)entry.Rows[0];
    _catalogEntryId = er.Code;
}
When the Entry itself is retrieved it's just standard procedures when it comes to coding.
In this example the SaveChanges() method calls Business Foundation for storing the specific in-stock values for the Entry.
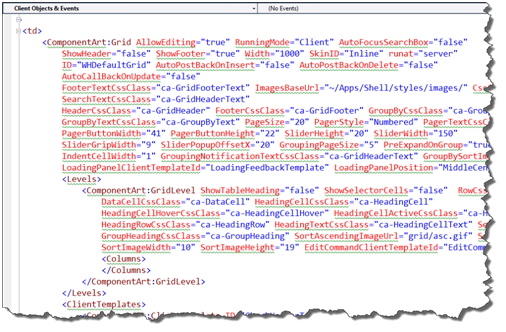
The markup for the user control is copied from the Assets tab and adjusted to fit the needs of the new warehouse user control. The below image contains the nice looking grid from Component Art.
Optionally, set the warehouse dropdown invisible in the EntryPricingEditTab.ascx at the following path ...\Shared\Apps\Catalog\Tabs\... as it no longer fulfills its purpose. The following screenshot is from the Pricing/Inventory tab when a SKU is in edit mode.

EPiLogue
Now that some customization patterns of the Commerce Manager business application is at hand I can only hope that this article will serve as a starter for further investigation and wish good luck in making Commerce Manager a personalized environment. More information regarding EPiServer Commerce will be available in additional articles at world.episerver.com. EPiServer Training can also assist in a broader view of our e-commerce platform.
Upcoming article
Next article will cover customized reporting and further customization options in Commerce Manager.