
Module Packaging in EPiServer CMS
If you have installed the new demo package available on EPiServer World, you have already used the new module installation feature in the EPiServer CMS Manager. This feature is rather new, and in my opinion one of the coolest things in EPiServer CMS 5.
Introduction
You need the latest version of the EPiServer CMS Manager to make everything work flawlessly. Installing pre-packaged EPiServer modules to extend the features of your site is of course neat, but did you know that you can actually package your own modules?
A module is just a zip file - but with some magic attached - which you'll learn all about right now!
So Why is This Cool?
This is a neat tool not only for module installations, but also to ship your deployment updates - especially where access to the production environment is limited, or if you are not allowed to do the deployment yourself. Apart from copying the runtime files (templates and dependencies) to the installation directory according to the relative paths within the zip, the EPiServer CMS Manager module installation can also import EPiServer data and perform web.config updates.
Include Runtime Files
You can use Unleash IT or a similar tool to extract the runtime files from your project. You will typically have a /bin folder for your .dll's, /lang for any language files, and so on.
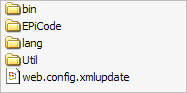
Sample structure for a module zip installation
EPiServer Data
Place any EPiServer content (new pagetypes, pages etc) in an .episerverdata export file into an Util/install folder.
Web.config Changes
All web.config changes need to be specified in a web.config.xmlupdate file located in the .zip root. It is possible to add, set and remove settings from the web.config file.
AppSettings using add
The example below will modify the first node of type <appSettings> where the attribute key has a value of ="UniqueKey". If that node does not exist, it will add a new node <add key="UniqueKey" value="abc" /> to the appSettings section.<?xml version="1.0" encoding="utf-8"?>
<modifications>
<add path="/configuration/appSettings">
<add key="UniqueKey" value="abc" __keyAttributes="key" />
</add>
</modifications>
NOTE that by omitting the __keyAttributes option, the configuration will modify the first node of type <add> that is a child of the node in "appSettings".
Custom configuration settings using add
<?xml version="1.0" encoding="utf-8"?>
<modifications>
  <add path="/configuration/configSections">
    <section name="EPiRssToPageSettings"
      type="EPiCode.RSSToPage.Library.RssSettingsSection"
      __keyAttributes="name" />
  </add>
  <add path="/configuration">
    <EPiRssToPageSettings disableModule="false"
feedUrl="https://www.coderesort.com/p/epicode/blog?format=rss"
rssTemplatePageTypeName="[EPiCode] ContentFromRss" />
  </add>
  <add path="/configuration">
    <location path="epicode/rsstopage" __keyAttributes="path">
      <system.web>
        <authorization>
          <allow roles="WebEditors, WebAdmins,
                  Administrators" />
          <deny users="*" />
        </authorization>
      </system.web>
    </location>
  </add>
</modifications>
The sample above will do three things:
1. Add a new configuration section to the configSections node.
2. Add the new section ”EPiRssToPageSettings” to the configuration node.
3. Add a location setting to secure my module folder.
Edit EPiServer Settings using set
EPiServer settings need to be prefixed with ”:epi”. The following example will enable globalization for all sites in the web.config file:
<?xml version="1.0" encoding="utf-8"?>
<modifications>
  <set path="/configuration/epi:episerver/
          epi:sites/epi:site/epi:siteSettings"
       name="uiShowGlobalizationUserInterface" value="true" />
</modifications>
Use xpath with a unique attribute to limit your update
If you want the sample above to only effect one of your sites - use applicationId as a unique value:
<?xml version="1.0" encoding="utf-8"?>
<modifications>
  <set path="/configuration/epi:episerver/epi:sites/
epi:site[@applicationId='/LM/W3SCV/19/Root']/epi:siteSettings"
       name="uiShowGlobalizationUserInterface" value="true" />
</modifications>
Remove settings
You can also remove settings from web.config:
<?xml version="1.0" encoding="utf-8"?>
<modifications>
  <remove
    path="/configuration/appSettings/add[@key='UniqueKey']" />
</modifications>
Additional Comments
- Path-attributes using <add> or <set> must point to an EXISTING node.
- Put the attributes that make your new node unique in the _keyAttributes list (comma separated).
- The installation will handle assembly redirects, and create a separate Upgrade.log file under
C:\Program Files\EPiServer\Manager\Modules\<yourmodulename>.
- You can put a myfile.systemsetup file in the package too, and have EPiServer set up the file access rights and also apply IIS (metabase) settings for you. Check your C:\Program Files\EPiServer\Manager\Download folder, and look for DefaultEPiServerSite.systemsetup for an example on how to apply these settings.