Custom validation in EPiServer XForm
Sometimes you might want to add some validation for the user input in a XForm. I recently did this for a customer of mine. If you can manage your validation with regular expressions you’re done. Just add a class to your project like this:
1: public class XFormValidation : EPiServer.PlugIn.PlugInAttribute
2: {
3: public static void Start()
4: {
5: // Add 24h time validation (HH:mm)
6: EPiServer.XForms.DataTypes.Types.Add("time", "([0-1]\\d|2[0-3]):([0-5]\\d)");
7: }
8: }
This validates the input as 24h time and will show up in the XForm editors “Validate as” drop down.
If you need to validate more complex things, like in my case, a dynamic range of real numbers and a Swedish social security number (personnummer), regular expressions isn’t enough and EPiServer doesn’t offer you any other way to do custom validation other then regular expressions. After discussions with my customer and the fact that the editors should be able to dynamically add a validation range we decided to use the “CSS class” property of the XForm controls as the place for the editor to state a validation range. We agreed on this form:
“<prefix><real number>|<real number>”
For example: “Range:-5,2|16,7” or “Range:0|100”
This could of course be solved with regular expressions but my customer would then need hundreds of ranges to choose from which would be very unpractical. Since the “CSS class” property isn’t used we decided to go for the approach above. A more elegant solution would be to add a extra field in the XForm editor, but then you need to reflect and modify EPiServer.XForm.dll which has its drawbacks.
The code
We do the validation in “BeforeSubmitPostedData”. Hook up the event as usual. I also added a asp:BulletedList to display messages to the user.
1: private void AddFailedValidator(String Message)
2: {
3: blMessages.Items.Add(new ListItem(Message));
4: }
5:
6: protected void FormControl_BeforeSubmitPostedData(object sender, SaveFormDataEventArgs e)
7: {
8: // Clear previous messages...
9: blMessages.Items.Clear();
10:
11: NameValueCollection objValues = FormControl.Data.GetValues();
12:
13: foreach (Control objControl in FormControl.Controls)
14: {
15: if (objControl.GetType() == typeof(EPiServer.XForms.WebControls.Input))
16: {
17: Input objInput = objControl as EPiServer.XForms.WebControls.Input;
18:
19: if (objInput.Attributes["class"] != null)
20: {
21: // Check if our prefix is present
22: if (objInput.Attributes["class"].StartsWith(XFormValidationHelper._RangeValidatorPrefix))
23: {
24: // Validate range
25: if (!XFormValidationHelper.ValidateRange(objInput.Attributes["class"], objValues[objControl.ID]))
26: {
27: e.CancelSubmit = true;
28:
29: AddFailedValidator(Translate("/templates/xformvalidation/errrange") + " " + XFormValidationHelper.GetRangeString(objInput.Attributes["class"]));
30:
31: // Color the control that failed
32: objInput.Attributes.Add("style", "background-color:red");
33: }
34: else
35: {
36: objInput.Attributes.Remove("style");
37: }
38: }
39: }
40: }
41: }
42: }
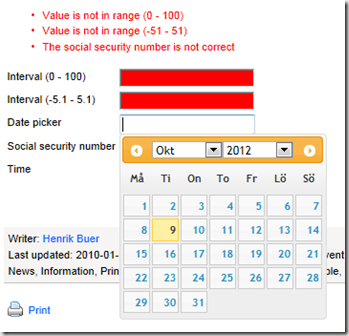
Here is an example of how it looks (we also see other validations and a date picker, but that’s another post)


Comments