Targeting multiple environments and machines – part 2/2
In the previous post we looked at why targeting multiple environments and machines can be a problem, and our approach to solving this problem. In this post I will walk you through our solution from a more technical perspective.
Our solution to this problem is achieved primarily by the use of NAnt 1 and some extensions we have built on top of that. Our setup allows us to support different configurations on not only a per-environment basis, but also on a per-machine basis in each environment. Our solution is stand-alone, not requiring any external references, and it is easy to setup. Best of all? We are offering it to you, free of charge! A download link for an example project can be found at the bottom.
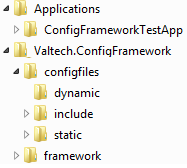
Let us dive right into it and take a look at an example project setup, see the figure below:
The interesting bit here is the “Valtech.ConfigFramework” project. The project is divided into a number of folders:
- configfiles/dynamic: This holds all the files that needs to be dynamically altered based on the target environment and/or machine.
- configfiles/include: This holds all configuration properties for each target environment and/or machine, needed to alter the files in “configfiles/dynamic”.
- configfiles/static: This holds all files that need to be included for a specific build configuration, but does not need to be altered, e.g. license files.
- framework: This holds all necessary files needed.
When building the project, the include files are merged with the dynamic files, and output along with any static files to the output folder( s). The actual folder structure looks like this:
Here, there is only one application named “ConfigFrameworkTestApp”, but you could have any number of applications using the same Valtech.ConfigFramework.
Dynamic and static files
In the previous solution overview, I showed an application alongside the configuration framework. In the figure below, two folders “License” and “Log” have been added to the application, and the “configfiles/dynamic” folder and “configfiles/static” folder for the Valtech.ConfigFramework project have both been expanded:
As you can see, there is one top-level folder below the “configfiles/dynamic” folder named “ConfigFrameworkTestApp”. This is simply the name of the application being targeted (see the physical folder structure figure above). One level below the application folder is a folder named @Log. Files from the ConfigFramework project are output to the application root directory, and the prefix @ tells the ConfigFramework to copy any files in this folder to the corresponding folders in the application
Below the “configfiles/static/ConfigFrameworkTestapp” folder there are three folders: development, prod and qa. These folders each act as containers for files specific to an environment. In the figure above, the qa-environment folder is expanded, and below this folder is a folder named @License containing a license file specific to this environment.
So in this case the following files are copied from the ConfigFramework project to the application:
| From (\configfiles\) | To (\Applications\ConfigFrameworkTestapp\) |
| dynamic\ConfigFrameworkTestapp\@Log\Log.config | Log\Log.config |
| dynamic\ConfigFrameworkTestapp\App.config | App.config |
| static\ConfigFrameworkTestapp\qa\@License\license.txt | License\license.txt |
The files from the dynamic folder, are altered based on configuration properties from the “configfiles/include” folder (more on this below) whereas the static files are simply copied to the application.
In this example we are only modifying and copying .xml and .txt files, but the ConfigFramework is not restricted to working with any specific file types, so you could for example add external .dll files as static files to be copied.
Include files
Now that we have an idea of what is going on, let us take a look at some actual examples. First take a look at the following figure:
As you can see, the “configfiles/include” folder is expanded, once again revealing the application “ConfigFrameworkTestApp” as the top-level folder. Below that there are a number of folders: development, prod and qa, each used for targeting a specific environment. However, as evident below the “configfiles/include/ConfigFrameworkTestApp/development” folder (which holds all properties for configuring the application in the development environment), there are two more folders: dk-lt-jani64 and dk-lt-jeth64. These are both actual machine names, and any properties defined for a machine will automagically override properties defined on the environment (i.e. development in this case) level.
Sounds confusing? Hopefully not so much if we look at an example. Below are a few lines from the App.config of the application:
<appSettings>
    <add key="HelloWorld" value="${HelloWorld}"/>
    <add key="GlobalWorld" value="${GlobalWorld}"/>
</appSettings>
And next are the contents of the configfiles\include\ConfigFrameworkTestApp\development\developer.properties file in the Valtech.ConfigFramework project:
<?xml version="1.0" encoding="utf-8"?>
<target xmlns="http://nant.sf.net/release/0.86-beta1/nant.xsd">
  <property name="HelloWorld" value="Hello World. I'm from development"/>
</target>
Notice the property with the name “HelloWorld”. When you build the Valtech.ConfigFramework, the value of this property will automatically replace the ${HelloWorld} token in any files under the configfiles\dynamic folder. Now, what if my personal HelloWorld value differ from the general development settings? Answer: I simply override the property in my machine specific developer.properties file – i.e. configfiles\include\ConfigFrameworkTestApp\development\dk-lt-jani64\my.properties:
<?xml version="1.0" encoding="utf-8"?>
<target xmlns="http://nant.sf.net/release/0.86-beta1/nant.xsd">
  <property name="HelloWorld" value="Hello World. I'm from my own machine"/>
</target>
But the ConfigFramework is not restricted to simply having key-value pairs. Supposing you only want to include parts of a Web.config for specific build configurations, and not others, you can do that too. For example, if I include the following line in my App.config file:
${SMTP}The ConfigFramework will look for a SMTP.property file under “configfiles/include”, and replace the line above with the contents of the file, e.g.:
<system.net>
    <mailSettings>
        <smtp>
            <network host="mailserver.mydomain.com" />
        </smtp>
    </mailSettings>
</system.net>
Putting it all together
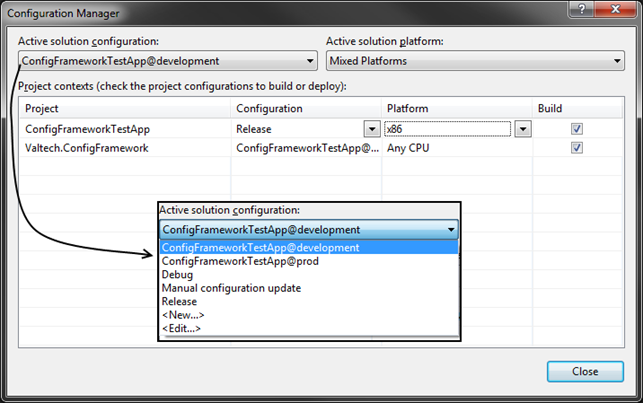
So how does all this work? The keen eyed reader may have noticed a number of .cmd files in the figures above, and this is where all the action is happening. Well, that and solution configurations in Visual Studio.
The figure above shows the different solution configurations for this solution. Depending on the active solution configuration, the application@environment (in this case ConfigFrameworkTestApp@development) will be built by calling the application@environment.cmd file. To create a new configuration, you simply need to copy one of the existing application@environment.cmd files, and rename it according to your Visual Studio solution configuration.
Wrapping things up
This solution, allow us to automatically build configurations for any number of environments and machines. It does require some initial setup, but once that bit is over, you don’t ever have to worry about manually merging config files from one environment with another. Secondly, if you pair this approach with a continuous integration package (e.g. TeamCity) you can automate the entire process of building and deploying your applications across multiple environments.
Now, for what you’ve all been scrolling to:
Make sure to replace the folder names “your-machine-hostname” with the name of your machine and try to play around with the different build configurations:- ConfigFrameworkTestApp@development
- ConfigFrameworkTestApp@prod
- Manual configuration update
The first two work as explained above, where as the third “Manual configuration update” bypasses the configuration builder which is useful if you would like to build your application without also building all configuration files.
Notes:
1. NAnt is a (free) .NET build tool based on Apache Ant, designed for developing software across multiple platforms. There are tons of examples on how to use NAnt on the projects homepage, so if you are new to NAnt I’d advise you to take a look at the project’s homepage here: http://nant.sourceforge.net/.


Comments