Azure DevOps and Episerver deployment API
With the release of the Deployment API, it's now possible to fully integrate existing CI/CD pipeline solutions with a DXC project. This blog post is using Azure DevOps as an example, but it's of course possible to use other tools to achieve pretty much the same thing. This pipeline is only a suggestion so it can of course be tweaked to better match the requirements of the specific project as needed.
If you want a quick start guide related to the API and how it can be accessed and used, this blog post might be of interest as well!
Creating a code package
First step is to generate a package that follows the standard described here. Your build process might vary slightly of course (for example the location of your nuget.config file), but an example yaml-file that works in Azure DevOps can be found in my fork of the alloy repo here. The goal is basically to produce the binaries needed by the web app and then zip them up and give the resulting package a name that complies with the naming convention described by the documentation linked above.
Once the above pipeline has been ran, it will produce an artifact that can be used as a deployment package in the release pipeline:
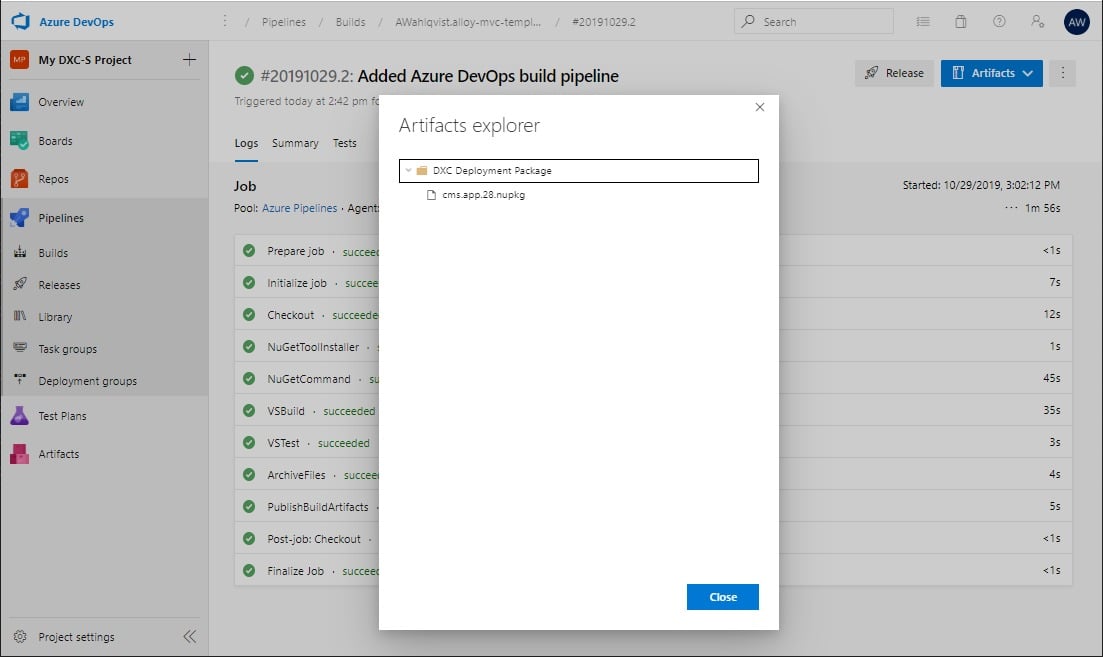
In this case, I've configured this build to run on each new commit on the master branch.
Creating a release pipeline
It's now time to create the pipeline that will be used to deploy the code package we created and promote it through the DXC project environments. At an overview this pipeline looks like this:
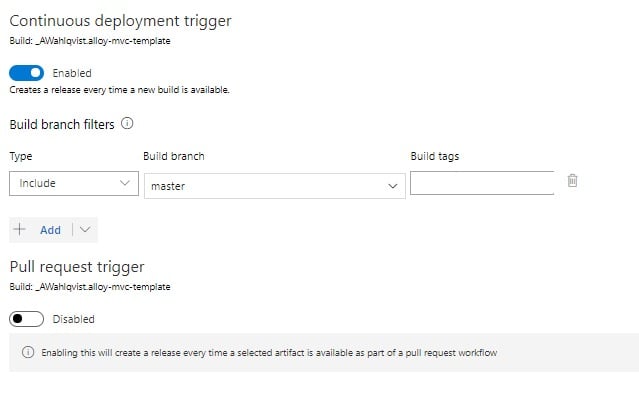
I've chosen to automatically trigger this release pipeline each time a commit is made to master:
Uploading the package
The first step of the release pipeline is to upload the code package so it's available for the deployment API. This can be done in various ways, but here's an example that works on the built-in agents (for example vs2017-win2016) that are available in Azure DevOps):
$env:PSModulePath = "C:\Modules\azurerm_6.7.0;" + $env:PSModulePath

$rootPath = "$env:System_DefaultWorkingDirectory\_AWahlqvist.alloy-mvc-template\DXC Deployment Package\"

if (-not (Get-Module -Name EpiCloud -ListAvailable)) {
    Install-Module EpiCloud -Scope CurrentUser -Force
}

$resolvedPackagePath = Get-ChildItem -Path $rootPath -Filter *.nupkg

$getEpiDeploymentPackageLocationSplat = @{
    ClientKey = "$(Integration.ClientKey)"
    ClientSecret = "$(Integration.ClientSecret)"
    ProjectId = "$(ProjectId)"
}

$packageLocation = Get-EpiDeploymentPackageLocation @getEpiDeploymentPackageLocationSplat

Add-EpiDeploymentPackage -SasUrl $packageLocation -Path $resolvedPackagePath.FullName
The first line makes sure that the PowerShell module required to upload the code package to blob storage is available (the Add-EpiDeploymentPackage cmdlet in the EpiCloud module requires that the AzureRm or the Az module exists). After that, I've specified the path to my artifact folder where the code package exists so I'll be able to specify the path to the code package that I'm about to upload.
Since I'm using shared infrastructure in Azure DevOps, the EpiCloud PowerShell module won't exist on the machine which is why I've added logic to install that as needed.
I've also added a few pipeline variables that will be used in this pipeline:

In this case, I'm using the credentials for the integration environment to be able to access the API and retrieve a upload location for the package (temporary link, which is why it will fetch a new one for each deployment), and then upload that package to the target blob storage account that is used to host the deployment packages for my DXC project. Most of these variables are probably self-explanatory, but it might be worth noting that you should set the ClientSecret as a "secret variable" to have it protected, and that you can set certain variables to be settable when a release is created (which could make sense for example the "UseMaintenancePage"-parameter).
If this step runs successfully, we now have a code package uploaded and ready to be used in a deployment.
Deploy package to Integration
It's now time to deploy this package to the integration environment and verify that it works as expected. The steps included in this stage are these:
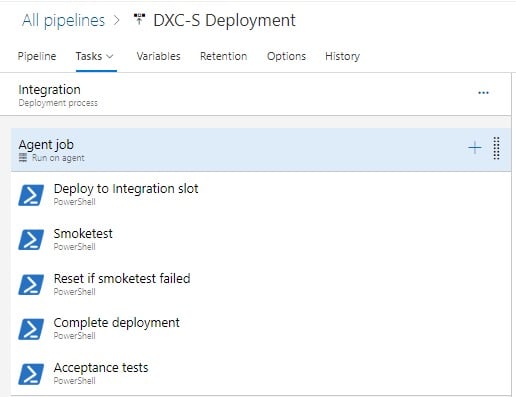
The first step, that deploys the code package to the integration slot looks like this:
$rootPath = "$env:System_DefaultWorkingDirectory\_AWahlqvist.alloy-mvc-template\DXC Deployment Package\"

if (-not (Get-Module -Name EpiCloud -ListAvailable)) {
    Install-Module EpiCloud -Scope CurrentUser -Force
}

$resolvedPackagePath = Get-ChildItem -Path $rootPath -Filter *.nupkg

$startEpiDeploymentSplat = @{
    DeploymentPackage = $resolvedPackagePath.Name
    ProjectId = "$(ProjectId)"
    Wait = $true
    TargetEnvironment = 'Integration'
    UseMaintenancePage = $(UseMaintenancePage)
    ClientSecret = "$(Integration.ClientSecret)"
    ClientKey = "$(Integration.ClientKey)"
}

$deploy = Start-EpiDeployment @startEpiDeploymentSplat

$deploy

Write-Host "##vso[task.setvariable variable=DeploymentId;]$($deploy.id)"
Pretty much the same principle as the previous script. Worth noting is the last line which creates a variable that will be used to complete/reset this deployment later. This variable is also specified under "Output Variables" and "Reference name" for the job step: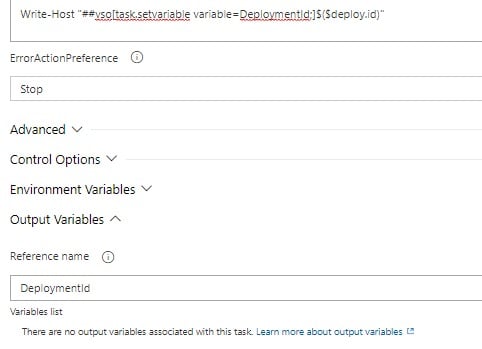
The reset task is configured to only run if a previous task has failed (see Control Options -> Run this task) which will then reset the environment if the smoketest step failed. If it works however, the pipeline will instead proceed with completing the deployment using the following code:
$rootPath = "$env:System_DefaultWorkingDirectory\_AWahlqvist.alloy-mvc-template\DXC Deployment Package\"

if (-not (Get-Module -Name EpiCloud -ListAvailable)) {
    Install-Module EpiCloud -Scope CurrentUser -Force
}

$completeEpiDeploymentSplat = @{
    ProjectId = "$(ProjectId)"
    Id = "$env:DeploymentId"
    Wait = $true
    ClientSecret = "$(Integration.ClientSecret)"
    ClientKey = "$(Integration.ClientKey)"
}

Complete-EpiDeployment @completeEpiDeploymentSplat
It would now make sense to run some sort of (preferably automated) acceptance tests on the integration site, if those succeed, we're ready to move on to the next stage, Preproduction.
Deploy to Preproduction
This stage will be quite similar to the Integration stage, but just to visualize how this might look for a real project, we can imagine that we have the following steps:
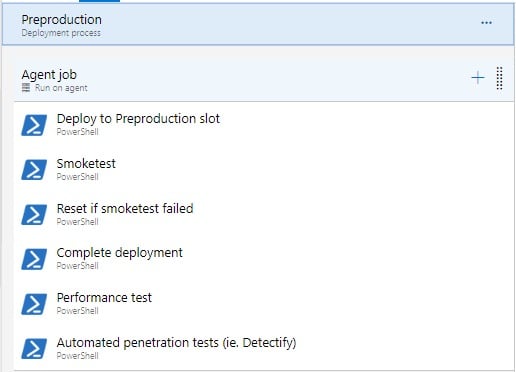
The difference compared to the Integration stage is that the environment in Preproduction will be better equipped to handle load, so a performance test would make more sense to run in this environment compared to the Integration environment. Could also make sense to run some automated penetration tests at this stage.
In my test project, I've also configured a "Post-deployment condition", this could for example be a QA lead that should approve the release before it leaves the Preproduction-stage, for demonstration purposes, I've added myself as an approver:
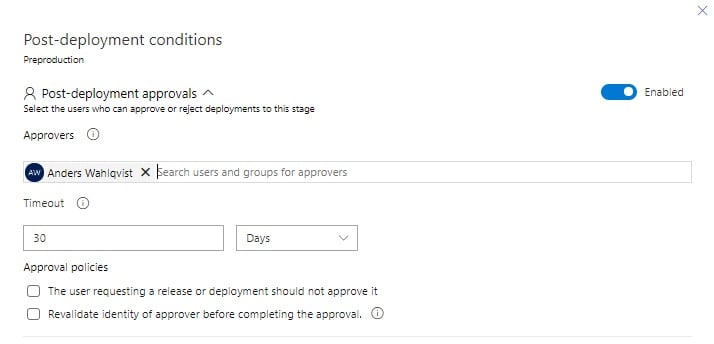
Note that "Gates" can also be used to for example trigger performance tests, penetration tests or just validate that other metrics are OK before leaving the Preproduction-stage.
Deploy to Production
For the production environment, I've chosen to add "Pre-deployment approvals" before the deployment is started, again, just for demonstration purposes I've added myself as the approver: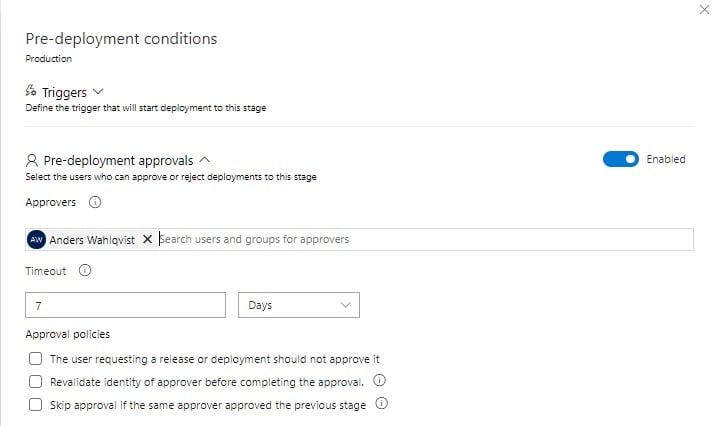
The actual deployment steps for this stage look like this: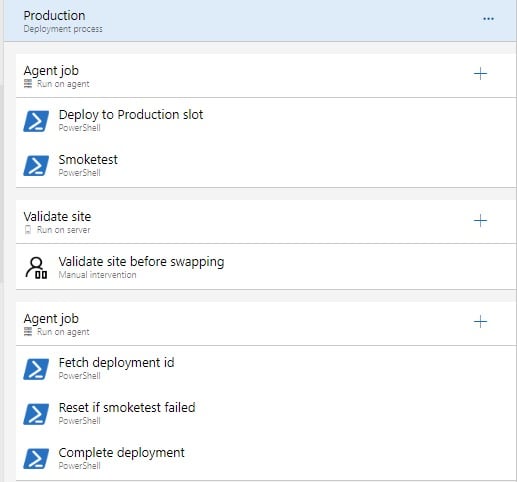
This allows the deployment to be validated before the swap to make sure it behaves as expected. Once it has been approved it's time to either reset (cancel the deployment) or complete the deployment (Go Live).
Here I use a slightly different approach to fetch the deployment id compared to the previous stages. The "Fetch deployment id" step looks like this:
$rootPath = "$env:System_DefaultWorkingDirectory\_AWahlqvist.alloy-mvc-template\DXC Deployment Package\"

if (-not (Get-Module -Name EpiCloud -ListAvailable)) {
    Install-Module EpiCloud -Scope CurrentUser -Force
}

$getEpiDeploymentSplat = @{
    ClientSecret = "$(Production.ClientSecret)"
    ClientKey = "$(Production.ClientKey)"
    ProjectId = "$(ProjectId)"
}

$deploy = Get-EpiDeployment @getEpiDeploymentSplat | Where-Object { $_.Status -eq 'AwaitingVerification' -and $_.parameters.targetEnvironment -eq 'Production' }

if (-not $deploy) {
    throw "Failed to locate a deployment to complete/reset!"
}

Write-Host "##vso[task.setvariable variable=DeploymentId;]$($deploy.id)"
Instead of using the deployment id returned from the Start-EpiDeployment cmdlet, I instead fetch deployments that has the status of "AwaitingVerification" for the Production environment. Both approaches have their pros and cons and fit different scenarios. An obvious risk with this approach might be that you can't be 100% sure you reset/complete the deployment started by the build but has the benefit of always finding the ID of an ongoing deployment if it exists if that's the goal.
Summary
I hope this blog post has provided some guidance on how the new API and corresponding PowerShell module can be used to setup a CI/CD pipeline for your DXC project, if you have any questions or thoughts, please feel free to reach out in the comment section below!


Nice, very informative article 👍
Great article. Thanks for sharing!
Awesome! Thank you, Anders!
In the Release, for the 'upload Package' step, what changes would I make for this to work with a self-hosted agent pool?
@Mike Malloy: You need to install the Az module (just account and storage related cmdlets are needed, but usually easier to install the whole thing) and the EpiCloud module on the VM (the latter is handled already by the snippet in the example above), should work after that!
Thanks, I got it going on my Windows 2012 Server with the following...
Needed the latest version of PowerShell
Installed Windows Management Framework 5.1
https://www.microsoft.com/en-us/download/details.aspx?id=54616
Then ran the following in PowerShell...
[Net.ServicePointManager]::SecurityProtocol = [Net.SecurityProtocolType]::Tls12
Install-PackageProvider -Name NuGet -MinimumVersion 2.8.5.201 -Force
Install-Module Az
Install-Module EpiCloud
Is there a way I can see if the upload package is successful?
I'm looking in Azure Storage Explorer but don't see anything.
Ah, that's right, the new Az module requires PowerShell 5.1 or greater and PowerShell Gallery requires TLS 1.2 (EpiCloud actually supports AzureRm as well but it's being deprecated this year I think).
If you successfully ran Add-EpiDeploymentPackage and it didn't throw an exception it should have worked, and you can try to do a deployment and specify the uploaded package name as described in the post, otherwise post another comment and I'll try to help out anyway I can!
Thx Anders! Your post has been a great source.
At Epinova we have created a Azure DevOps extension that contains tasks so that is very simple to use the DXP deployment API. No powershell is needed.
https://marketplace.visualstudio.com/items?itemName=epinova-sweden.epinova-dxp-deploy-extension
https://github.com/Epinova/epinova-dxp-deployment (Repo/Documentation)
@Ove, thanks! And that extension looks super useful and the repo seems to contain a lot of useful pipelines, well done! Really need to take that for a spin when I get a chance!
I'm sure a lot of people will appreciate this! Thanks to you and the Epinova team!
Encountered a broken link:
Creating a code package
First step is to generate a package that follows the standard described here.
Could someone repair it? It should probably lead here:
https://world.episerver.com/documentation/developer-guides/digital-experience-platform/deploying/episerver-digital-experience-cloud-deployment-api/deploy-using-code-packages/code-packages/
Feel free to delete this comment afterwards.
Thank you for pointing that out @Oscar, we're looking into it!
Hey Anders (or others),
Is there a change that needs to happen to the build paramters for an e-commerce website?
The artificat that is getting generated in the build pipeline, is placing commerce manager & CMS app on top of each other (I think) causing an issue. The code deploys perfectly to PAAS environments but the website throws an error on load but nothing in the logs.
Any thoughts?
Hi Aniket! Apologies in advance if I missunderstood you. But for commerce, you need to produce a separate package for the commerce manager (you can still deploy them at the same time by specifing both packages though, but they can't be deployed as one package/one file). The naming convention for the packages also needs to follow the guidelines outlined here. Hope this helps, otherwise get back to me again or reach out to support and we'll figure out what's wrong!