
[Tutorial] Creating your own menu inside the Episerver UI using MVC
A few weeks ago we started a project to create a new solution for the Episerver Education store (more on this in upcoming blog posts) and one of things we had to do was to create a new administrative system to handle this. In order to make it easily acceissble for everyone working for the Education department at Episerver we decided to add links in the menu to manage everything. Sounds simple? Well yes and no, tag along and I will explore some of the problems I encountered along the way.
(If you want to read more you can visit Episerver world page about menu items or visit my blog post about dynamic MVC menu routes for an example code and my aha moment.)
Here is what are we trying to achieve. Our own custom Education store menu with some links to various functions. In this tutorial I will go through all steps needed to create the menu below.
Menu items
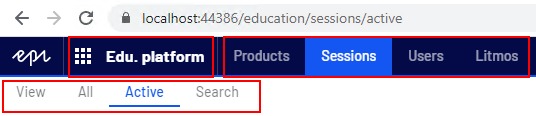
The menu consists of 3 elements:
- The name Edu. platform is what's called the "product name". This is (besides being listed above) also what you will see in the waffle menu (9 dot menu to the left).
- Next to the product name is menu level one.
- And finally below menu level one is (lo and behold) menu level two. Tip: If menu level two does not have any menu items, it will not be shown.
| Item path | Name | Parent |
| /education | Edu. platform | - |
| /education/sessions | Sessions | /education |
| /education/sessions/active | Active | /education/sessions |
Why is this important to know?
Well the menu is built on a child-parent relationship. If you have a menu item but no relation to the parent, it will not be display and when I say it will not be displayed, I mean it. This is what happens when one item is missing in the chain.
So when you are building your own menu, you need to keep in mind that you always need to have a parent for your menu items except for the product name item (which uses the /global as parent.)
MVC
Controller
Next up we need to create the a MVC controller for the URL. Once the method Active is called, we want to show the correct menu item. The code is standard .NET MVC and includes no EpiServer elements. (I have included a RedirectRoute. More about why later on.)
Controller class that exposes one method with the route {mysite}/education/sessions/active.
using System.Web.Mvc;namespace Episerver.Sessions{ [Authorize(Roles = "WebAdmins")] [RoutePrefix("education/sessions")] public class EducationSessionController : Controller { [Route(""), HttpGet] public ActionResult Active() { return RedirectToAction("Active"); }
[Route("active"), HttpGet] public ActionResult Active() { return View(); } }}
View
A blank cshtml page with one line to call @Html.Raw(Html.CreatePlatformNavigationMenu())
You can of course add whatever you want onto this view as long as you add the above line.
Menu Provider
Now that we have the controller and class ready, we can begin to construct the provider that will render the menu for us.
Start with a new class, add the attribute [MenuProvider] and implement the interface IMenuProvider.
using System.Collections.Generic;using EPiServer.Shell.Navigation;
namespace Episerver.Sessions{ [MenuProvider] public class MenuProvider : IMenuProvider { public IEnumerable<MenuItem> GetMenuItems() { // Menu comes here } }}
Menu Items
Before we create the menu I want to quickly go through the Menu Item class. Below we will use the UrlMenuItem which extends the MenuItem class by allowing us to define a url in the constructor at the same time as the text and path. No other difference exists between them.
A menu item consists of several elements but I will only go into a few important ones here.
| Name | Description |
| Text | Controls what text that should be shown in the menu. |
| Url | The url that is matched to display the correct item. |
| Path | The Epi UI menu path where it should be displayed. |
| IsAvailable | If the current user should see the item or not. |
Menu Sections
A SectionMenuItem is an extended MenuItem with some smaller css fixes for the older rendering of the menu. However, this was more part of the legacy rendering and you do not need this to implement a menu.
Adding menu items
Now it is time to setup the items that should represent the structure. In our example we only have one method so technically it makes sense to only show the menu at level one. However, for the sake of this tutorial we will also do level two (like the picture shown above).
We start by adding a string to contain the base url followed by the product name. Add the following inside the class.
private readonly string PlatformPath = MenuPaths.Global + "/education";public IEnumerable<MenuItem> GetMenuItems(){ var items = new List<MenuItem>();
items.Add(new UrlMenuItem("Edu. platform", PlatformPath, "") { SortIndex = 10, IsAvailable = (_) => true });
// More items to be added here
return items;}
This will create the product name that is shown in the waffle menu. It has no url attached to it as it is part of the global menu.
The next steps are the sessions (level one and two) menu items. Remember that in order to achieve the structure above /education/sessions/active we need to create 3 items.
Add the following two items.
items.Add(new UrlMenuItem("Sessions", EducationPlatform + "/sessions", "/education/sessions"){ SortIndex = 20, IsAvailable = (_) => true});
items.Add(new UrlMenuItem("Active", EducationPlatform + "/sessions/active", "/education/sessions/active"){ SortIndex = 30, IsAvailable = (_) => true});
As you might have noticed from the above, the first parameter is the Text followed by the Path and lastly the Url. Now if you were to run the project you would see your own menu link show up in the waffle menu and if you click on it, it should show 1 menu level one item called Sessions and 1 menu level two item called Active.
Note: The Sessions item can also be created with a SectionMenuItem instead of a UrlMenuItem. The end result should be the same.
Child-Parent relationship (Path)
The structure is based on the path variable. This means that we do not have to explicitly tell Episerver who our parent is instead this is done for us by the MenuAssembler class that parses all items and their path property, and thus makes a menu structure for us. As I wrote in the beginning, all menu items except the product name item has to have a parent. An easy way to test this is if you omit the second item (Sessions) and run the code again. This will result in the menu being empty as no relationship can be found for the active menu item. 
Empty url (Url)
Under the MVC Controller I added an empty method that only redirected to the active method. The reason for this is that if you don't supply a URL then the menu provider will pick the first child item and use that as the url. This might be fine but in many cases you want to control the menu and don't leave it up to the framwork to determine the url. So it is advisable to always supply a url even if it is optional.
Visibility (IsAvailable)
Lastly it is always important to include who should see this menu item. If this is not set then everyone will see the menu item which might not be what is intended. This should not be confused with access rights. Access to the method is controlled by the MVC Controller/Method and the Authorize attribute. The IsAvailable is for visualization only.
Example: IsAvailable = (_) => PrincipalInfo.CurrentPrincipal.IsInRole("WebAdmins")
Tip: If you use the MenuItemAttribute then this will be detected automatically if you have an AuthorizeAttribute tag for the specific method.
Different menues
In the example I used the MenuPaths.Global constant. There are however a few more possibilities like MenuPaths.Help, MenuPaths.User and MenuPaths.UserSettings that lets you put your menu items in different areas.
Inner workings
The inner working of Episerver is fetching all MenuProviders using reflection. (What, did you think yours was the only menu provider? No there are plenty of them and they are used to present different parts of the UI.) During start-up, all providers are loaded using the ServiceLocator - if they expose the attribute MenuProvider.
There are a few classes that are responsible for the menu such as the MenuHelper (responsible for generating the menu code), NavigationService (middle layer that loads the menu items and returns them in the correct order to the MenuHelper) and the MenuAssembler (responsible for loading all MenuProviders and organize the menu items and their relations).
Items are picked on a first come, first serve basis - same as routes in MVC - which means that, if you have 2 items that matches then the first one will be picked not the second one.
Why is this relevant?
Well you might see a different result than you expected to see. The reason is that the MenuAssembler is organized by depth of the path (/ = depth 1, /education = depth 2, /education/sessions = depth 3 etc) and not by the property sort order. Which means that if you have 2 items then the one with the shortest path will be picked before the one with the longer path. Therefore try to always have unique urls.
Avoid this:
/education/sessions
/education/sessions/list
In favor of:
/education/sessions/active
/education/sessions/list
Wrapup
I hope that you have gotten better understanding of the menu and how to create one yourself.
Finally, the cleaver one will have noticed that I have not included dynamic routes in the tutorial above. The reason is that this requires some extra effort and you can read about it in my blog post here.
Good walkthrough! Thx Patrik!