This topic describes various environment-specific configuration options in Optimizely Digital Experience Platform (DXP), such as restricting access, or applying specific configurations or configuration transforms, when deploying.
In this topic
- Environment-specific configurations
- Events and BLOB providers
- Configuration transforms
- Custom maintenance page
Environment-specific configurations
When you deploy to a production environment, ensure that the correct configurations are applied. In a Production environment, you should never use credentials, tokens, or endpoints from a Preproduction environment.
Environment-specific configurations are also useful if you have an e-commerce site with payment provider methods that you do not want to run in a test environment, or if you want to apply specific log rules for an environment.
Adding the configuration
Add the environment-specific configuration in web.config for your web application. Alternatively, you can store the settings in the database and retrieve the settings based on environment name by adding the specific configurations for the environments (integration, preproduction, production) where you want them to apply.
Note: See the Azure portal to identify the environment names, see Accessing Azure information to get access.
Identifying the environment
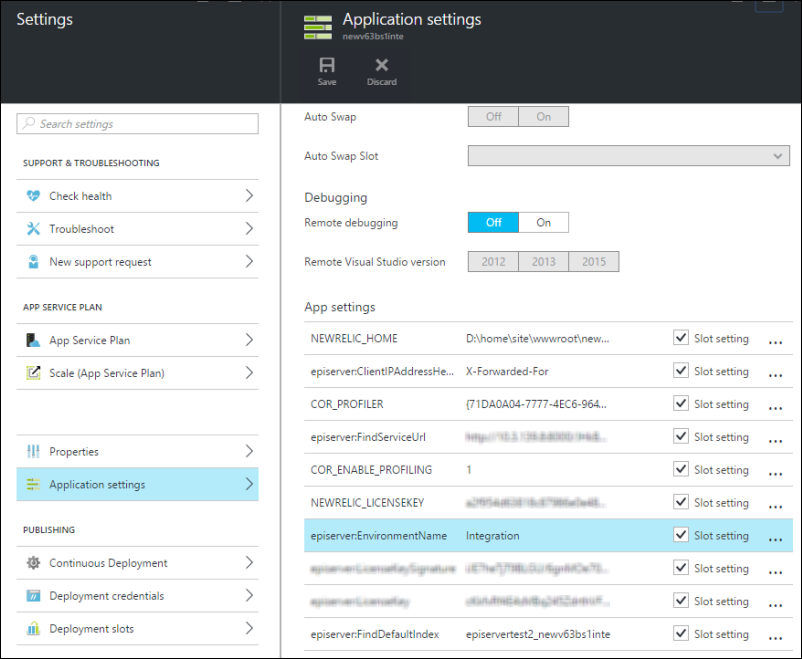
To apply a specific configuration, you need to identify the environment name at runtime using episerver:EnvironmentName. You can retrieve the defined name for each environment setting from Application settings in Azure Portal.
Add the configuration for each environment requiring a specific configuration.
Using the configuration
To apply a specific configuration and identify the environment at runtime, use the following code:
ConfigurationManager.AppSettings["episerver:EnvironmentName"]Applying this where needed picks the correct configuration for the running environment.
var appSettings = ConfigurationManager.AppSettings;
var environmentName = appSettings["episerver:EnvironmentName"];
if (environmentName == null || environmentName.Equals("Integration"))
{
    // TODO: use Integration configuration parameters
}
else if (environmentName.Equals("Preproduction"))
{
    // TODO: use Preproduction configuration parameters
}
else if (environmentName.Equals("Production"))
{
    // TODO: use Production configuration parameters
}
Defining site context
The following example defines and uses specific payment gateways and shipping methods for environments in an Optimizely Commerce solution based on Optimizely Customer-Centric Digital Experience Platform (DXP).
Create a class to act as a global context for the site.
using EPiServer.ServiceLocation;
using System;
using System.Configuration;

namespace EPiServer.DxcSite
{
    [ServiceConfiguration(Lifecycle = ServiceInstanceScope.Singleton)]
    public class DxcApplicationContext
    {
        private DxcEnvironment _environment;
        public DxcApplicationContext()
        {
            var setting = ConfigurationManager.AppSettings.Get(“episerver:EnvironmentName”);
            if(!Enum.TryParse<DxcEnvironment>(setting, true, out _environment))
            {
                //Default environment is integration;
                _environment = DxcEnvironment.Integration;
            }
        }

        public DxcEnvironment CurrentEnvironment
        {
            get
            {
                return _environment;
            }
        }
    }

    public enum DxcEnvironment
    {
        Integration,
        Preproduction,
        Production
    }
}
Defining environment-specific payment gateways and shipping methods
Currently, the best way to separate payment gateways and shipping methods is to use a specific prefix for their system names. For example, you can set Integration- for the payment gateways and shipping methods used in Integration, Preproduction- for Preproduction and so on. The prefix should be in line with the enum defined in previous steps, for easier matching.
Getting payment gateways and shipping methods
public IEnumerable<ShippingMethodDto.ShippingMethodRow> FilterShippingMethods(ShippingMethodDto dto)
{
    var environment = ServiceLocator.Current.GetInstance<DxcApplicationContext>().CurrentEnvironment;
    return dto.ShippingMethod.Select().Where(c => c["Name"].ToString().StartsWith(environment.ToString(),
     StringComparison.OrdinalIgnoreCase))
        .Select(c => (ShippingMethodDto.ShippingMethodRow)c);
}
Note: The code that displays the shipping method name to the user in the production environment might need modification to remove the prefix part.
Events and BLOB providers
You need to change some configurations for the website to work with Azure. The container attribute for the BLOB provider and topic for the event provider should be unique per site, within the same storage or service bus account. Therefore you need to update the mapping for BLOBs and event providers.
Important! Do not skip this step! If you do, assets are stored locally, and will not deploy properly to the Azure BLOB storage.
- In Visual Studio, open web.config and add the following configuration under the episerver.framework section.
Do not change the values for connectionStringName, because these are overwritten with the correct environment-specific values during deployment. Optionally, you can change the container and topic names mysitemedia and MySiteEvents to names of your choice. The storage container name must be in lowercase, for example mysitemedia, for DNS compatibility.
<blob defaultProvider="azureblobs"> <providers> <add name="azureblobs" type="EPiServer.Azure.Blobs.AzureBlobProvider,EPiServer.Azure" connectionStringName="EPiServerAzureBlobs" container="mysitemedia"/> </providers> </blob> <event defaultProvider="azureevents"> <providers> <add name="azureevents" type="EPiServer.Azure.Events.AzureEventProvider,EPiServer.Azure" connectionStringName="EPiServerAzureEvents" topic="MySiteEvents"/> </providers> </event> - Compile the solution (Build > Build Solution) and run it.
Note: Your local site displays an error message because the site is pointing to Azure after the configuration changes. This is corrected when you publish the project to Azure.
Note: When you deploy a website, you may want settings in the deployed application's web.config to be different from your local development web.config. Instead of changing these settings for your local installation (as done here), you can apply a transformation of the web.config file when you deploy to Azure to avoid breaking your local site.
Configuration transforms
DXP supports the use of configuration transforms to make changes to .config-files when deploying between environments. Even though the following example is for a web.config file, DXP supports this feature on any *.config file if the transform file follows the naming convention (OriginalFileName.{EnvironmentName}.config).
If you deploy using Deployment API, you can deploy the code package to the Integration environment directly instead of the conventional way of publishing the code from Visual Studio. However, when you do so, configuration transformation is applied on the code being deployed to Integration (if the deployment engine sees a valid transformation file to apply).
For example, if there is a web.integration.config, it is processed as part of the deployment flow. This is similar to when you deploy code from Integration to another environment using the DXP management portal. Deploying to Integration using Visual Studio does not apply any configuration transformation.
Adding transform files
Add a file calledweb.{EnvironmentName}.config (see Identifying the environment for naming conventions) at the same level/folder as the web.config file you want to transform. If you have web.config files at multiple levels/folders that needs transformation, add a transform file next to each one.
The {EnvironmentName}-part should correspond to the value of the application setting with the same name of the target environment for the deployment. For example, to apply a transformation file to web.config when deploying to the Preproduction environment, you add a file called web.preproduction.config that contains the transformation you need.
If you need to do configuration transformations in multiple environments (such as for both Preproduction and Production), then use multiple transformation files, which are applied either from the code package or one after the other as the deployment moves towards the production environment.
Note: The transform files always transform web.config file in the same way but there is still a difference in behavior depending on if deployment is done between environments, or if deploying using a code package. When deploying between environments, the transformation will be applied to the web.config from the source environment. When deploying from a code package, the transformation will be applied to the web.config in the code package.
To make configuration transforms work from Visual Studio you need to make sure you add the transformation files as content files so they are deployed together with the rest of the site.
Configuration transformation syntax
When inserting elements into the configuration, the element can be removed before inserting it so that it depends less on the structure of the base configuration. This has the added benefit of the transform behaving the same in both code package and environment to environment deployments.
Example:
<?xml version="1.0" encoding="utf-8"?>
<configuration xmlns:xdt="http://schemas.microsoft.com/XML-Document-Transform">
  <authentication xdt:Transform="Remove" />
  <authentication xdt:Transform="InsertIfMissing">
    <forms name=".EPiServerLogin"
           loginUrl="Util/login.aspx"
           timeout="120"
           defaultUrl="~/" />
  </authentication>
</configuration>
When transforming element attributes for appSettings for example, inserting the element first and then setting its attribute will ensure that it behaves the same regardless if the appSetting exists or not in the base configuration. This should also make the attribute-transformations easier to work with because they always behave the same.
Example:
<?xml version="1.0" encoding="utf-8"?>
<configuration xmlns:xdt="http://schemas.microsoft.com/XML-Document-Transform">
  <appSettings>
    <add key="AppSettingName"
         xdt:Transform="InsertIfMissing"
         xdt:Locator="Match(key)" />
    <add key="AppSettingName"
         xdt:Transform="SetAttributes"
         xdt:Locator="Match(key)"
         value="AppSettingValue" />
  </appSettings>
</configuration>
For documentation regarding the transforms, see Web.config Transformation Syntax (Microsoft).
Code package configuration transform
The base configuration file is taken from the code package and transformations are applied to all environments.
Example:
- Code package is uploaded to Optimizely storage. It contains web.config, web.Integration.config, web.preproduction.config and web.production.config.
- The application is deployed to the Integration environment. Use web.config as a base for transformations which a web.Integration.config are applied to and a new web.config is added to the Integration environment.
- The application is deployed to Preproduction and the web.preproduction.config transformation file is applied to web.config from the code package, creating a new web.config in Preproduction environment.
- The application gets deployed to Production, and the web.production.config file gets applied to web.config from the code package, creating a new web.config in Production environment.
Environment to environment configuration transform
The base configuration file is taken from the source environment to apply transforms to, transformations are applied to Preproduction and Production.
Example:
- The application is deployed to the Integration environment. It contains a Web.config for that environment (no transformation is done in Integration), web.preproduction.config, and web.production.config.
- The application is deployed to Preproduction and the web.preproduction.config transformation file is applied to the web.config used in Integration, creating a new web.config in Preproduction.
- The application gets deployed to Production, and the web.production.config file gets applied to the web.config from Preproduction environment.
The Production web.config is therefore the result of both web.preproduction.config and web.production.config being applied to the original web.config file that was used in the Integration environment. The transformation files need to follow the syntax described in Web.config Transformation Syntax (Microsoft).
Adding transform files for Commerce Manager link
When deploying Commerce Manager between different environments, the link remains the same across these. Therefore, in some cases it will be pointing to the wrong one. As previously explained, you can use transform files, which takes care of updating Commerce Manager links specifically for each environment.
For example, for deploying to Preproduction a transform file could look like this:
<?xml version="1.0" encoding="utf-8"?>
<configuration xmlns:xdt="http://schemas.microsoft.com/XML-Document-Transform">
  <appSettings>
    <add key="CommerceManagerLink"
         xdt:Transform="InsertIfMissing"
         xdt:Locator="Match(key)" />
    <add key="CommerceManagerLink"
         xdt:Transform="SetAttributes"
         xdt:Locator="Match(key)"
         value="{LinkToCommerceManager}" />
  </appSettings>
</configuration>
Custom maintenance page
During deployments where the site needs to be taken offline, you have the option to add a custom maintenance page that will be displayed during the deploy. See Custom maintenance page how to work with maintenance pages.
Related topics
- Azure websites – block web access to non-production deployment slots
- URL Rewrite Module Configuration Reference – Functionality Overview
- How to transform web.config when deploying a web application project (Microsoft)
- Blog post: Support for ApplicationHost transforms in DXP by David Buö
Last updated: Sep 28, 2021