User guide - EPiServer Social Reach
The user guides describes how to use EPiServer Social Reach for EPiServer CMS 6 R2, including step-by-step instructions and general concept information.
Table of contents
User guide for administrators: Setting up channels
Under Settings you can set up social media channels of your choice, and administrate which groups and users that will have access rights to send messages to these channels. To be able to set up channels you need to be a member of the Administrators or SocialAdmins group.
If you want to use Google Analytics to segment and track the referrals from the different channels, use the fields Campaign source and Campaign medium. By default the source is set to episocial and the medium to the channel name (for example, Facebook, LinkedIn or Twitter), see http://support.google.com/googleanalytics/bin/answer.py?hl=en&answer=55518.
For more information about virtual roles configuration changes, refer to EPiServer Social Reach Installation Instructions.
Adding a channel
Facebook and LinkedIn give you the option to post to the account wall or to another page/company page that the account is administrator for.
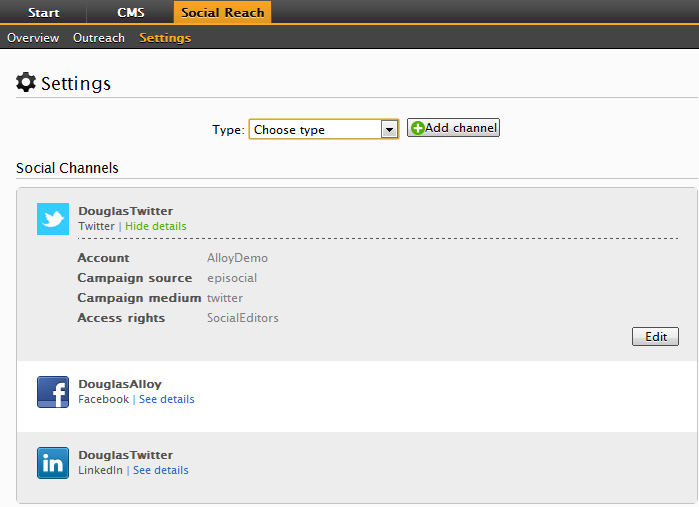
Add a channel as follows:
- In Type, select the type of channel and click Add Channel. You can select any of the following channels:
- Connect the channel to the social media channel by logging on to the account. The latest added channel will be placed at the top.
- If you want to change the default access rights, do the following:
- Add. Click Add Group and select the group or user you want to add access rights to.
- Remove. Click X for the group or user you want to remove access rights from.
Editing a channel
Edit a channel as follows:
- Click See details for the channel you want to edit.
- Click Edit and make your changes.
- Click Save.
Change access rights for a channels as described in “Adding a Channel”.
Deleting a channel
Delete the connection to a channel account as follows:
- Click See details for the channel you want to delete.
- Click Edit > Delete Account.
- Confirm your deletion by clicking OK.
User guide for editors: Sending a message to one or several channels
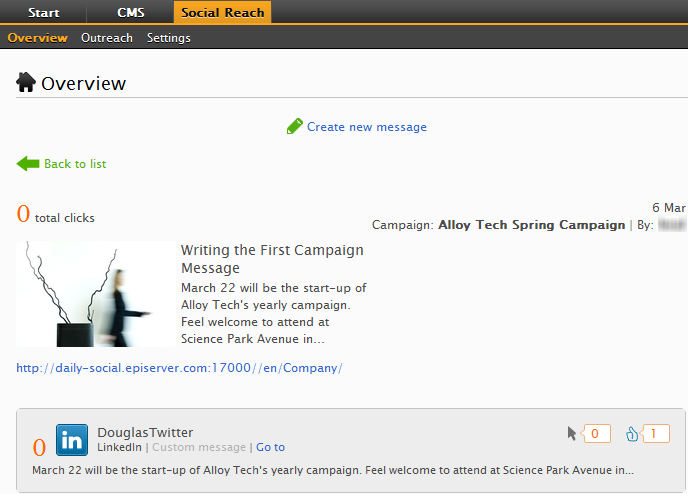
The Overview shows a summary of all campaign messages sent by your organization, with statistics of the number of clicks. The number of clicks is automatically updated every 10th second. For more information about each campaign, click the link for the message.
Note You can only get statistics of the number of clicks for links that leads to the sites that Social Reach is installed on.
Under Outreach you can create messages to send to the social media channels of your choice. To be able to create messages you need to be a member of the SocialEditors group.
You can create a default message for all social media channels. Or, you can create a default message for all social media channels and add a specific text for each channel.
If you want to use Google Analytics to segment and track the referrals in a specific campaign, use the field Campaign name. This makes it possible to follow the user when entering your site and for example track the number of conversions in a specific campaign, see http://support.google.com/googleanalytics/bin/answer.py?hl=en&answer=55518.
Creating and sending a message
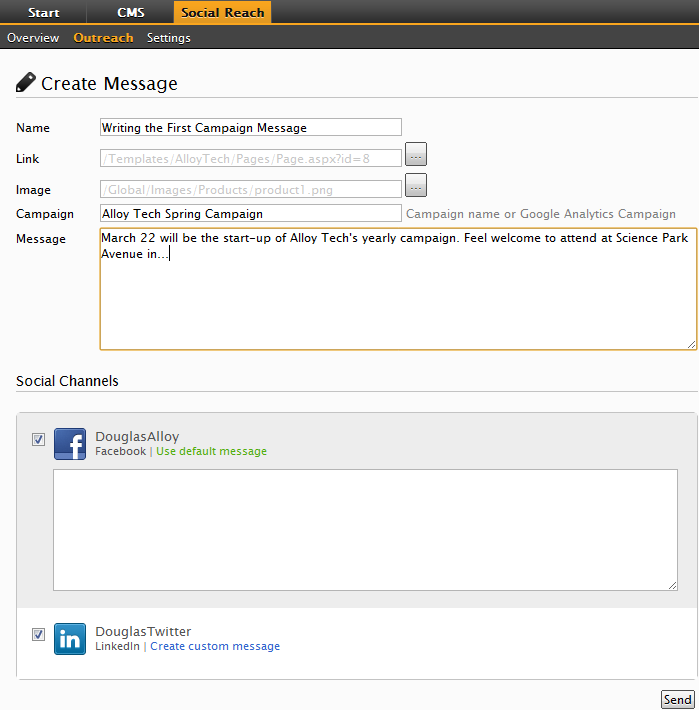
Create a message as follows:
- Click Create New Message.
- In Name, name the social message.
- In Link, select the link to a page, document or e-mail you want to include in your message.
- In Image, select the image you want to include to your message. Note that the available number of characters in will be reduced with 20 characters, which will especially affect Twitter messages.
The link and image is attached last in the message automatically. - In Campaign, type the name of your campaign to be shown under Overview, or leave blank. It could also be your Google Analytics campaign. Using this option you can track how your campaign is performing in the Google Analytics for EPiServer gadget, see Top Campaigns.
- In Message, type the default message to be shown for all channels.
- Select the channels you want to send the message to. If you want to send a specific message to any channel, click Create custom message for that channel and type the message.
- When you are done, click Send to send the message. Message sent shows in green.
Frequently asked questions
- What happens if the access to a channel expires?
- You cannot sent to the channel, and a warning symbol appears. You can get detailed information if you click the warning symbol shown in Detailed statistics.
- Re-authenticate the channel under settings.
- What happens if any of the social services is down?
- You cannot sent to the channel, and a warning symbol appears. You can get detailed information if you click the warning symbol shown in Detailed statistics.
- If a "rotating circle" is shown for a social message, what does that mean?
- A message is currently being sent.
- How come the click count can sometimes be over 5 clicks immediately after posting a social message?
- There are several robots scanning all social networks and following links in posted messages.
- Why has the reported Facebook Likes/Comments decreased to 0 for a posted message?
- The Facebook account has probably expired. Facebook only allows around 2 months before a specific account needs to be re-authenticated. Go to Settings and authenticate the account again.
For more information about the news about EPiServer Social Reach and its content, please refer to the article Launch of EPiServer Social Reach.
Last updated: June 20, 2012