Installation Instructions EPiServer Mail 5 R2
Product version: EPiServer Mail 5 R2
Introduction
This document describes the necessary steps to install the EPiServer Mail package. Installing EPiServer Mail is completed through the EPiServer Deployment Center. All the EPiServer Mail installation steps are described in this document.
Content
Prerequisites
The following prerequisite exists for EPiServer Mail:
Upgrading EPiServer Mail
Upgrade to EPiServer Mail 5 R2 as follows:
-
If you are running EPiServer CMS 5, you need to upgrade to EPiServer CMS 6. See the blog article How to Upgrade from EPiServer CMS 5 to 6.
-
Download, unzip the EPiServer Mail package from EPiServer World (login access required) and run setup.exe. If you are running 4.x versions of EPiServer Mail, upgrade to EPiServer Mail 5 before you upgrade to EpiServer Mail 5 R2.
Important! Uninstall EPiServer Mail 4.3 or earlier before installation, see Uninstalling EPiServer Mail 4.3. -
Open EPiServer Deployment Center (Start > Programs > EPiServer > Quick Links) and select website to install EPiServer Mail 5 R2 on. Information about how installation and deployment works in EPiServer CMS, refer to Deployment Center.
Installing EPiServer Mail onto a Website
When opening the EPiServer Deployment Center the different versions of EPiServer Mail currently installed on your machine will be listed. Select the task you want to perform under EPiServer Mail and click the Run button.
-
Install EPiServer Community Integration
-
Install EPiServer Mail on an Existing Website
-
Install EPiServer Mail without a Database
-
Install SQL Server Database
Installing EPiServer Mail on an Existing Website
Choosing this option installs EPiServer Mail on a website with a SQL Server database. Target platform is EPiServer CMS 6 R2 with or without Community Module. This installs all components required for EPiServer Mail to work. As certain components are shared between EPiServer Mail and the Community Module, a new separate database with required tables and stored procedures will automatically be installed for EPiServer Mail if the Community Module is not already installed. Proceed the installation as follows:
- Select the website which you want to install EPiServer Mail on.
- In this step information shall be entered about the EPiServer Mail database that will be created/used. In most cases creating a new database for EPiServer Mail is recommended. Although selecting an existing database should not be problematic.
- Select or Enter the name of the Server instance to use and the Port number (default) in the Port field defines the database server's default port. If you want to install to another database server port, change the value to the desired port number.
- Select the authentication mechanism to use when accessing the server
- Select the name of the database you intend using from the Existing Database list or enter the name of a new database.
- Either create a new user/login and password or select an existing user that has owner rights to the database (passwords must include lower and upper case, a digit and a non-alphanumeric character). In the Password box type the password associated with the specified user. Note! To run EPiServer Deployment Center you need to have owner access rights to access the database.
- Click Next.
- Create a user and the password that will have the role of Administrator for the EPiServer Mail database. If you do not use the WindowsRoleProvider to authenticate logging onto EPiServer CMS then the user created here will need to be used.
- User name. The username of the administrator user.
- Password. The password of the administrator user.
- Enter the correct information in the following form as described below:
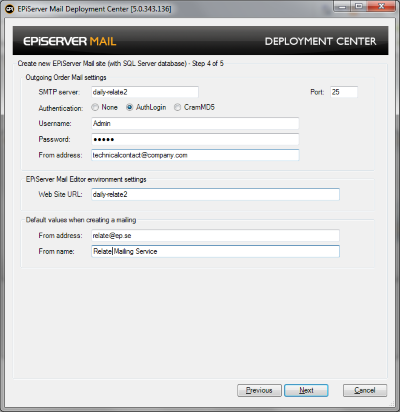
- SMTP Server settings
Server Address. Type the name of the SMTP Server instance to use and the port number. This is the mail server from where the e-mail messages will be sent, if it is the same server as where the EPiServer CMS website resides entering localhost should be sufficient.
Authentication None, AuthLogin, CramMD5. Determines the connection Authentication.
Username. Type the username if required.
Password. Type the password if required. - EPiServer Mail Editor Settings
Website URL. Type the web address of the site you will be running EPiServer Mail from.
From address. Type the e-mail address to a technical support contact who can solve any problems with the distribution of order mails from the EPiServer Mail installation to the EPiServer Mail Service, or who can act if the mail server you have defined under Server Address bounces the sent mailings. - Default values when creating a e-mail messages
From address. The e-mail address that is visible in the sent e-mail messages (can be used to mask the e-mail address from where the e-mail messages are sent, see above).
From name. The name of the sender of the e-mail messages.
- SMTP Server settings
- Select the Optional Modules to Install with EPiServer Mail:
- You can select Install EPiServer Community Integration and the following options if you want:
Community Source. The package will add integration files and settings to your EPiServer Community installation. Select this option if you are installing onto an EPiServer Community installation.
Community Search Source. The package will add search integration files and settings to your EPiServer Community installation. Select this option if you are installing onto an EPiServer Community installation.
- You can select Install EPiServer Community Integration and the following options if you want:
- The last step is a summary of all the steps that will be taken by the installation wizard. If the actions are correct, click Next to start the installation on the website.
Note! Preventing a Mailing to Be Caught in Spam Filters
If you have an SPF record in DNS for the domain of your sender e-mail address (From address), add include:_cluster1.episervermail.episerver.com to that record. For example, if no-reply @example.com is used as your sender e-mail address the DNS for example.com is subject for this addition.
If you do not yet have an SPF record it is still advisable to add one, allowing your regular SMTP servers as well as the include directive for the EPiServer Mail cluster. See http://www.openspf.net/ for further information.
Installing an EPiServer Community Integration
Choose this option if you want to install EPiServer Community components. This installs components which allows EPiServerMail to interact with the EPiServer Community Module, and supports the following:
- Sending mail to users in EPiServer Community with a specific set of attributes
- Sending mail to users in EPiServer Community selected by a User Search
It installs no databases and makes no database changes.
Installing EPiServer Mail without a Database (When you are mirroring)
Choose this option if you want to install EPiServer Mail without a database. The steps are identical to those described above in Installing EPiServer Mail on Existing Website except for step 2.
Target platform EPiServer - Load balanced environments, with a single database with tables and stored procedures which support the needs of EPiServer Mail.
This installs all components required for an EPiServerMail instance to work. By itself it installs no databases and makes no database changes.
Installing SQL Server Database
Choose this option if you want to install a database for EPiServer Mail. The steps are identical to step 2, 3 and 7 described above in Installing EPiServer Mail on an Existing Website. This option could be a suitable option when using multiple instances of EPiServer Mail in a load balanced environment (without a suitably configured database). It installs the database, along with database tables and stored procedures which support the needs of one or more EPiServer Mail instances.
Activating an Account
After installing EPiServer Mail 5 R2 refer to Activating EPiServer Mail for more information on how to activate an EPiServer Mail account.
Using Membership Provider to Create Groups
Using a membership provider other than EPiServer.Common.Web.Authorization.MembershipProvider (such as SqlServerMembershipProvider in combination with EPiServer.Common.Web.Authorization.IntegrationMembershipProvider or EPiServer.Common.Web.Authorization.Multiplexing.IntegrationMultiplexingMembershipProvider)?
You need to create the groups MailAdmins / MailEditors in the EPiServer CMS Admin system in order to distribute appropriate access rights to the users that should have permission to use EPiServer Mail.
Configuring Windows Authentication
If you are using Windows Authentication, the EPiServerCommonIntegrationProvider cannot handle the syncing of users and roles.
This is due to the fact that the ValidateUser(username, password) method in EPiServerCommonIntegrationProvider will never be called, as the WindowsAuthentication ticket stores everything needed to validate the user. So the user will be authenticated, but not synchronized. The Identity of the request is set, but the Name of the Identity will not be available in the EPiServerCommon database.
To solve this, you can use a HTTP Module included in EPiServer Common. Add the following module to your list of HTTP Modules in web.config:
<add name="EPiServerCommonWindowsAuthenticationIntegration" type="EPiServer.Common.Web.Authorization.IntegrationHttpModule, EPiServer.Common.Web.Authorization" preCondition="managedHandler" />Note: If you are not uisng IIS 7, remember to remove the preCondition="managedHandler" attribute.
Related topics
For Information regarding developing EPiServer Mail, see the EPiServer Mail Developers Guide.
Document last saved: