Reporting options in EPiServer Commerce Manager
This article is a walkthrough of alterations of the included reports in Commerce Manager as well as options in adding custom reports to various places in the application. In my previous article, the concepts of standard UI customizations in Commerce Manager were the focus. The same general concepts regarding commands, user controls and views seen in my previous article apply to the reporting subsystem as well. As the focus of this article is to show reporting options available, folder structures and configuration files will only minimally be discussed.
You can easily build your own custom reports and add them to Commerce Manager. Reports are created by using standard .NET and SQL Server Reporting Services reports. Creation and inclusion of both local reports as well as server side reports stored in an SQL Server Reporting Services server are supported in Commerce Manager.
Different options and different ways of working with reporting in Commerce Manager give freedom when it comes to developing a reporting solution for the EPiServer e-commerce platform.
EPiServer Commerce R2 SP1 requires, at minimum, SQL Server Express Advanced Services for database storage due to the SQL Server full-text index option. Reporting Services is included in that edition and I will use this functionality in some of the discussion below.
SQL Server Reporting Services from Microsoft is a fairly easy product to work with and it is conceivable to rapidly develop and deploy reports inside Commerce Manager. If you include the remote server option you will also be able to take advantage of the subscription services to distribute reports automatically in various ways.
Note: Not much effort is made to show stunning report design or present fancy images of reports in this article; the scope here is all about the first hand options that exist for reports in Commerce Manager and what can be achieved rather easily. The reports shown in this article are built on my demo installation, so there is no wealth of data either.
Included and added reports
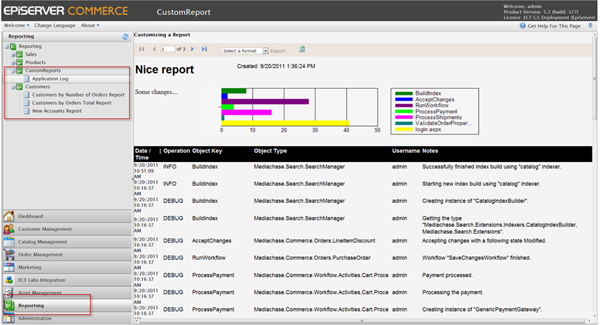
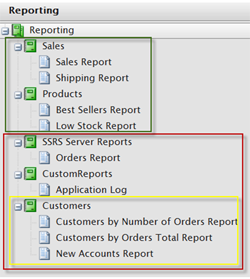 A few reports are included in the default installation (the green square in the image).
Although these reports are fully functional they are merely there for inspiration and will serve as a teaser. These reports, and further information below in this article, will show how to work with what is shipped with Commerce Manager in terms of reporting.
In this article we will mostly take a look at the custom added reports (the red square).
Note: There are additional reports installed by the default setup but commented out in configuration files due to some bits and pieces that not are in place (the yellow square).
The file structure of the default installation for the Reporting Subsystem follows the same pattern as for the rest of the subsystems. The reporting subsystem for the Commerce Manager is found at the following location: <installation path>\Shared\Apps\Reporting.
Folders in \Reporting\ and what they contain:
- Config - different configuration options for the reporting subsystem.
- Filters - sample filter for reports that have parameters.
- Images - images used by the reporting subsystem.
- Reports - the reports deployed in the system.
The general pattern for the Reporting subsystem is that a user control hosts a Microsoft Report Viewer Control that will expose a certain report pointed to from the Report Control. Regardless of the two options, server side or client side, the pattern for reports is the same.
Client side (local reports)
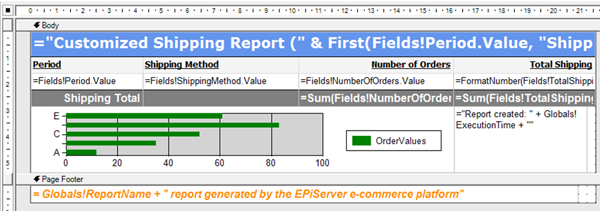
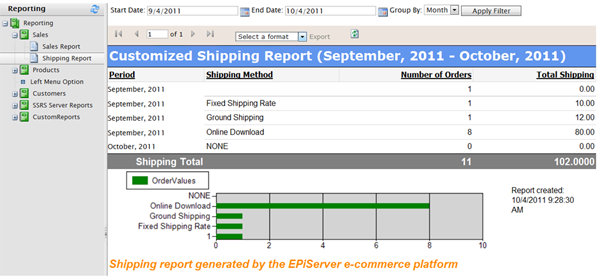
To start, I will simply show alteration and customization of the included (and by default visible) reports. The report definition is built on a predefined XML schema so it is fairly easy to open the report for editing in Visual Studio and alter the definition, as the image below shows. The report altered here is the included Shipping report.
The following image is from Visual Studio where the report definition is loaded and altered. Altered in the original report are formatting, expressions and an added chart.
When saved, moved and executed it incarnates as the following image shows.
In our documentation of EPiServer Commerce we have a topic on how to add custom reports to Commerce Manager. At the very end of that guide there is a link for downloading the Visual Studio project used in the example of the guide. When the project is cleaned up a bit and adjusted to fit the specific installation where this report shall serve, it is a nice example and includes both a custom client side report and a custom server side report.
Note: The structure of configuration in general has changed since the guide was written. The @.xml file referred to in the guide is replaced by the LeftMenu.xml in Commerce R2. The guide also mention a file with the name of Reporting.config, this file is not applicable to the R2 release.
The following file structure for the Commerce R2 release differs from what is stated in the guide: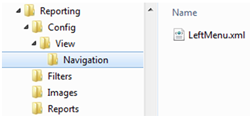
The LeftMenu.xml contains navigational items like Tabs, Links and commands (the former @.xml file)
The View folder implicitly contains the views (no need for the Reporting.config file)
Code example from the ..\Reporting\Config\ View\ApplicationLog.xml that has to be created (the partial content from the file Reporting.config)
<?xml version="1.0" encoding="utf-8"?>
<View xmlns="http://schemas.mediachase.com/ecf/view">
   <ViewConfig>
      <setAttributes id="ApplicationLog"
                     name="CustomReport"
                     controlUrl="Reporting/LocalApplicationLog.ascx"
                     help="Reporting"/>
   </ViewConfig>
</View>
The image below shows the same report that the example guide creates, except for some added formatting and a chart at the top. The example solution in the SDK-guide reads through the application log table in the Commerce Manager database. With some additional filtering of the rows in the table it could look like the following image.
Custom SDK-guide report (with additional alterations of the report itself)
Summary of the inner workings
The following are the highlights of how client side reporting in Commerce Manager works:
- A report layout is created based on the definitions of a dataset in Visual Studio. The report itself builds on a standard "reportdefinition" XML schema from Microsoft.
- In the code behind file for a user control that hosts the ReportViewer control, a SqlCommand executes a query string and populates a dataset. That dataset is then added to the ReportViewer control to feed a report with data. The ReportViewer control is configured with which report to load, and then the data binding is done.
- The report most often would reside in the Reports folder of the Reporting subsystem.
For a full description of how to create the above report I recommend our SDK-topic about how to add custom reports.
The hidden reports of the default installation
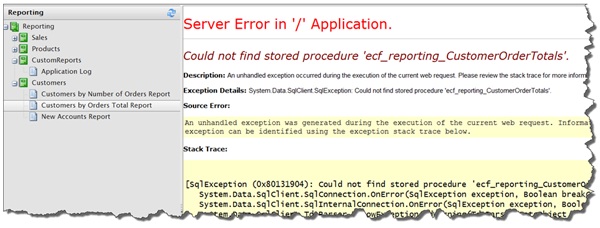
In the image below (the Customers reports node) are the ones commented out in the LeftMenu.xml configuration file in the default installation. If the Customers section (NewAccounts, CustomerOrderTotals and CustomerNumOrders reports) is uncommented in the LeftMenu.xml file of the Reporting subsystem, the reports show up and are almost ready to use. All of the user controls, views and report files for the reports are in place; however we are missing the stored procedures that assemble data from the database.
If the reports are executed, something like the following will appear:
The only thing that has to be done is the creation of these stored procedures. Create the stored procedures and keep an eye open for the parameters that the stored procedures should define. For example, the "New Accounts Report" expects the following parameters:
- @ApplicationId (uniqueidentifier)
- @Interval (varchar(int))
- @startdate (datetime)
- @enddate (datetime)
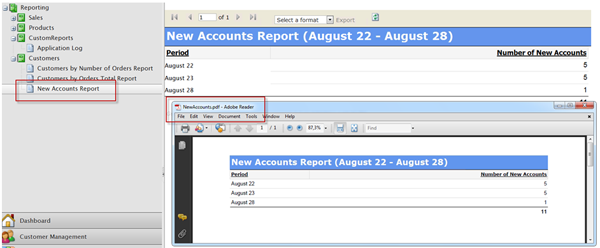
When the stored procedures are created with whatever query needed, the report will execute just fine. See the image below and also notice the overall possibility for all reports to export the report to either MS Excel or PDF format. For server side reports an option for exporting to MS Word also exists.
Server side reports
Use of server side reports into Commerce Manager follows about the same pattern as client side reports (local reports). The design phase of the actual reports is the same; what differs is the loading of data which is handled on the reporting server. With this a possible offloading of reporting from the e-commerce management server can be done, which can be very useful for separating reporting processing if extensive reporting is required.
The pattern of a user control containing a .NET ReportViewer control and the definition of a view (xml format) that points to the user control is the same as for the client side reports.
Specific to server side reports are the ReportServerCredentials, ReportServerUrl and ReportPath that the ReportViewer needs to know about so it can find the report at the server.
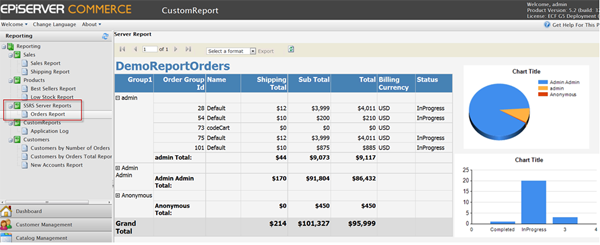
Note: In the SDK-guide (Creating Custom Reports) mentioned, and recommended above, the server side option for reports uses the application log report. In this article I use my own report to show how easy it is to build more appealing reports with drill-down and nicely formatted charts, as the image above demonstrates. As an example, creating, deploying and linking the above report consumed less than 20 minutes.
Yet another option
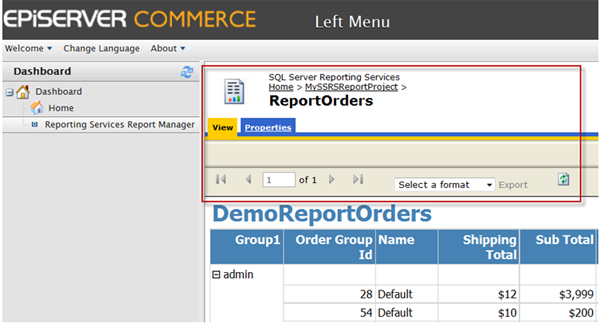
The Left Menu option of Business Foundation and Commerce Manager gives the possibility for adding several things to Commerce Manager; one of them is linking to a URL. The image below shows the Report Manager from SQL Server Reporting Services and a piece of the server side report in the previous image. The Report Manager could then be used, as shown in the image, to act as a starting point in the Commerce Manager Dashboard for server side reporting together with the included widgets at the "Home" link. As stated before, with server side reports an export to the MS Word format is added.
Another nice thing is that in the R2 release of EPiServer Commerce the "pick lists" and "packing slips" for purchase orders are built on standard client side reports. This makes the customization of these printable items easy and adjustable to fit the specific needs of a site owner.
EPiLogue
Strong support exists out of the box in Commerce manager for creating a wide variety of appealing and functional reports. Reports in the form of tabular presentation and matrices expand the visualization of captured data in our e-commerce platform. I hope this article has highlighted some of the options for creating and including a rich reporting experience in the back end business application Commerce Manager.
For more information about the compelling, powerful and easy to use SQL Server Reporting Services browse to microsoft.com/sql. At the solutions & technology tab chose Business Intelligence and Reporting Services. Also, plenty of guides, movies and examples for Reporting Services can be found on the rest of the web as the tool is popular and widespread.
