Using dotnet CLI to create your new Optimizely project
As everyone knows Optimizely CMS and Commerce have entered the .NET 5 era a while back. There is not yet much blog posts or Optimizely help documentation how you actually create the solution with projects and other needed files in a real world project. Lets face it, we don't create new solutions daily and even the seasoned developers might forget "what they were supposed to do when starting a new customer project". So here is my take to add to the existing guides and documentation.
What do we want to achieve?
- we want to have a solution
- which has two projects
- one for CMS
- one class library (lets pretend we will place our content models here)
- it has a nuget.config which includes the Optimizely NuGet feed
- (it is a shame that the .editorconfig template is not available with SDK 5.x but comes in SDK 6.x otherwise that would have been added here too)
- added to version control
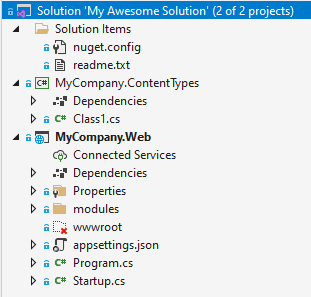
And the solution would look like this in Visual Studio (ignore the readme.txt in the image)

Prerequisites
- You need to have Visual Studio v16.8 or newer installed (comes with 5.0.100 .NET 5 SDK)
- Optimizely templates and Episer CLI tool installed
- see install instructions from the "Setting up development environment" documentation
- (optional: git, if not having ;-) then skip the git commands)
dotnet CLI commands to create the solution
// open command prompt and create a new folder which will hold the solution, projects and other files
mkdir MyAwesomeSolution
cd MyAwesomeSolution

// initialize git
git init

// OPTIONAL: this step is mandatory only if you have .NET 6 SDK(s) installed
// as the default is that the latest SDK is used, with global.json we can "lock" to a certain version
dotnet new globaljson --sdk-version 5.0.100

// open the created global.json in a text editor and add "allowPrerelease" and "rollForward" properties (and save it)
// we don't allow prereleases and we allow latest minor SDK version upgrades, so we stick to the 5.x versions
{
  "sdk": {
    "allowPrerelease": false,
    "version": "5.0.100",
    "rollForward": "latestMinor"
  }
}

// next create the solution file
dotnet new sln -n "My Awesome Solution"

// create a folder to hold the sources, its common to have the source files/projects under 'src' folder
mkdir src

// next add the empty CMS project to the src folder
// -n is used for the project name
// -o is used to specify where the output from template should be placed in
dotnet new epicmsempty -n MyCompany.Web -o src\MyCompany.Web

// next add the class library
dotnet new classlib -n MyCompany.ContentTypes -o src\MyCompany.ContentTypes

// next the projects need to be added to the solution
// NOTE! The --in-root is used so that the command doesn't create a "src" solution folder
// but places the projects directly under the solution, remove the --in-root option to create a solution folder
dotnet sln "My Awesome Solution.sln" add --in-root src/MyCompany.Web/MyCompany.Web.csproj
dotnet sln "My Awesome Solution.sln" add --in-root src/MyCompany.ContentTypes/MyCompany.ContentTypes.csproj

// next we need nuget.config
dotnet new nugetconfig

// and then we need to add the Optimizely NuGet feed to it
dotnet nuget add source https://nuget.optimizely.com/feed/packages.svc -n "Optimizely NuGet Feed"

// and then add the gitignore file
dotnet new gitignore

// and then stage and commit our files
git add -A
git commit -m "Initial commit."
Open the solution in Visual Studio
Now it is time to open the solution in Visual Studio, and you should be able to build it and all should be fine.
But remember the step where the nuget.config was added? At least I'm used to have the nuget.config visible in "Solution Items", but we never added that file to the solution using "dotnet sln add...", well there is a reason for that - currently you can only add project files with the "dotnet sln add" command, so if you want to have the file in "Solution Items" you need to do it in Visual Studio.
Running the created solution
So we created empy Optimizely CMS site but we have no database for it or edit/admin user.
As the default empty site is configured to use ASP.NET Identity we can use the dotnet-episerver tool to create the database and add an admin user. Minimal documentation for the tool can be found from the "Creating a starter project" documentation or from the tool itself by executing "dotnet-episerver --help" for general help and then same can be used for details on the command usage like "dotnet-episerver create-cms-database --help".
// create databse for CMS
// -S is the server and instance where the database will be created, so in my case local machine and SQLEXPRESS named instance
// -E means that integrated security aka Windows authentication is used (using my credentials) when connecting to the database server
// if the database server uses only SQL authentication or your identity don't have access then you shouldn't use -E but -U and -P to define the SQL credentials to connect to the server
// -dn is the database name to be created
// -du is the user to be created that is used by the website to access the DB
// -dp is the users password
dotnet-episerver create-cms-database src\MyCompany.Web\MyCompany.Web.csproj -S .\sqlexpress -E -dn "MyCompanyWeb" -du "mycompanywebuser" -dp "W3RySeCre7!2021"

// next add the "admin" user
// -u is the username
// -p is the password
// -c is the connection string name (see MyCompany.Web projects appsettings.json)
dotnet-episerver add-admin-user src\MyCompany.Web\MyCompany.Web.csproj -u mycompanyuser -p MySecret!2021 -e mycompanyuser@local.local -c EPiServerDB
After the above commands have been executed do note that adding the admin user generates a log file (log.txt), and naturally you don't want to have this added to version control, so delete the file (its placed to the solution root folder, where the command was executed from). Don't forget to commit your changes.
Now you can run the website and login to edit/admin views with the created user, so hit F5. Browser naturally tries to request the root of the website and as there is no content, you need to manually change the address to the default Optimizely CMS edit url "/episerver/cms/" and hit enter.

Happy happy, joy joy ;-)

Valuable! thx!
This is still correct except the package name has been updated to epi-cms-empty
Until I write a new post or update this..