Creating an EPiServer CMS 6 VB Site from Visual Studio
Based on CMS 6.0.530.0 and Visual Studio 2008
Not too long ago, one of our partners, Oshyn, wrote an excellent blog post on Creating an EPiServer VB Site from Visual Studio. The intent was based on the fact that the current Visual Studio (VS) integration is based on C# and some client requirements may be a project and templates based on VB. The original blog was based on CMS 5, and with the recent release of CMS 6, I thought it might be worthwhile to re-author it for the new version differences. Of course, all credit for the real work and steps involved go to our friends at Oshyn so I’m giving them a digital high five! I am, apparently, someone who just likes to get a good workout for my fingers during the course of the day by typing a lot. :)
_________________________________________________
Below you will find the necessary steps to create a fresh EPiServer VB project:
1. Open VS and create a basic C# EPiServer Project:
- Go to File~New~Project
- Select the project type C#
- Select the EPiServer Project item and name it whatever you like
- Select the OK button
- This will create a clean EPiServer Project with all of the needed components for an EPiServer web application
2. Create a common VB ASP.NET Web Application:
- Go to File~New~Project.
- Select the project type VB
- Select the ASP.NET Web Application item and name it whatever you like. I chose to use “MyEPiServerVBProject” so you will see references to this throughout this blog
- Select the OK button
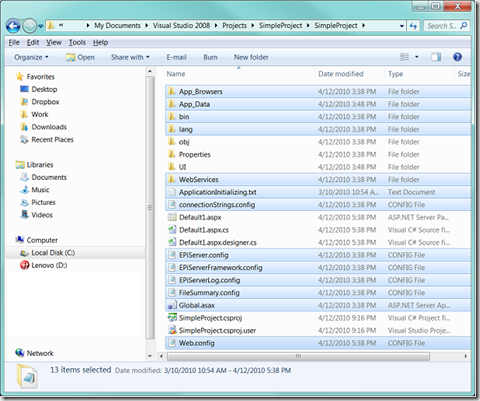
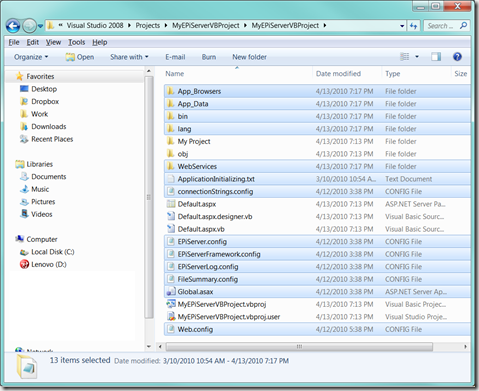
3. Now that the two projects exist you'll need to copy all of the EPiServer files that came with the EPiServer project template over to the standard VB project so that you can make it an EPiServer application. I suppose you could drag-and-drop items from Windows Explorer to the VS project. However, in my case I closed out my project and executed the copy operation in Windows Explorer so my steps will align with that path. So, close your two VS projects and copy each of the following files and folders from the C# project to the VB project. Note, since some of these items already exist you will likely be notified and asked if you'd like to overwrite them. Yes, you DO want to overwrite them.
Folders
- App_Browsers
- App_Data
- bin
- lang
- WebServices
Files
- ApplicationInitializing.txt
- connectionStrings.config
- Episerver.config (new with CMS 6)
- EpiserverFramework.config (new with CMS 6)
- EPiServerLog.config
- FileSummary.config
- Global.asax
- Web.config
Because everyone likes pretty pictures :), below is a screen shot of the files and folders to copy from the C# project:
to the VB project:
4. Now that you've moved over the necessary files and folders open both projects in VS.
5. Add the files and folders in the VB project to the project itself:
- Right click on the project
- Select Add~Existing Item…
- Select all files/folders added in step 3 above
- Select the OK button
The EPiServer files/folders should now be part of your VB project.
6. In the Web.config file for the VB project search for the following line of code:
- <compilation defaultLanguage="c#" debug="true">
And change the default language from “c#” to “vb”:
- <compilation defaultLanguage="vb" debug="true">
7. You will likely find another reference to C# in the web.config in the system.codedom section. Leave this as is with the compiler language of C#.
- <system.codedom>
- <compilers>
- <compiler language="c#;cs;csharp" extension=".cs" type="Microsoft.CSharp.CSharpCodeProvider,System, Version=2.0.0.0, Culture=neutral, PublicKeyToken=b77a5c561934e089" warningLevel="4">
- <providerOption name="CompilerVersion" value="v3.5" />
- <providerOption name="WarnAsError" value="false" />
- </compiler>
- </compilers>
- </system.codedom>
8. Next you have to update the project to use the appropriate port as specified in the Web.config file, typically 6666 by default. A quick search in EPiServer.config for “siteUrl” should result in the item you are looking for. Take note of the port in this URL.
- <siteSettings enableScheduler="true" enableEvents="true" enableRemoteEvents="true" errorMailHandler="~/util/SendErrorReport.aspx" globalErrorHandling="RemoteOnly" globalErrorMail="" httpCacheExpiration="0:0:0" httpCacheability="Public" httpCacheVaryByCustom="path" httpCacheVaryByParams="id,epslanguage" indexingDelayAfterPublish="0:0:20" indexingTextRegExp="[\p{N}\p{L}]{1}[\p{N}\p{L}-\._]*[\p{N}\p{L}]{1}" logServiceUrl="soap.tcp://localhost/TimeSpanAnalyzerView" mirroringFileWriteRetryDelay="0:0:5" mirroringHtmlTextEncoding="" mirroringRetries="5" mirroringRetryDelay="0:0:1" pageCacheSlidingExpiration="12:0:0" pageFolderVirtualPathProvider="SitePageFiles" pageOfficeStartId="0" pageRootId="1" pageUseBrowserLanguagePreferences="false" pageValidateTemplate="false" pageWastebasketId="2" remoteCacheListenerShortNames="" remotePageCacheSlidingExpiration="2:0:0" remoteWebServiceCulture="0" sgmlParserDecodeCharEntities="false" stringCompressionThreshold="0" stringDelayedLoadThreshold="0" subscriptionHandler="EPiServer.Personalization.SubscriptionMail,EPiServer" uiDefaultPanelTab="0" uiEditorColors="" uiEditorCssPaths="" uiEditorHeight="250" uiEditorValueOptions="0" uiEditorWidth="500" uiImageTransparencyReplacement="White" uiKeepUserLoggedOn="true" uiMaxVersions="0" uiOptimizeTreeForSpeed="false" uiSafeHtmlTags="b,i,u,br" uiShowGlobalizationUserInterface="true" uiTheme="" uiVersionMerging="true" urlRewriteExtension="" urlRebaseKind="ToRootRelative" operationCompatibility="None" pageStartId="1" siteDisplayName="MyEPiServerVBProject" siteUrl="http://localhost:6666/MyEPiServerVBProject/" uiUrl="~/EPiServer/CMS/" utilUrl="~/util/" />
9. Navigate to the Solution Explorer in VS, right click on the project, and select “Properties”.
10. In the project properties navigate to the “Web” tab and select the “Use Visual Studio Development Server” radio button.
11. Select the “Specific Port” option and set it to the port you have configured in EPiServer.config, likely 6666 if you left the default.
12. Then look at the “Virtual Path” setting. It should be your project name, in my case it is “/MyEPiServerVBProject”.
13. Since previously you copied your Web.config from your C# project to your VB project it will contain the C# project name. Clean this up by doing a search and replace in Web.config for the C# project name replacing it with the appropriate VB project name.
14. Similarly update the “siteId” name in the EPiSeverFramework.config file to your VB project site name:
- <episerver.framework>
- <scanAssembly forceBinFolderScan="true" />
- <siteHostMapping>
- <siteHosts siteId="MyEPiServerVBProject">
15. To wrap up the configuration you need to add the appropriate References. Go to the Solution Explorer in VS, right click on the project name, and select “Add Reference”.
16. Navigate to the “Browse” tab.
17. Even though you might not utilize all of the EPiServer functionality right now lets take the easy approach and add everything to make things simple. Navigate to the “bin” directory in your project, highlight all DLL’s here, and select the OK button. You should now have references to everything you need (and then some).
18. It’s likely that you want at least one page template that works in VB right? Open the Default.aspx page in Code View mode (right click on the aspx file and select “View Code”) and overwrite it with the text below (thanks again Oshyn).
- Imports System.Collections.Generic
- Imports System.Web
- Imports System.Web.UI
- Imports System.Web.UI.WebControls
- Imports System.Web.UI.HtmlControls
- Imports EPiServer
- Imports EPiServer.Core
- Imports EPiServer.DataAbstraction
- Imports EPiServer.Web.WebControls
- Partial Public Class _Default
- Inherits EPiServer.TemplatePage
- Protected Sub Page_Load(ByVal sender As Object, ByVal e As System.EventArgs) Handles Me.Load
- End Sub
- End Class
19. There’s some other things you can do as pointed out in Oshyn’s blog such as setting up other user and roles. Since EPiServer is set up for authentication via a Windows user out-of-the-box I left this step out of this blog and just relied on one of the admin accounts in my OS to log in. Please refer to Oshyn’s blog if you want to use a SQL, or other, user. Build and run the application in VS suing Ctrl+F5 or your favorite VS menu or shortcut options for the same.
20. After running the project you’ll likely end up at http://localhost:6666/MyEPiServerVBProject/Default.aspx with an empty page unless you put something exiting into the Default.aspx html. To get to Edit or Admin mode go to http://localhost:6666/MyEPiServerVBProject/episerver/cms/edit or http://localhost:6666/MyEPiServerVBProject/episerver/cms/admin respectively. For more information on navigating to Edit and Admin mode via a URL please reference a most excellent blog post written by my good friend…..myself. ;)
__________________________________________________
You should now have a basic EPiServer VB project to use as a starting point for building out Page Templates. I hope this helps for those planning to use VB with the EPiServer CMS. On the side I’m also working on creating a EPiServer VB project template for VS but I’m facing some time constraints finishing it due to other projects. I will post this when I am able to complete it. If someone wants to beat me to the finish line, please do so! Again, special thanks goes to Oshyn for their original blog post.


Comments