Setting up a Maintainable EPiServer Site – Part 1
Most of us have been there before. You are the new guy and your first assignment is to check out Project X from the source control and fix Issue #1847: Change H3 to H2 for sub headings on Article Page. “Great,” you think to yourself, “this will make sure I get familiar with things until they get me my new cell phone.”
You proceed with opening up source control, fetching the solution and try to build the site…
Compiler Error Message: CS0234: The type or namespace name 'Personalization' does not exist in the namespace 'EPiServer' (are you missing an assembly reference?)
You are riddled with missing references, code that does not compile and no clue why. You notice some references point to the GAC, others to the bin folder and yet more that points into some unknown entity in outer space. When asking around nobody really knows what to do because it works on their machine. An assignment that at first glance looks like a five minute job is quickly turned into a whole day activity which you teeth-grittingly delve into, presumably while cursing the CMS in front of you in ancient sumerian language.
The Cause
What you just experienced is your company’s lack of strategy in the arguably most critical phase of a project – the initial setup. This is where team members ponders higher level decisions which, for better or for worse, will have great long term effect on the project.
No matter how small the project, this phase should not be neglected. Hours here are well spent as this is where you might make or break future maintainability. Being able to get up to speed with a project in no time will make future employees and customers alike happier, allowing everyone to concentrate on the fun and important parts.
Over the years, I’ve had the dubious pleasure of working with people a lot smarter than me. This has allowed me to pick up some of the tricks that made them truly great developers. With this series, I intend to share some of that knowledge and hopefully making development with EPiServer a little more fun and profitable for someone out there. Starting from the very beginning with setting up a project, I will progressively delve further into the project life cycle. So, buckle up and read ahead…
The Remedy
For this setup, I will assume the following setup while trying to offer alternative solutions where applicable:
- Windows 7
- IIS 7
- SQL Server 2008
- Access to a windows share
Getting the site up and running
First, we will download the latest and greatest version of EPiServer. Proceed with opening the package and run setup.exe. For starters, install the Application files only. This will make sure some of the services needed by EPiServer gets installed. Please note that this will always(?) be needed on every machine running an EPiServer site, no matter how nicely set up your solution is.
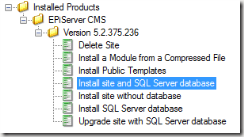
Now that your computer is set up with everything needed, fire up EPiServer Deployment Center and choose “Install site and SQL Server database”.
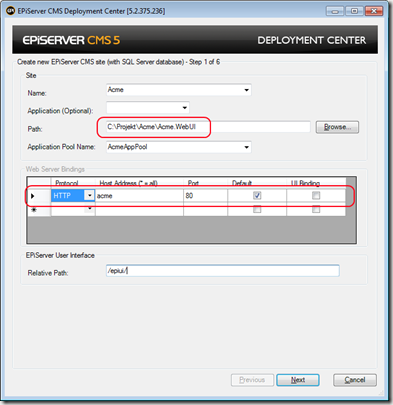
Let us call our new site Acme. I’ve added a binding for host address “acme” on port 80. Check out the path. This is just the Web UI for the project. We want it to be put under an “Acme” folder, since we will also want to put other things related to this solution there. For you unlucky enough to still be running Windows XP, there are alternatives to multiple sites, such as IISAdmin.NET.
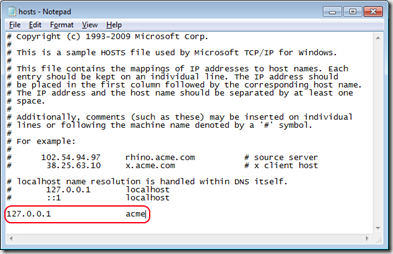
EPiServer Deployment Center will set up a site in IIS for you, but you will also need to open up C:\Windows\System32\drivers\etc\hosts with your favorite text editor and add one line.
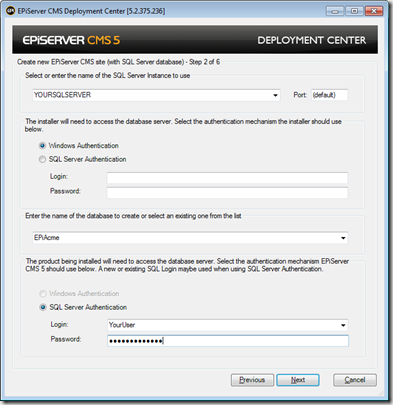
The next step is setting up a development database both you and your fellow team members can work against. This should be set up right now, so please resist any temptation to run against your local SQL Express installation for the time being just because it happens to be pre-selected in the dropdown list. Making this work now is crucial to the next part of this series, but let’s leave it at that for now.
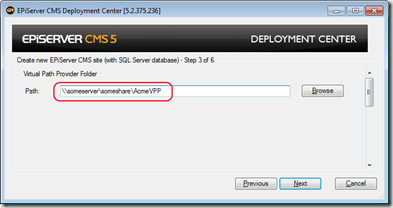
Now for the VPP folder. To make sure everyone on the team has the same content, we will use a windows share. Make sure you have access to a share where we can set up the file system, then enter it like so: \\someserver\someshare\AcmeVPP. If this is not possible at the moment, you can just enter a physical path and change it later under the virtualPath element in web.config. You will need full access to the file system being used.
This will require additional configuration which I will cover a little further down.
Now go ahead. Install the public templates. We can use it as a basis for this project. Pick your license file if you’ve already got it. It can be put into the root folder anytime later.
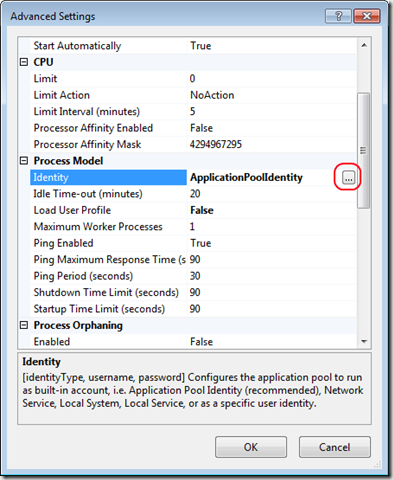
Click away and after a couple of seconds your new site will open up, or if you’ve already configured the site to use VPP on a share it will probably crash with saying something about file system permissions. This is easily fixed by changing the identity of the user running the application pool. Go ahead and change it to someone who has access to the share.
For you unlucky enough to be running Windows XP, you will have to change this in C:\Windows\Microsoft.NET\Framework\v2.0.50727\CONFIG\machine.config like so:
<processModel userName="yourUser" password="yourPassword" autoConfig="true"/>
Also, keep in mind that with IIS6 if you’re using Kerberos authentication you may need to switch to NTLM authorization for this site if you keep getting weird authentication problems on the site.
Cleaning up the solution
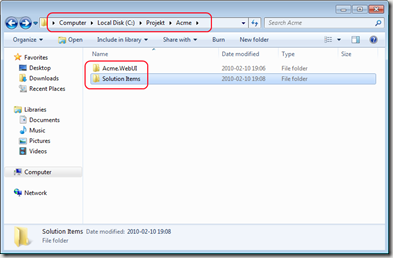
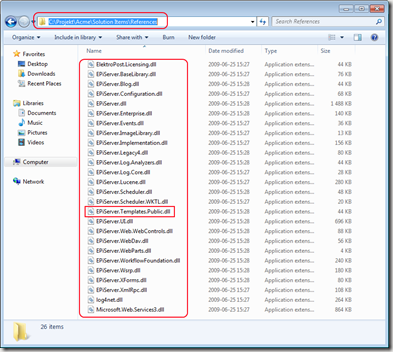
This is the critical point where you should stop and add a few extra minutes to set up the structure of your project. Before compiling anything at all, take a look in the bin folder. All the necessary references are there, but they should reside in their own folder. Proceed with creating a directory called “Solution Items” under your Acme folder.
Please note that the folder is not created under the web root. This folder will contain things like references, code analysis rules, build- and configuration files for continuous integration but let’s not get ahead of ourselves. For now, just create another folder called “References” under your newly created “Solution Items” and copy all assemblies from Acme.WebUI\bin there. Proceed with deleting EPiServer.Templates.Public.dll from both Acme.WebUI\bin and the References folder. We will rename the assembly name shortly.
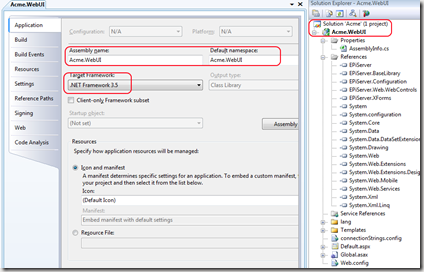
It is truly ridiculous to find a site with a PublicTemplates.dll or EPiServer.Templates.Public.dll in the bin folder, so let us open up the project file with Visual Studio and change a few things under project properties and on the project- and solution files. Make sure you change your Target Framework to 3.5 (or 4.0 if you wish).
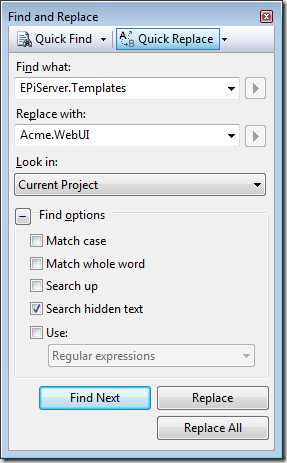
And now for replacing some namespaces… Pray to ye gods and click “Replace All”.
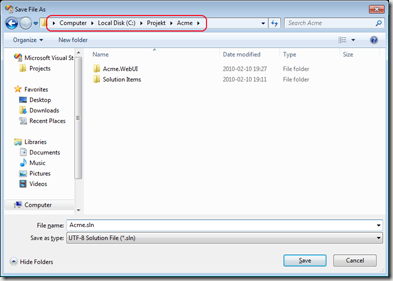
Now save the solution under your Acme folder, alongside with Solution Items and Acme.WebUI.
Try and build your solution. You will get tons of build errors like the ones below. Just double click each error and do a ctrl + . and then enter to add the using directives. Be wary, everything starting with Configuration is in EPiServer.Configuration.
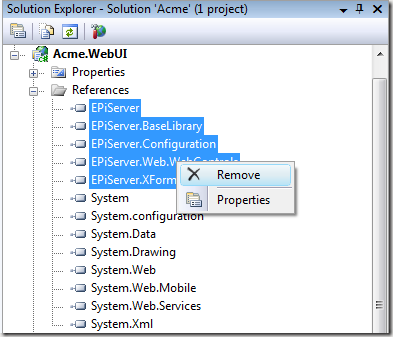
The next step is to remove all references to EPiServer.*…
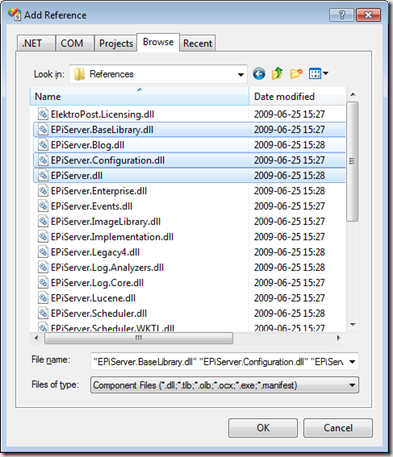
…and re-add them from your Solution Items\References folder.
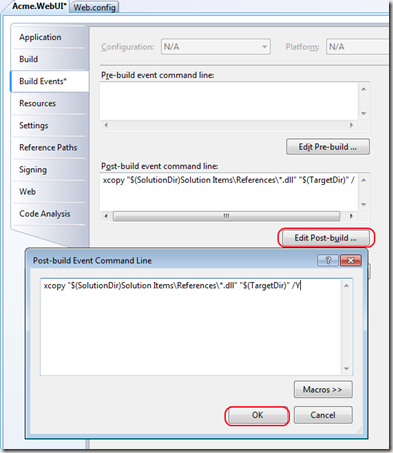
We now need to make sure this solution will work as soon as somebody grabs it from source control and compiles. We do not want the bin folder in source control. Let’s make a neat post-build script on Acme.WebUI!
Easy as that! Each time you build, all the assemblies needed will be copied over to your bin directory.
Optional
The last step I usually take is subject to some debate and pretty much a matter of taste. I usually remove the VPP bindings to the EPiServer application files and put them physically under the web root. I like to include this in the source control (but not included in the project file), to make sure a new developer gets everything he needs from the very start. If you decide to do this, you need to remove the bindings illustrated below and copy the folders to your web root. 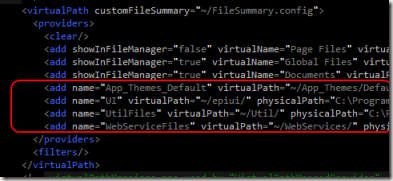
By now, you should be all set to put your solution in the source control. Make sure you do not include license files, obj- and bin directories and other things that should not be there.
If the team members are on very different machines, consider including a masterWeb.config which they can copy and modify locally themselves, allowing them to tinker without affecting other users.
The extra effort you just made will make future developers happy. If you are still wondering why all this was necessary, go ahead; delete the solution and grab it from source control again. I assure you, it will run after the first build. This is exactly what we were after.
The Effects
Aside from the obvious benefits in productivity, this type of work promotes a structural way of thinking about setting up projects and making technical decisions. It will leave something constantly nudging you, thinking always one step ahead. In short, you are becoming more of a developer and less of a coder.
Stay tuned for the next part in the series which will interest those of you that are still doing manual deployments and have no idea what other people does or have done on the project…


Good post!
/ Christer Åkerlund
Nice work :)
/ Johan Hörlén
Of course some parts are a matter of taste and some are more critical than others. But just the other day I spent a good four hours cleaning up a project from stuff like this after people who apparently were completely unaware of these issues, so your post is called for!
Very nice post :)
You have learned a lot, young Wachenfeldt! :-)
/ Johan D
I don't get anything! Isn't there some examples for PHP? Or even better - JavaScript?
Anyways, nice post! Nice to see you've set this nice blog up!
Good Luck Mannu-boy!
/ Herbert Cuba Garcia
great post!
maybe you could add the buildscript in the text so it can be copy/pasted
copy paste:
xcopy "$(SolutionDir)Solution Items\References\*.dll" "$(TargetDir)" /Y
/ Johan Hörlén
Great post, Johan!
A question, why the build script? Why is setting the "Copy Local" property on the Reference to true not enough?
Mattias, that is because I do not want to reference all the assemblies. But I still want them to be moved to /bin after a build. :)
/ Magnus von Wachenfeldt
Great article - anybody else had problems getting this to work in xp / iis6? After changing the machine.config to use the account required for the VPP we are getting:
aspnet_wp.exe could not be launched because the username and/or password supplied in the processModel section of the config file are invalid.
.. But these credentials are correct and the account is a local administrator. We also tried explicitly giving that account full control of the .net paths.
I like how the EPiServer community in general is a big case of "the blind leading the blind".
Just a warning. If you've followed this and subsequently upgrade, make sure that you remember to update your Solution Items and virtual path provider content (if you followed the optional last step). Then you won't waste the time we just did!
If creating this on a later version of EPiServer using the AlloyTech example site as a starting block you will also need to replace AlloyTech references so after replacing EPiServer.Templates with Acme.WebUI also replace Acme.WebUI.AlloyTech with Acme.WebUI
Also if you want to get rid of the Templates\AlloyTech folder structure:
1) Move all files and folders from within \Templates\AlloyTech to site root
2) Move Templates\Advanced to \Advanced
3) Serach and Replace '/Templates/AlloyTech/' with '/'
4) Search and Replace '/Templates/Advanced' with '/Advanced'
5) Update tblPageType in the db to reflect these paths (you may want to try a select 1st!):
UPDATE dbo.tblPageType
SET FileName = REPLACE(FileName, '/Templates/AlloyTech/','/')
WHERE FileName LIKE '%/Templates/AlloyTech/%'
UPDATE dbo.tblPageType
SET FileName = REPLACE(FileName, '/Templates/','/')
WHERE FileName LIKE '%/Templates/%'
UPDATE dbo.tblProperty
SET String = '~/Styles/Default/Editor.css'
WHERE String = '~/Templates/AlloyTech/Styles/Default/Editor.css'