Live Writer and Protected Blog Pages
![]() The EPiServer demo package includes blog templates with a partial implementation of MetaWeblog API which is used by Windows Live Writer for blog publishing. You can write, publish, edit and delete your blogs directly from Live Writer, which is quite a neat feature.
The EPiServer demo package includes blog templates with a partial implementation of MetaWeblog API which is used by Windows Live Writer for blog publishing. You can write, publish, edit and delete your blogs directly from Live Writer, which is quite a neat feature.
Recently I was involved creating an EPiServer site where blog contribution were central. The site was non-public site, restricted to a limited group of people, meaning Everyone did not have access to the site at all. As you will see below this created several challenges related to the Live Writer integration.
When setting up your account in Live Writer you specify your Blog start page, and your username and password.
Next, Live Writer will try to discover two files: an rsd file and a manifest file. Beginning from the weblog homepage URL, writer first looks for a file named “wlwmanifest.xml” within the weblog’s root directory. For example:
Weblog URL: http://www.myblog.com
Manifest URL: http://www.myblog.com/wlwmanifest.xml
If this probe is not successful then Writer downloads the weblog homepage contents and looks within the <head> for a <link> tag which points to a manifest.
If you look at the html of a Personal Blog Start page you will find the following lines inside the <head> tag:
<link rel="EditURI" type="application/rsd+xml"
href="http://dellm4400/util/xmlrpc/RSD.aspx?pageid=37"
title="edit uri" />
<link rel="wlwmanifest" type="application/wlwmanifest+xml"
href="http://dellm4400/util/xmlrpc/Manifest.aspx?pageid=37"
title="windows livewriter manifest" />
The manifest and rsd files themselves does not need to be protected, but since they are part of the Personal Blog Start page (and since Live Writer don’t support Forms authentication), EPiServer will return ‘AccessDenied’ and redirect to Login.aspx, quite the catch 22.
Getting around the problem
Keep in mind that I wanted to find a solution without requiring changes in the blog implementation itself (EPiServer.Blog.dll).
Step 1: Building a custom response for Live Writer
I started by overriding the AccessDenied method Inside the Personal Blog Start template (PersonalStart.aspx.cs):
public override void AccessDenied()
{
string userAgent = Request.UserAgent;
if (userAgent.IndexOf("Windows Live Writer") > -1)
{
// request from Windows Live Writer
StringBuilder responseBuilder = new StringBuilder();
// Building a custom response containing manifest and rsd for Live Writer
responseBuilder.Append("<html><head>");
responseBuilder.Append("<link rel=\"EditURI\" type=\"application/rsd+xml\" href=\"{0}util/xmlrpc/RSD.aspx?pageid={1}\" title=\"edit uri\" />");
// Pointing to a custom manifest file
responseBuilder.Append("<link rel=\"wlwmanifest\" type=\"application/wlwmanifest+xml\" href=\"{0}wlwmanifest.xml\" title=\"windows livewriter manifest\" />");
responseBuilder.Append("</head><body></body></html>");
string response = string.Format(responseBuilder.ToString(), Settings.Instance.SiteUrl.ToString(), Request["id"] as string);
// Clear Response before writing the new one
this.Response.Clear();
this.Response.Write(response);
return;
}
// Not Live Writer, business as usual
base.AccessDenied();
}
Now, Live Writer will get a custom response when trying to retrieve the manifest and rsd file. The custom response only includes links to the two files (similar to the html posted above), but now I’ve changed the url of the manifest to point to a custom wlwmanifest.xml file. I’ll explain below why we need to change the manifest file.
Step 2: Creating a custom manifest file
The manifest tells Live Writer what the blog supports and doesn’t support and it’s content is static regardless of the blog start page url. You can find more information about manifest files here.
In order to provide the information required to ensure an optimal WYSIWYG editing experience, Live Writer will try to download the blog’s theme. Because the default implementation of the manifest has no <views> section, Live Writer tries to publish a test blog item, but again it will fail because of missing access rights.
In other words, we need to specify views:
Using the output from the default implementation, I created the wlwmanifest.xml file and added a views section at the end.
<manifest xmlns="http://schemas.microsoft.com/wlw/manifest/weblog">
<options>
<clientType>Metaweblog</clientType>
<supportsCategoriesInline>Yes</supportsCategoriesInline>
<supportsNewCategories>Yes</supportsNewCategories>
<supportsNewCategoriesInline>Yes</supportsNewCategoriesInline>
<supportsHeirarchicalCategories>Yes</supportsHeirarchicalCategories>
<supportsPages>No</supportsPages>
<supportsPageParent>No</supportsPageParent>
<supportsPageOrder>No</supportsPageOrder>
</options>
<weblog>
<serviceName>EPiServer Blog</serviceName>
<watermarkImageUrl />
<imageUrl />
<homepageLinkText>View your page</homepageLinkText>
<adminLinkText>Manager your site</adminLinkText>
<adminUrl><![CDATA[{blog-homepage-url}?_c02_owner=1]]></adminUrl>
</weblog>
<buttons />
<views>
<default>WebLayout</default>
<view type="WebLayout" src="BlogItem.htm" />
<view type="WebPreview" src="BlogItem.htm" />
</views>
</manifest>
Step 3: Creating the view template
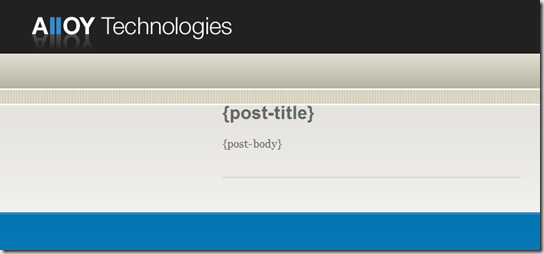
For simplicity I decided to use the same template for edit and view. I created BlogItem.htm simply by saving html output of an existing blog item, then removing all JavaScript, menus and static content.

The blogitem.htm for the Alloy technologies demo site.
It’s important that the template contains the {post-title} and {post-body} substitutable macros to indicate the respective locations of the post title and body within the template.
Complete these relatively simple steps and you can continue to use Live Writer against EPiServer sites, even if they are non-public.

Comments