
What news in the JavaScript API for the Episerver Perform 2.1.0 (Episerver Commerce 12.9.1)
As you all know, the release of Episerver.Commerce 12.9.1 was included a major change in JavaScript API for Episerver Perform version 2.1.0 (link to release notes)
In this post, I will show you what are changes and how to update the existed code.
Don't need TrackingMode app setting
In Episerver.Commerce 12.9.1, there is no longer exist TrackingMode in the appsetting. Since now, we can use both server to server API and javascript API in parallel.
To use server to server API, we need to add CommerceTracking attribute to the action of controller. Or call to tracking method in the IRecommendationService.
With javascript API, we are no longer had to call tracking from the server side. Just load epiRecommendation javascript class, create a tracking data object then send it to the server via proxy endpoint.
// In Layout.cshtml
<head>
    @Html.LoadTrackingAPI()
</head>
<body>
    @Html.Partial("_RecommendationsTemplates")
    @RenderSection("Tracking", false)
</body>
// In home page index
@section Tracking{
<script>
$(document).ready(function () {
var homeTrackingData = TrackingDataFactory.createHomeTrackingData();
epiRecommendations.track(homeTrackingData, null, Recommendations.render, {
sectionMappings: [{
area: "homeWidget", selector: ".recommendations-right", numberOfItemsToRender: 6
}]
})
});
</script>
}Collecting data from the client
As before, to use JavaScript tracking API, we need to set TrackingMode is ClientMode and call to Tracking Service in the controller. The purpose is that to collect the tracking data and set it to http context. Then it returns that data to the client later.
But now, there are no need to edit the controller. It means no need to build web application. Just create the tracking data directly from the View by using TrackingDataFactory javascript class.
<script>
    $(document).ready(function () {
       var refCode = '@Model.Product.Code';
       var productName = '@Model.Product.Name';
       var productTrackingData = TrackingDataFactory.createProductTrackingData(refCode, productName);
    }
</script>
With product tracking type, it supports the recommendation id for click tracking.
var recommendationId = parseInt(isNaN('@Request.QueryString["recommendationId"]') ? '0' : '@Request.QueryString["recommendationId"]');
if (recommendationId > 0) {
    productTrackingData["recommendationId"] = recommendationId;
}
We also setting to exclude recommendations, just tracking only.
productTrackingData["SkipRecommendations"] = true;The tracking data can be set the custom attributes, it supported types like datetime, double, long, decimal, int, bool and string.
productTrackingData["customAttributes"] = { 'marketId': Market.getSelectedMarketId() };Not calling directly to Personalization Service's end point from the client
Recently, the flows of JS tracking API works like this.
- Waiting the server side collecting data and rendering to the client side.
- When the page rendered in client side, the data will send directly to Personalization Service endpoint.
- Waiting response from Personalization Service and render in client with template.
The problem that if the data from server side was cached, then the JS tracking API will send the same data, include the client configuration will be cached.
The second problem is because JS tracking API will send directly to one endpoint. So it means not all of implemented Personalization Service will be used.
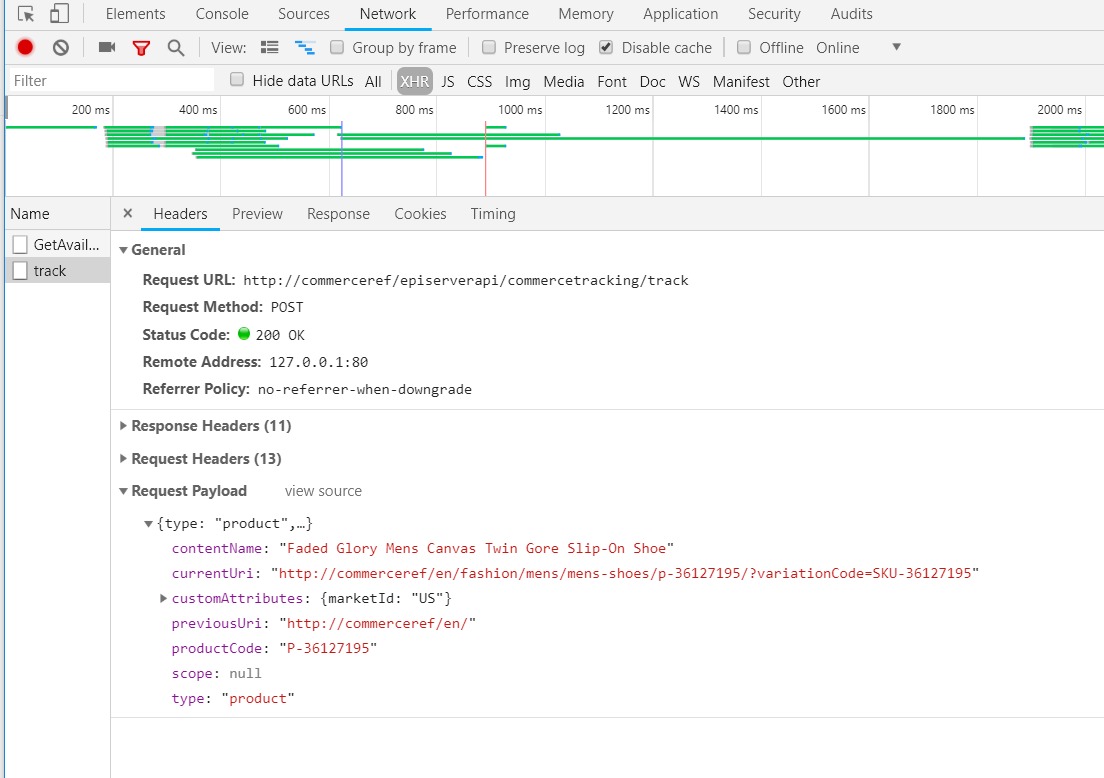
But now, instead of call to the end point of tracking service directly, we call to JS tracking API from the View. It will send a post request to web API with url '/episerverapi/commercetracking/track' and the tracking data collected in the client.
Handling the response from Personalization Service
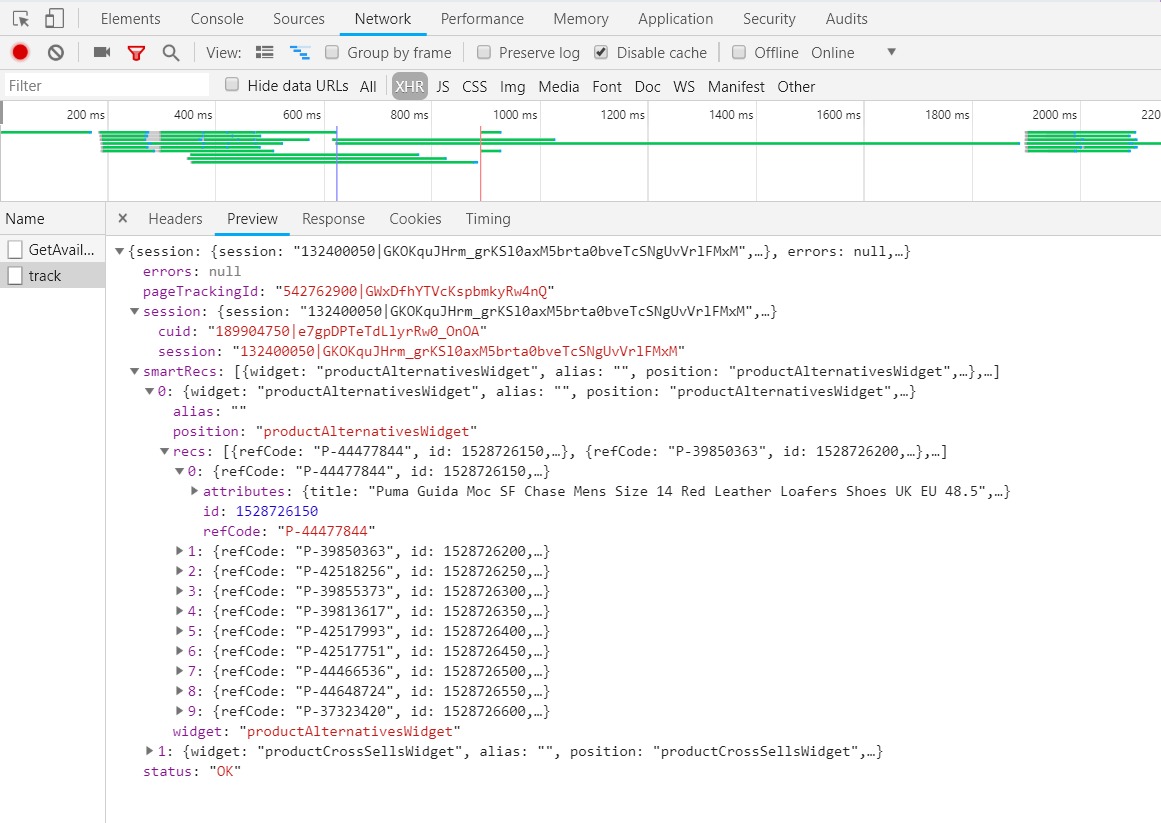
The web API (proxy) works like server to server API. It handles the request from client and send the tracking data to the ITrackingService. The response from Personalization Service will be de-serialize to the server model whereas it hasn't data for price or image information. That information from Services is either real-time or latest update, so it may not usable.
Like server to server, we need to intercept that response data by using ITrackingResponseDataInterceptor.Intercept(TrackingResponseData)
One last step, we won't forget update the recommendation template for the response. As before, it uses mustache template but the property has changes. By default, there are no longer exist functions that filter markets and currencies for display prices. If you have any custom response data, make sure to present it in this template _RecommendationsTemplates.cshtml.
<script id="epiRecommendationListTemplate" type="x-tmpl-mustache">
    {{#recs}}<div class="jsProductTile product-row__tile" data-recommendation-id="{{id}}">{{> epiRecommendationItemTemplate}}</div>{{/recs}}
</script>
<script id="epiRecommendationItemTemplate" type="x-tmpl-mustache">
    {{#hasDiscount}}<div class="product has-discount">{{/hasDiscount}}
    {{^hasDiscount}}<div class="product">{{/hasDiscount}}
        <a href="{{#attributes}}{{url}}{{/attributes}}&recommendationId={{id}}" class="link--black">
            <div class="view-details"></div>
            <img src="{{#attributes}}{{img}}{{/attributes}}" alt="{{refCode}}" class="img-responsive" />
            <h3 class="product-title">{{#attributes}}{{title}}{{/attributes}}</h3>
            <div>
                {{#hasDiscount}}
                <h4 class="product-price">{{#attributes}}{{unitPrice}}{{/attributes}}</h4>
                <h4 class="product-price product-price--discount">{{#attributes}}{{salePrice}}{{/attributes}}</h4>
                {{/hasDiscount}}
                {{^hasDiscount}}
                <h4 class="product-price">{{#attributes}}{{salePrice}}{{/attributes}}</h4>
                {{/hasDiscount}}
            </div>
        </a>
    </div>
    <div class="quick-view-btn-container">
        <button type="button" data-toggle="modal" data-target="#ModalDialog"
                data-url="{{#attributes}}{{url}}{{/attributes}}&recommendationId={{id}}"
                class="btn btn-block btn-sm quickview-button">@Html.Translate("/Product/Quickview")</button>
    </div>
</script>
Conclusion, with the new structure of JavaScript tracking API, the tracking in the Commerce site is now much easier to implement and flexible with both server to server API and javascript API with the same result.
Comments