
A day in the life of an Optimizely OMVP - Creating a blazor add-on for CMS 12
Hello and welcome to another instalment of a day in the life of an Optimizely OMVP. In this post I will be covering how to create a blazor based add-on in CMS 12 and how you get this published on various NuGet feeds including Optimizely's own feed.
Overview
This comprehensive guide walks you through the process of building a custom Blazor add-on for Optimizely CMS, combining the power of modern .NET development with enterprise content management.
Blazor offers CMS developers a unique opportunity to create rich, interactive admin interfaces using C# throughout the entire stack, eliminating context-switching between languages and enabling seamless integration with Optimizely's backend APIs. Whether you're building a custom dashboard widget, a specialized property editor, or a complete admin tool, Blazor's component-based architecture and real-time capabilities make it an ideal choice for extending Optimizely's functionality.
In this tutorial, you'll learn how to set up a Blazor project within your Optimizely solution, integrate it with the CMS's authentication and routing systems, and create a polished admin interface that feels native to the platform.
By the end of this guide, you'll have the knowledge to build production-ready Blazor add-ons that enhance your editors' experience and extend Optimizely CMS to meet your specific business needs. Whether you're a seasoned Optimizely developer exploring modern UI frameworks or a Blazor enthusiast entering the CMS world, this guide provides the practical insights you need to succeed.
Setup
The following section covers how you setup your projects, enable Blazor functionality, create the menu for your add-on, enable authorisation and also how you could setup your projects into vertical sliced features.
Extension project creation
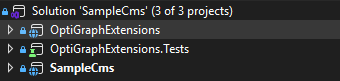
For my example extension, I created three separate projects, as follows:
- OptiGraphExtensions - the main Blazor add-on project
- OptiGraphExtensions.Test - the unit tests for the functionality
- SampleCMS - A full and running version of Optimizely CMS 12 with a reference to the OptiGraphExtensions project allows testing in a real CMS 12 application.
To get the CMS to reflect your add-on DLL and find your add-on, you need to have a module.config in the root of your add-on project that will define the assembly so that it is picked up by the CMS. In this case the assembly refers to "OptiGraphExtensions" which is the same name as the project.
<?xml version="1.0" encoding="utf-8" ?>
<module loadFromBin="true" clientResourceRelativePath="" viewEngine="Razor" authorizationPolicy="OptiGraphExtensions:Security:Policy" moduleJsonSerializerType="None" prefferedUiJsonSerializerType="Net">
  <assemblies>
    <add assembly="OptiGraphExtensions" />
  </assemblies>

  <clientModule>
    <moduleDependencies>
      <add dependency="CMS" />
    </moduleDependencies>
  </clientModule>
</module>
Adding new menu options
To get your add-on to display in the CMS, you will need to create a new MenuProvider. As shown below you decorate the class with [MenuProvider] and inherit from the IMenuProvider interface. You then create your individual menu items within the GetMenuItems method.
[MenuProvider]
public sealed class OptiGraphExtensionsMenuProvider : IMenuProvider
{
    public IEnumerable<MenuItem> GetMenuItems()
    {
        // Nested Menu Example
        yield return CreateMenuItem("Opti Graph Extensions", "/global/cms/optigraphextensions", "/optimizely-graphextensions/administration/about/", SortIndex.Last + 30);
        yield return CreateMenuItem("About", "/global/cms/optigraphextensions/about", "/optimizely-graphextensions/administration/about/", SortIndex.Last + 31);
        yield return CreateMenuItem("Synonyms", "/global/cms/optigraphextensions/synonyms", "/optimizely-graphextensions/administration/synonyms", SortIndex.Last + 32);
        yield return CreateMenuItem("Pinned Results", "/global/cms/optigraphextensions/pinned.results", "/optimizely-graphextensions/administration/pinned-results", SortIndex.Last + 33);
    }

    private static UrlMenuItem CreateMenuItem(string name, string path, string url, int index)
    {
        return new UrlMenuItem(name, path, url)
        {
            IsAvailable = context => true,
            SortIndex = index,
            AuthorizationPolicy = OptiGraphExtensionsConstants.AuthorizationPolicy
        };
    }
}
Enabling Blazor in sample CMS
Add the following to your "Program.cs" or "Startup.cs":
services.AddServerSideBlazor();And also, in the ApplicationBuilder you need to add:
app.UseEndpoints(endpoints =>
{
    …
    endpoints.MapBlazorHub();
    endpoints.MapControllerRoute(
        name: "default",
        pattern: "{controller=Home}/{action=Index}/{id}");
    …
});
Once the above has been added, this is all that is needed to allow Blazor to run in your Optimizely CMS instance.
Main Administration Controller
You need to ensure that you create a controller for your menu options, this is created in the following manner. As can be seen the routes match the routes specified in the MenuProvider shown above.
[Authorize(Policy = OptiGraphExtensionsConstants.AuthorizationPolicy)]
public sealed class AdministrationController : Controller
{
    [HttpGet]
    [Route("~/optimizely-graphextensions/administration/about")]
    public IActionResult About()
    {
        var model = new AdministrationViewModel
        {
            Title = "Opti Graph Extensions - About",
            Subtitle = "OptiGraphExtensions is a comprehensive add-on for Optimizely CMS 12 that provides seamless management of both synonyms and pinned results within Optimizely Graph. This add-on enables content editors and administrators to enhance search experiences through intelligent synonym mapping and strategic result pinning capabilities, all integrated directly into your Optimizely CMS administration interface."
        };

        return View("~/Views/OptiGraphExtensions/Administration/About/Index.cshtml", model);
    }

    [HttpGet]
    [Route("~/optimizely-graphextensions/administration/synonyms")]
    public IActionResult Synonyms()
    {
        var model = new AdministrationViewModel
        {
            Title = "Opti Graph Extensions - Synonyms",
        };

        return View("~/Views/OptiGraphExtensions/Administration/Synonyms/Index.cshtml", model);
    }

    [HttpGet]
    [Route("~/optimizely-graphextensions/administration/pinned-results")]
    public IActionResult PinnedResults()
    {
        var model = new AdministrationViewModel
        {
            Title = "Opti Graph Extensions - Pinned Results",
        };

        return View("~/Views/OptiGraphExtensions/Administration/Pinned-Results/Index.cshtml", model);
    }
}
The views that are linked to in the above controller contain the main RenderComponentAsync functionality that calls the related Razor Component that exists within its own individual feature (vertical feature slicing is covered below), an example of this is shown below:
@{
    Layout = "/Views/Shared/Layouts/_LayoutBlazorAdminPage.cshtml";
}

@(await Html.RenderComponentAsync<OptiGraphExtensions.Features.PinnedResults.PinnedResultsManagementComponent>(Microsoft.AspNetCore.Mvc.Rendering.RenderMode.Server))
The main layout referenced looks as follows and includes the main Blazor js file:
@using EPiServer.Framework.Web.Resources
@using EPiServer.Shell.Navigation
<!DOCTYPE html>
<html lang="en">
<head>
    <title>Opti Graph Extensions</title>

    <!-- Shell -->
    @ClientResources.RenderResources("ShellCore")

    <!-- LightTheme -->
    @ClientResources.RenderResources("ShellCoreLightTheme")

    <style>
        main {
            display: flex;
            flex-direction: column;
            gap: 2rem;
            max-width: 1000px;
        }
        div.criteriabox {
            border: 2px solid #e0e0e0;
            border-radius: 0.5rem;
            display: flex;
            flex-direction: column;
            gap: 1rem;
            padding: 1rem;
        }
    </style>

    <base href="~/" />
</head>
<body>
    @Html.AntiForgeryToken() <!-- Thanks to: https://world.optimizely.com/blogs/matthew-slim/dates/2023/6/new-menu-system-released/ -->
    @Html.CreatePlatformNavigationMenu()
    <div @Html.ApplyPlatformNavigation() style="padding-left: 10px;background: white;padding: 1rem;">

    @RenderBody()

    </div>
    <script src="_framework/blazor.server.js"></script>
</body>
</html>
Vertical Feature Slicing
There are various ways in which you can decide to structure the features within your add-on, I opted for a vertical feature sliced architecture where all code and associated razor files for a specific feature all existed under one folder, as shown below:
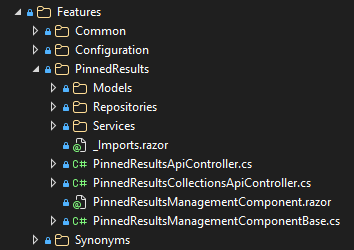
This creates a clean separation of concerns and ensures that files are easily identified.
Authorisation setup
To add authorisation to your add-on, you need to add a policy to your AdministrationController as shown below:
[Authorize(Policy = OptiGraphExtensionsConstants.AuthorizationPolicy)]
public sealed class AdministrationController : Controller
The Authorisation Policy needs a specific name, which I add as a constant in a constants file.
public static class OptiGraphExtensionsConstants
{
    public const string ModuleName = "OptiGraphExtensions";

    public const string AuthorizationPolicy = "OptiGraphExtensions:Security:Policy";
}
We then add that policy to the authorisation options when registering the add-on middleware.
        services.AddOptiGraphExtensions(optiGraphExtensionsSetupOptions =>
        {
            optiGraphExtensionsSetupOptions.ConnectionStringName = "EPiServerDB";
        },
        authorizationOptions =>
        {
            authorizationOptions.AddPolicy(OptiGraphExtensionsConstants.AuthorizationPolicy, policy =>
            {
                policy.RequireRole("WebAdmins", "Everyone");
            });
        });
Publishing to feeds
This section provides information on how you package up your extension so that you can publish it to NuGet feeds.
If you are using Visual Studio, right click on the project you want to package and select properties to show the project properties screen. Under the Package section you can define all of the properties for your NuGet package.
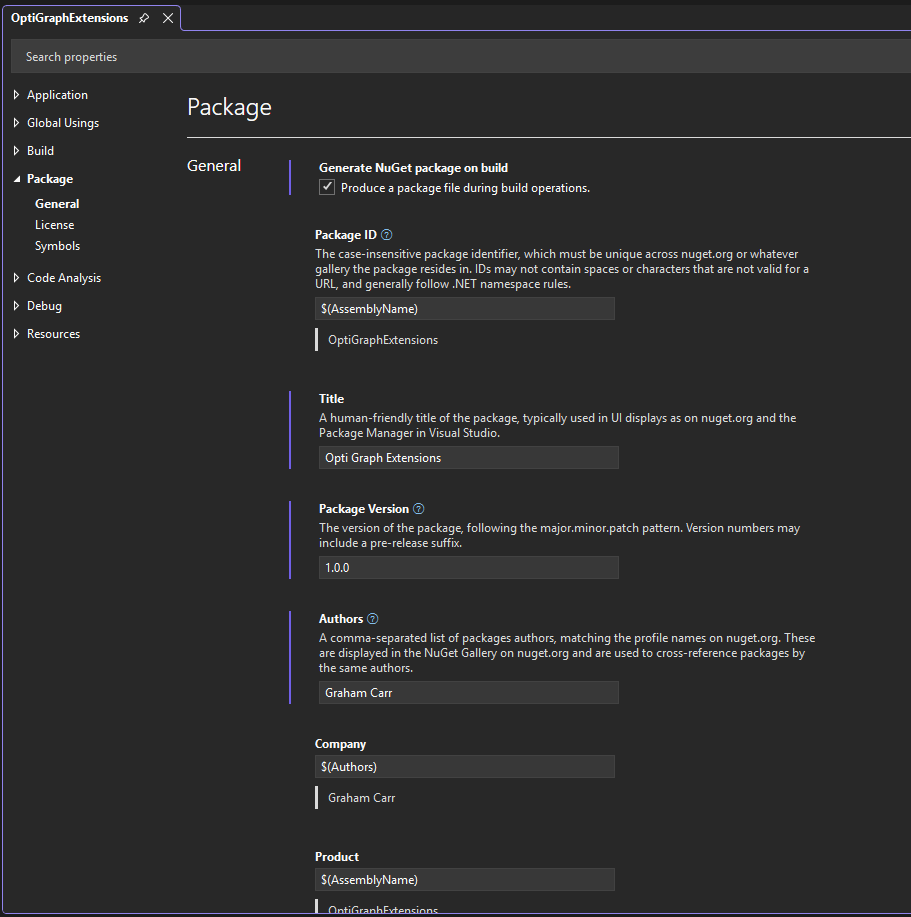
I would recommend you complete the following:
| Property | Reason |
|---|---|
| Package Id | This will need to be globally unique name within nuget.org and nuget.optimizely.com. If you use the $(AssemblyName) variable, then this will match the name of the project. |
| Title | Visual Studio describes this as the name of the package used in UI displays such as Package Manager, but this largely does not get used. |
| Package Version | This should be a semantic version number with three or four parts and an optional alpha or beta tag. For Example: 1.0.0 1.0.0.0 0.1.1-alpha 0.2.2.0-beta |
| Authors | This should contain the names of all of the package owners. |
| Company | This should contain the name of the business that is behind creating the Add-on. If this is individually owned, then seting this to $(Authors) will mirror the value from the Authors property. |
| Description | This should be a short description about your Add-on, this will be visible within the NuGet package feed and within the Plugin Manager screen within Optimizely CMS. |
| Copyright | This should contain the name of the owner and the year. You get copyright protection automatically when creating software and you do not have to apply or pay a fee. There isn’t a register of copyright works in the UK. There are however organisations which will provide extra protection for a fee for validating your copyright. You can read more about copyright here: How copyright protects your work. It is however worth you performing your own research into the matter within the country you live in. |
| Project Url | This should point either to the repository for your Add-on or an appropriate project page. Developers will use this to find out more about your Add-on or to report issues that may need resolving. |
| Readme | I have set this to the readme.md for my repositories, this will be visible to developers within the NuGet platform. |
| Repository Url | This should point to the repository for your Add-on, assuming that your Add-on is Open Source. |
| Tags | This is a delimited set of tags that make your package easier to find within the NuGet feeds. |
| License File | This should reference the license within your repository. Careful consideration should be given to the type of license for your Add-on. Certain licenses may require your users to make their code open source to utilize your package, so think carefully about the permissiveness or restrictiveness of your license. It is noteworthy that some highly popular Add-ons employ an MIT or Apache license. I am utilizing an MIT license due to its permissive nature and lack of warranty. While I do engage with my users and address any issues that are raised, my Add-ons are free and are maintained in my free time. |
| Require License Acceptance | If you tick this, the consumer will have to accept the license as they install the package. If you are using an MIT license, you may want to tick this to encourage the consumer to accept the warranty free nature of your Add-on. |
Nuget.org
It is advisable to get your NuGet package listed on Nuget.org before you submit it to the Optimizely NuGet feed. To submit your add-on on NuGet.org, simply visit https://www.nuget.org/users/account/LogOn and sign in, once signed in you can visit the package upload screen here - https://www.nuget.org/packages/manage/upload - simply select your .nupkg file and click Upload as shown below.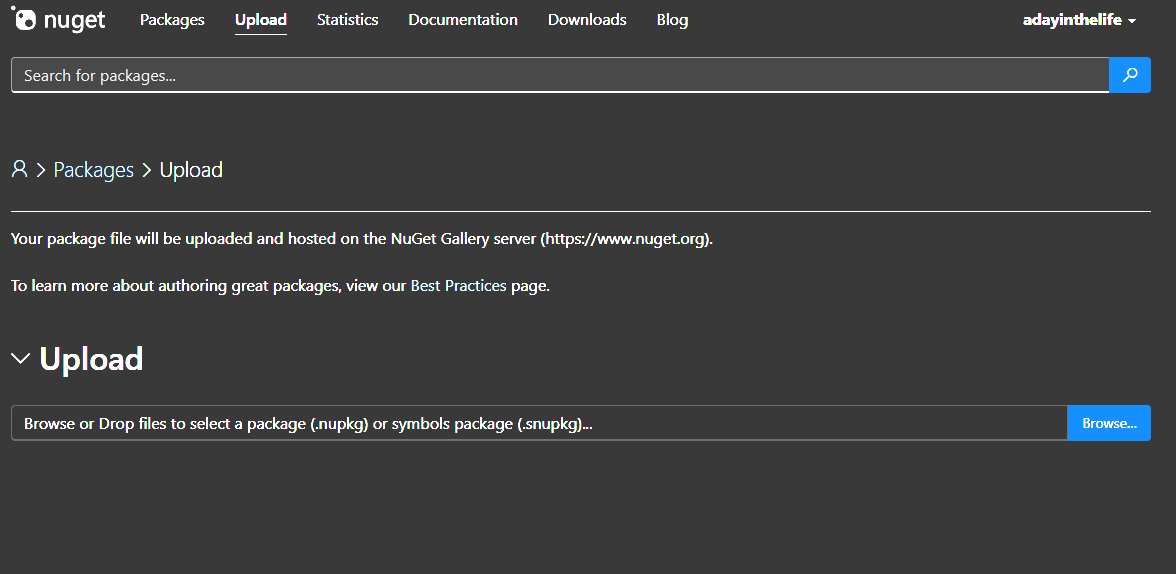
At this point your NuGet package will be uploaded, and after a few minutes will be scanned, indexed and available on the NuGet.org feed.
Optimizely Nuget
Firstly, ensure that you have an Optimizely World account. You can create a new account by visiting Optimizely World and following the registration link located in the top right corner. This account will also provide access to the Optimizely NuGet feeds. Optimizely maintains two NuGet feeds:
- https://nuget.optimizely.com (v2 NuGet feed)
- https://api.nuget.optimizely.com (v3 NuGet feed)
When you upload packages to the v2 NuGet feed, they're automatically synced to the v3 feed, so uploading to v2 is the recommended approach. After Optimizely receives your package, their QA team will review it to ensure your Add-on works properly with the CMS. To help expedite this process, include testing instructions in your repository's readme file.
The review typically takes at least one business day, but there's no automated notification system to update you on the testing progress or results. You'll need to check the NuGet feed periodically to see if your package has been approved.
Since Optimizely reviews all packages on their feed, it's best practice to download Add-on updates directly from them for distribution. If you need to quickly deploy a hotfix, consider using nuget.org as an alternative.
Additionally, you should upload your package to nuget.org at least once alongside the Optimizely feed. This reserves your package name on nuget.org and prevents naming conflicts across major feeds that could impact your users.
Wrap-up
In this guide, we've explored the essentials of building Blazor-based add-ons for Optimizely CMS, covering everything from initial project setup to preparing for publication on NuGet feeds.
Key Takeaways:
- Blazor's Power in CMS Development: By leveraging Blazor's component-based architecture, you can create rich, interactive admin interfaces using C# throughout your entire stack, eliminating the need for context-switching between frontend and backend languages.
- Core Implementation Steps: You've learned how to configure module settings, create custom menu providers for seamless navigation integration, and enable Blazor functionality in your CMS with just a few lines of code in your startup configuration.
- Enterprise-Ready Extensions: With proper authorization policies and vertical feature slicing approaches, your add-ons can maintain clean architecture while meeting enterprise security and scalability requirements.
Whether you're building custom dashboards, specialized property editors, or complete admin tools, you now have a solid foundation for extending Optimizely CMS with modern .NET technology. The next step is packaging your add-on and sharing it with the community through NuGet, helping fellow developers enhance their Optimizely implementations.
Happy coding, and welcome to the growing community who are pushing the boundaries of what's possible with CMS development!
Reference Links
https://github.com/adayinthelifeofapro/OptiGraphExtensions
https://www.epinova.se/en/blog/2024/use-blazor-components-in-optimizely-cms-adminedit-interface/
https://www.stott.pro/article/creating-an-optimizely-addon-part-3

Comments