
Optimizely Headless Form Setup
1. Create empty CMS applications
First, let’s setup an empty CMS application.
Install the NuGet packages in your solution using the NuGet Package Manager in Visual Studio or with the command line:
dotnet add package EPiServer.CMS
2. Setup headless Optimizely Forms API
Optimizely Headless Form API consists of one main NuGet package, Optimizely.Cms.Forms.Service, and some additional NuGet packages let you install only the necessary functionality.
Install the NuGet packages in your solution using the NuGet Package Manager in Visual Studio or with the command line:
dotnet add package Optimizely.Cms.Forms.Service
Configure form headless API options
Configure the API in ConfigureServices in startup.cs.
services.AddOptimizelyFormsService(options => {
  options.EnableOpenApiDocumentation = true;
  options.FormCorsPolicy = new FormCorsPolicy {
    AllowOrigins = new string[] {
        "*"
    }, //Enter '*' to allow any origins, multiple origins separate by comma
    AllowCredentials = true
  };
  options.OpenIDConnectClients.Add(new() {
    Authority = "" //Enter the client's domain that requires authentication. The domain must include the protocol, e.g., https://localhost:3000.
  });
});
3. Authentication using OpenIDConnect
Install Episerver.OpenIDConnect package using the NuGet Package Manager in Visual Studio or with the command line:
dotnet add package Episerver.OpenIDConnect.UI
Configure encryption key for OpenIDConnect.
public class FormServiceOptionsPostConfigure : IPostConfigureOptions<OptimizelyFormsServiceOptions>
{
    private readonly OpenIddictServerOptions _options;

    public FormServiceOptionsPostConfigure(IOptions<OpenIddictServerOptions> options)
    {
        _options = options.Value;
    }

    public void PostConfigure(string name, OptimizelyFormsServiceOptions options)
    {
        foreach (var client in options.OpenIDConnectClients)
        {
            foreach (var key in _options.EncryptionCredentials.Select(c => c.Key))
            {
                client.EncryptionKeys.Add(key);
            }

            foreach (var key in _options.SigningCredentials.Select(c => c.Key))
            {
                client.SigningKeys.Add(key);
            }
        }
    }
}
Configure OpenIdConnect in Startup.cs.
services.AddOpenIDConnect<ApplicationUser>(
    useDevelopmentCertificate: true,
    signingCertificate: null,
    encryptionCertificate: null,
    createSchema: true
    );

services.AddOpenIDConnectUI();
services.TryAddEnumerable(ServiceDescriptor.Singleton<IPostConfigureOptions<OptimizelyFormsServiceOptions>, FormServiceOptionsPostConfigure>());
4. Create key/secret using OIDC UI and test your authentication
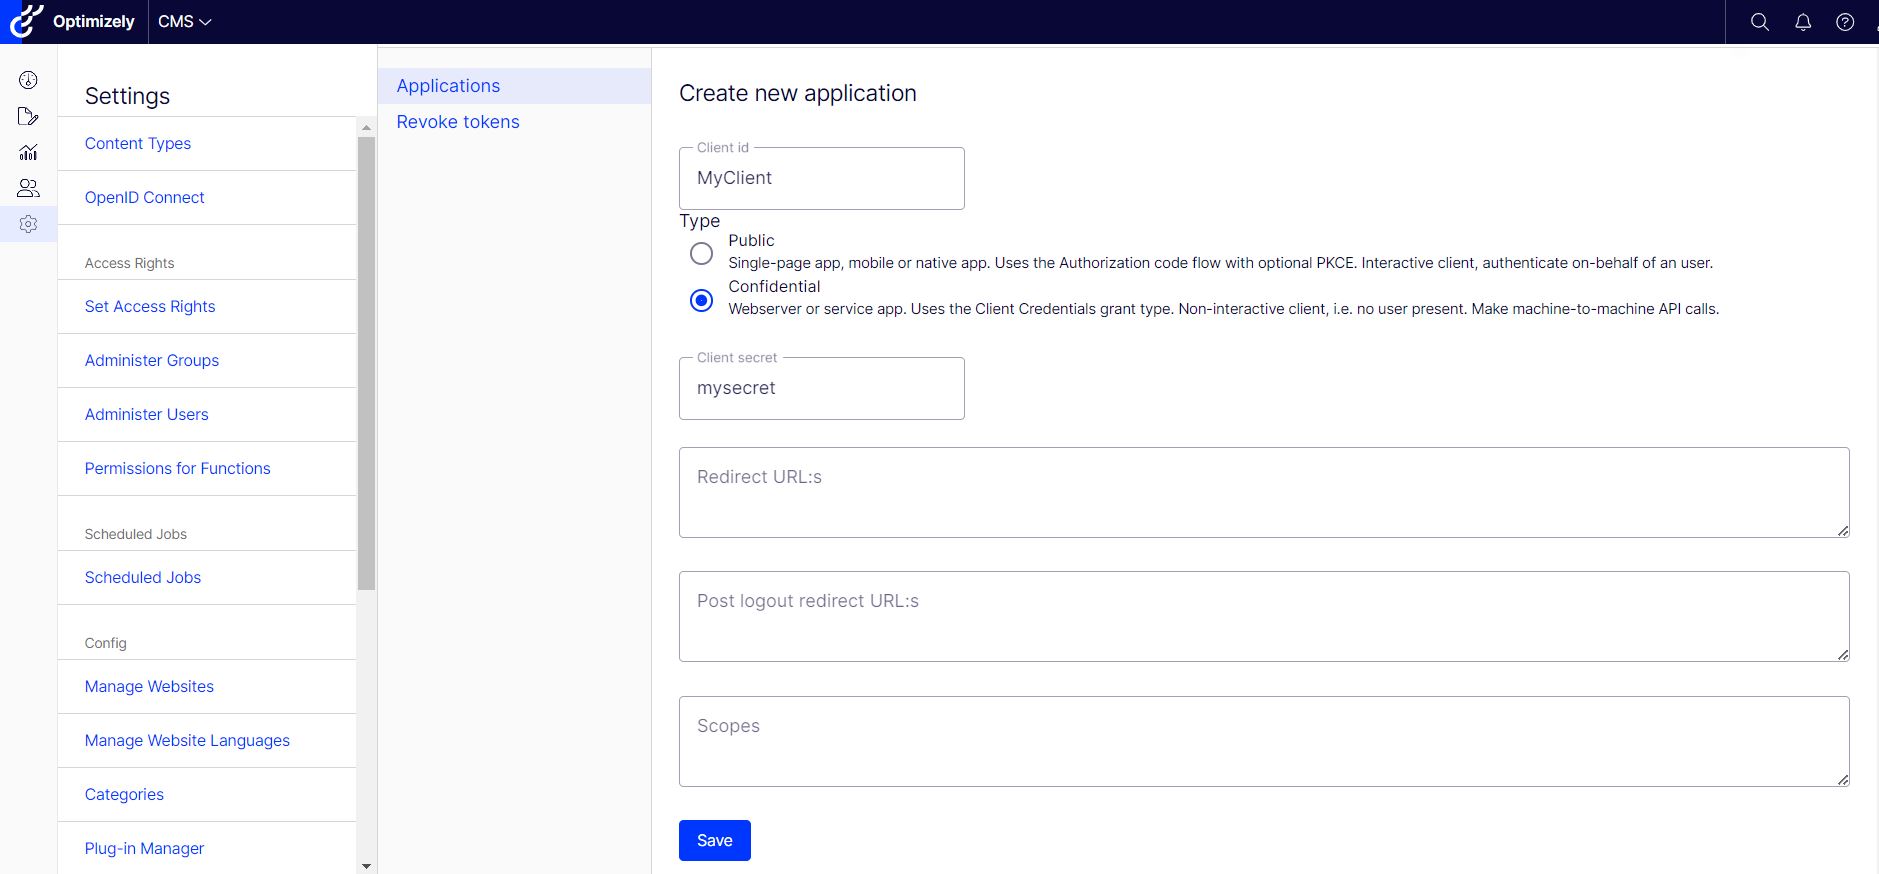
Open “OpenID Connect” tab in Settings, create new application then input your client id and client secret
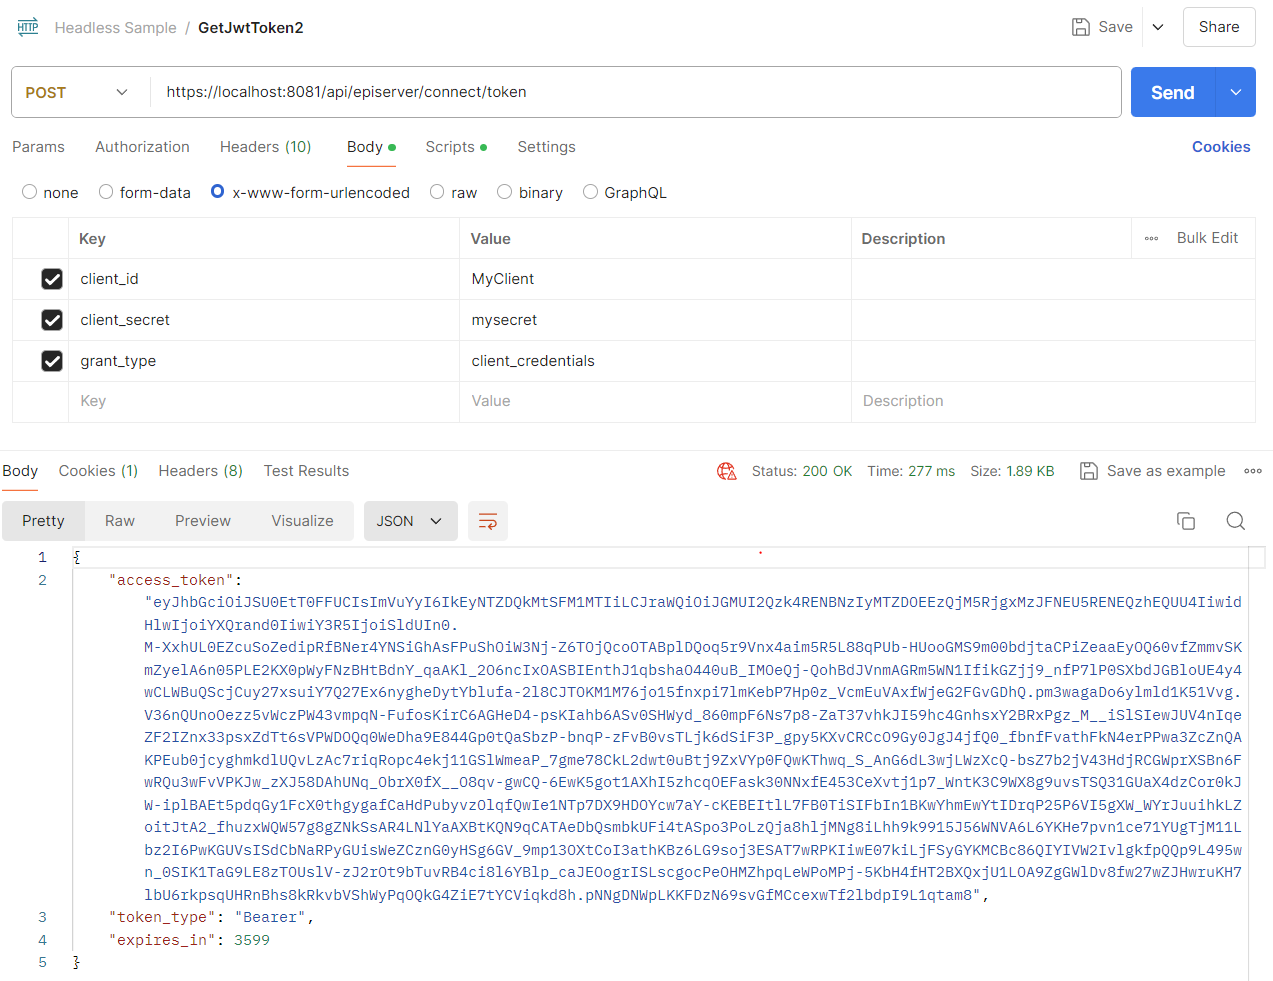
Test if it all works by making a POST request in Postman to /api/episerver/connect/token with the following parameters:
- client_id: api-client
- client_secret: SuperSecret
- grant_type: client_credentials
You'll receive a time-limited access token.
5. Api specification
You should have the following endpoints available on your host site:
- GET – /_forms/v1/forms/{ContentKey}?language={Language} – Retrieve form data with form elements by content key
- PUT – /_forms/v1/forms/ – Submit the form.
To verify that the API is working properly, open the Form Headless API in your browser:
http://<your-site-url>/_forms/v1/forms/<ContentKey>?language=en
Note: ContentKey is the content guid id without hypen
For more api details: Headless Form Api Specification
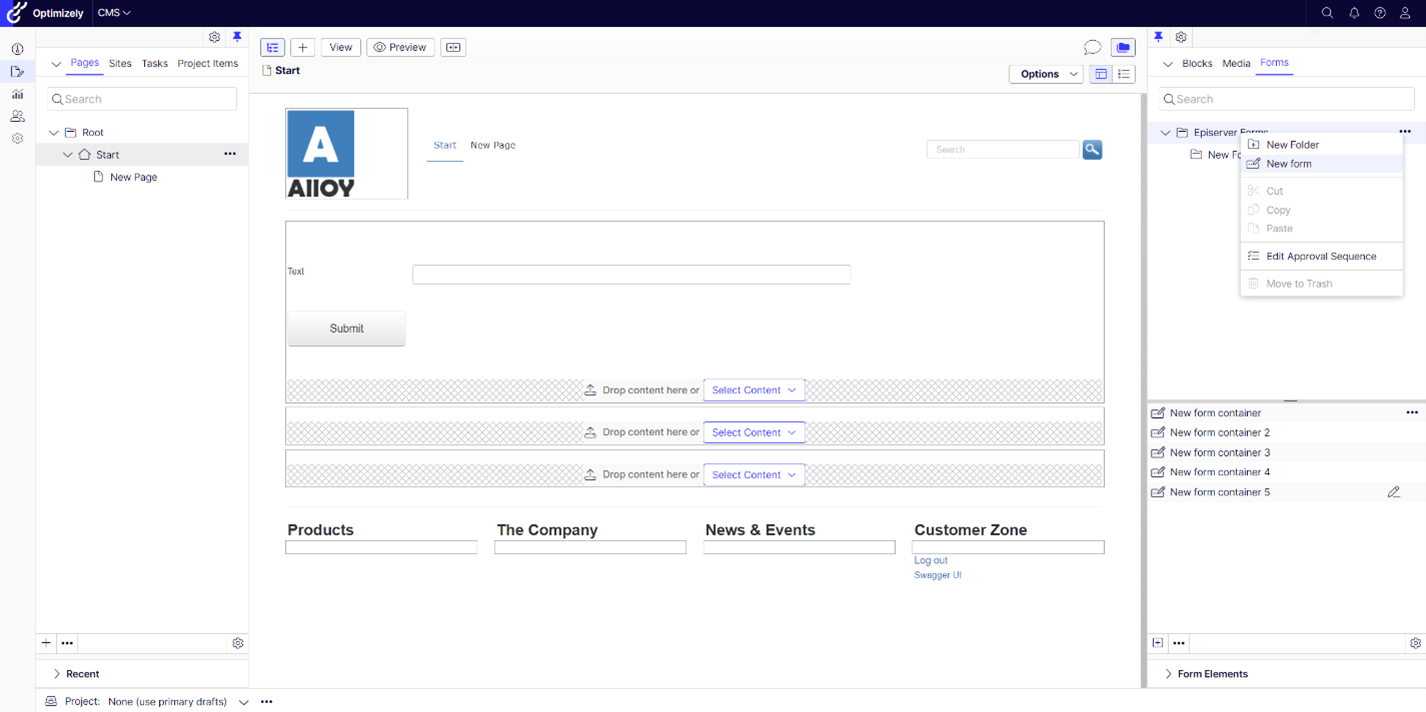
6. Create simple hello world form with single text input
In right menu panel, create New Form, enter your form name.
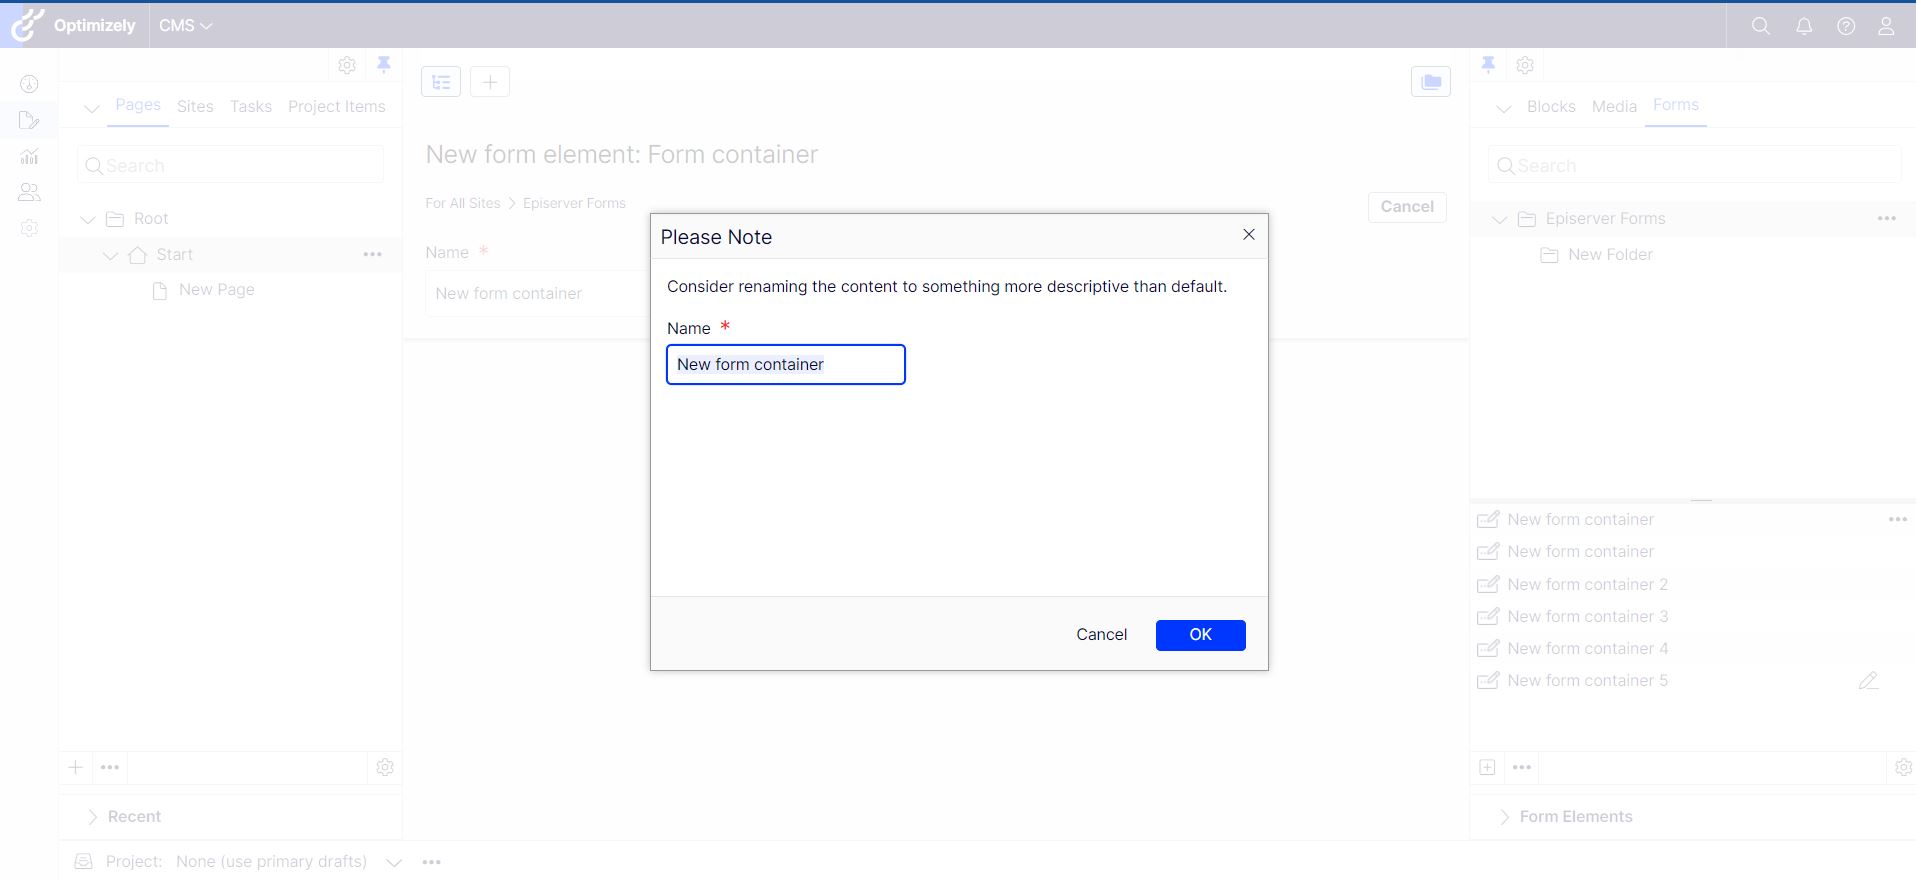
Add textbox and submit button to form then publish form.
7. Retrieve form using Postman
Import postman collection Headless Sample.postman_collection.json
8. Prepare backend site for form render
8.1. Update Manage Website setting for both case
- Browse the site > Manage Websites: Update Delivery site = localhost:3000
- Browse the site > Manage Websites : Remove Host name = * the list
- (Optional) Update ManagementSite to use http instead of https on json (if you deploy your site on the local ): "applicationUrl": "http://localhost:8000",
- Browse React site:http://localhost:3000/en/[pageURL]
8.2. Render form using ContentGraph
- Set up management site
Install Optimizely.ContentGraph.Cms and Optimizely.Cms.Forms.ContentGraph using the NuGet Package Manager in Visual Studio or with the command line:
dotnet add package Optimizely.ContentGraph.Cms
dotnet add package Optimizely.Cms.Forms.ContentGraph- Add CG key to appsettings.json (at the same level as Episerver).
"Optimizely": {
    "ContentGraph": {
      "GatewayAddress": "<<Gateway Address>>",
      "AppKey": "<<App Key>>",
      "Secret": "<<Secret>>",
      "SingleKey": "<<Single Key>>",
      "AllowSendingLog": true,
      "ContentVersionSyncMode": "DraftAndPublishedOnly",
      "Include": {
        "ContentIds": [],
        "ContentTypes": []
      },
      "SyncReferencingContents": true
    }
}- Add settings to Startup.cs
//Register ContentGraph for HeadlessForm
services.AddContentDeliveryApi(op => {
  op.DisableScopeValidation = true;
  op.RequiredRole = null;
});
services.ConfigureContentApiOptions(o => {
  o.FlattenPropertyModel = true;
  o.IncludeNumericContentIdentifier = true;
});
services.AddContentGraph();

services.AddOptimizelyFormsContentGraph();
8.3. Render form using Rest API
Add ReactController.cs file in Controllers folder to get all form keys in page
using EPiServer;
using EPiServer.Cms.Shell;
using EPiServer.Core;
using EPiServer.Forms.Implementation.Elements;
using EPiServer.ServiceLocation;
using EPiServer.SpecializedProperties;
using EPiServer.Web;
using EPiServer.Web.Routing;
using Microsoft.AspNetCore.Mvc;
using System.Collections.Generic;

namespace AlloyMvcTemplates.Controllers;
[Route("api/[controller]")]
[ApiController]
public class ReactController : ControllerBase
{
    public ReactController()
    {
    }

    [HttpGet("GetFormInPageByUrl")]
    public IActionResult GetFormInPageByUrl(string url)
    {
        var builder = new UrlBuilder(url);
        var content = UrlResolver.Current.Route(builder, ContextMode.Default);

        if (content is null)
        {
            return NoContent();
        }

        var contentLoader = ServiceLocator.Current.GetInstance<IContentLoader>();
        var pageModel = new PageModel();

        if (content is not null)
        {
            pageModel.Title = content.Name;
            pageModel.PageUrl = content.PublicUrl();

            foreach (var props in content.Property)
            {
                if (!props.IsNull && props is PropertyContentArea)
                {
                    var contentArea = props as PropertyContentArea;
                    foreach (var item in contentArea.PublicContentArea?.FilteredItems)
                    {
                        var contentItem = contentLoader.Get<IContent>(item.ContentLink);

                        if (contentItem is FormContainerBlock)
                        {
                            pageModel.FormKeys.Add(contentItem.ContentGuid.ToString("N"));
                        }
                    }
                }
            }
        }

        return Ok(pageModel);
    }
}

public class PageModel
{
    public string Title { get; set; }
    public string PageUrl { get; set; }
    public List<string> FormKeys { get; set; } = new List<string>();
}
9. Render form using simple react app
9.1. Create a React app template
- Create an empty folder : \ClientApp for example
- Run cmd on the folder :
npx create-react-app headless-form --template typescript
Result: \headless-form folder is added
9.2. Install JS SDK
- Navigate to \headless-form
- Create a file .npmrc with content:
@episerver:registry=https://pkgs.dev.azure.com/EpiserverEngineering/netCore/_packaging/HeadlessForms/npm/registry
- Install react-router-dom. Run cmd:
npm install react-router-dom@5.3.4 @types/react-router-dom@5.3.3 - Install @episerver/forms-react. Run cmd:
npm install @episerver/forms-react@1.0.0 - Install @episerver/forms-sdk. Run cmd:
npm install @episerver/forms-sdk@1.0.0
9.3. Add file .env with content in both case
REACT_APP_ENDPOINT_GET_FORM_BY_PAGE_URL=https://localhost:8000/api/React/GetFormInPageByUrl?url=

REACT_APP_HEADLESS_FORM_BASE_URL=https://localhost:8000/

REACT_APP_AUTH_BASEURL=https://localhost:8000/api/episerver/connect/token
Render form using Content Graph, add the lines below to the .env file
REACT_APP_CG_PREVIEW_URL={GatewayAddress}/content/v2

REACT_APP_CONTENT_GRAPH_GATEWAY_URL={GatewayAddress}/content/v2?auth={SingleKey}

REACT_APP_LOGIN_CLIENT_ID=frontend

REACT_APP_HEADLESS_FORM_BASE_URL=https://localhost:8000/
NOTE:
- Update the port = ManagementSite’s URL if needs
- GatewayAddress, SingleKey are from appsetting.json
9.4. Add the file \src\useFetch.ts that contains a function to request form data
import { useEffect, useState } from "react";

export const useFetch = (url: string) => {

    const [data, setData]= useState<any>(null);

    const [loading, setLoading] = useState<boolean>(false);

    const [error, setError] = useState<any>(null);

    useEffect(()=>{

        const fetchData = async () => {

            setLoading(true);

            fetch(url)

                .then(async (response: Response)=>{

                    if(response.ok){

                        setData(await response.json());

                    }

                })

                .catch((err: any)=>{

                    setError(err);

                })

                .finally(()=>{

                    setLoading(false);

                });

        };

        if(!loading){

            fetchData();

        }

    // eslint-disable-next-line react-hooks/exhaustive-deps

    },[url]);

    return {data, loading, error};

}
9.5. Update \src\App.tsx
import './App.css';

import { useFetch } from './useFetch';

import { Form, FormLogin } from '@episerver/forms-react';

import { FormCache, FormConstants, IdentityInfo, extractParams } from '@episerver/forms-sdk';

import { useState } from 'react';

import { useHistory, useLocation } from 'react-router-dom';


function App() {

    const location = useLocation();

    const { language } = extractParams(window.location.pathname)

    const url = `${process.env.REACT_APP_ENDPOINT_GET_FORM_BY_PAGE_URL}${location.pathname}`;

    const { data: pageData, loading } = useFetch(url);

    const formCache = new FormCache();

    const [identityInfo, setIdentityInfo] = useState<IdentityInfo>({

        accessToken: formCache.get<string>(FormConstants.FormAccessToken)

    } as IdentityInfo);

    const history = useHistory()

    const handleAuthen = (identityInfo: IdentityInfo) => {

        setIdentityInfo(identityInfo);

    }

    return (

        <div className="App">

            Hello

            {loading && <div className='loading'>Loading...</div>}

            {!loading && pageData && (

                <>

                    <h1>{pageData.title}</h1>

                    <div className='main'>

                        <div className='left'>

                            {pageData.formKeys.map((key: any) => (

                                <Form

                                    key={key}

                                    formKey={key}

                                    language={language ?? "en"}

                                    baseUrl={process.env.REACT_APP_HEADLESS_FORM_BASE_URL ?? "/"}

                                    identityInfo={identityInfo}

                                    history={history}

                                    currentPageUrl={pageData.pageUrl}

                                   // optiGraphUrl={process.env.REACT_APP_CONTENT_GRAPH_GATEWAY_URL}//uncomment this line if you want to render using content graph

                                />

                            ))}

                        </div>

                        <div className={`right`}>

                            <h2>Login</h2>

                            <FormLogin

                                clientId='TestClient'

                                authBaseUrl={process.env.REACT_APP_AUTH_BASEURL ?? ""}

                                onAuthenticated={handleAuthen} />

                        </div>

                    </div>

                </>

            )}

        </div>

    );

}

export default App;
Comments