
Create a new Optimizely Commerce 14 Project
The purpose of blog to create a new Optimizely commerce project in version 14.x using dotnet-episerver CLI and helps to remember the steps for developer to create a new commerce project. I have also mentioned few errors solution which I experienced during the project setup.
Before to jump on steps make sure the development environment & system requirement is ready.
Step 1:
- Install EPiServer templates:
dotnet new -i EPiServer.Net.Templates --nuget-source https://nuget.optimizely.com/feed/packages.svc/ --force--force: forces the modification and overwriting of required files for installation if required files exist.
- Install EPiServer CLI:
dotnet tool install EPiServer.Net.Cli --global --add-source https://nuget.optimizely.com/feed/packages.svc/Step 2:
Open the Visual Studio and click on Create a new project link and search “episerver”, you will see EPiServer installed templates for both CMS and Commerce. We are going to create a commerce project so choose “Episerver Commerce Empty Project” and click on next.
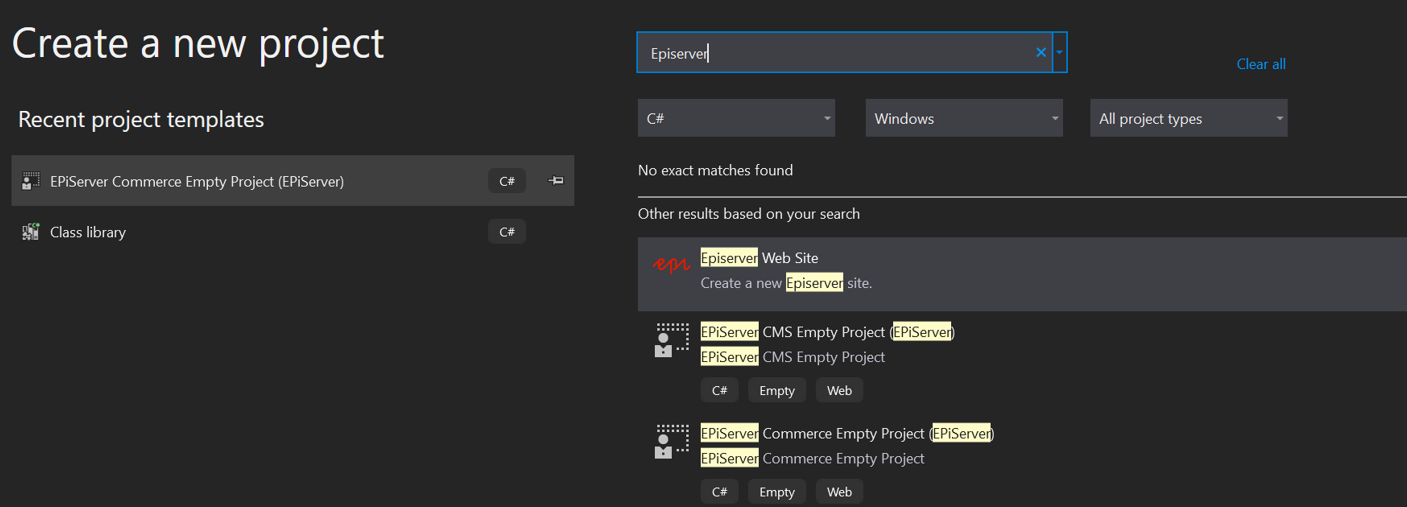
Enter the project name e.g. QuickDemo and create.
Step 3:
Create database with admin user.
Open the package manager console in visual studio and select default project.
OR
If you are using other command prompt, then reach out the project location using cd command e.g., ‘C:\Optimizely\QuickDemo’ and type EPiServer cli commands as mentioned below.
- CMS Database:
dotnet-episerver create-cms-database QuickDemo.csproj -S [ServerName] -U [ServerLoginUserName] -P [ServerLoginPassword] -dn QuickDemoCms -du [DataBaseUserName] -dp [DataBasePassword]- Commerce Database:
dotnet-episerver create-commerce-database QuickDemo.csproj -S [ServerName] -U [ServerLoginUserName] -P [ServerLoginPassword] -dn QuickDemoCommerce -du [DataBaseUserName] -dp [DataBasePassword]- Add admin user
dotnet-episerver add-admin-user QuickDemo.csproj -u admin -p Episerver123! -e admin@example.com -c EcfSqlConnectionNote: -c = connection string name is the case sensitive so make sure the name is same as in your appsetting.json
-S: Database server name
-U: Database server login username
-P: Database server login password
-dn: Database name e.g. epiCms
-du: Database username e.g. sa
-dp: Database password
-u: Admin user username/loginname e.g. admin or email
-p: Admin user password
-e: Admin user email
-c: connection string name e.g. EcfSqlConnection
Step 4:
Setup the launch browser for empty site in debug mode and press ctr+f5 or f5 (in windows) to run the site.
- For login use /util/login
- For CMS view type: /episerver/cms

Step 5:
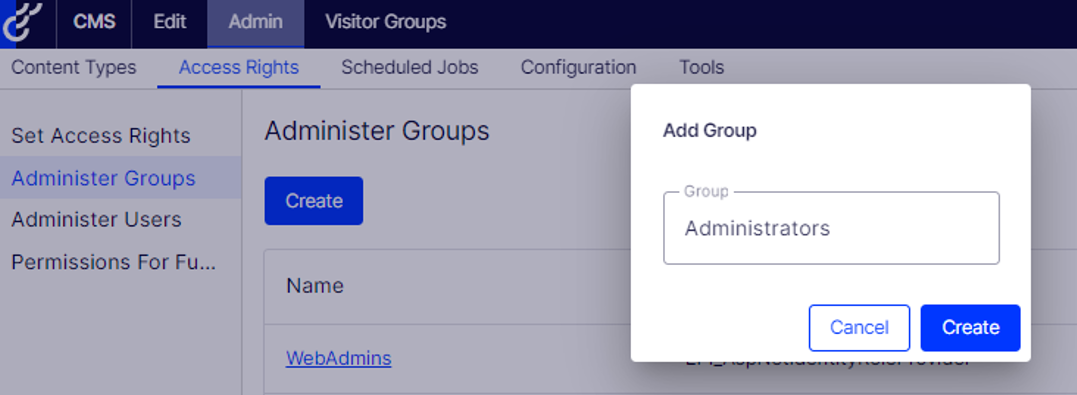
Enable Commerce Tab: Once you login into the CMS area then make sure the  icon is visible for you if not exist then follow up the below steps and enable it
- Add new Administrators group:
Admin --> Access Rights --> Administer Groups --> And create a new Administrators group
- Assign the Administrators group to the created user:
Admin --> Access Rights --> Admin Users --> Click on the username

- Now logout and login again then you will see the missing dotted icon on top navigation.

Okay, now time to visit into the commerce area so click on the dotted icon and select the commerce tab and you will see the new features of commerce 14.x.
---
[Optional]
During the commerce empty project setup I faced below errors which is highlighted with the solution.
Error 1:
- Are you getting “Something Went Wrong” error when entering in commerce area?
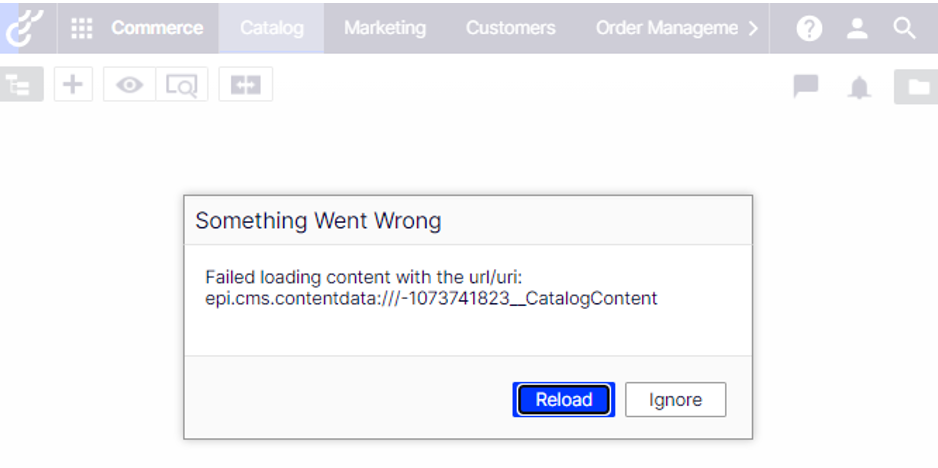
Solution:
- Set the access rights for catalog root node.
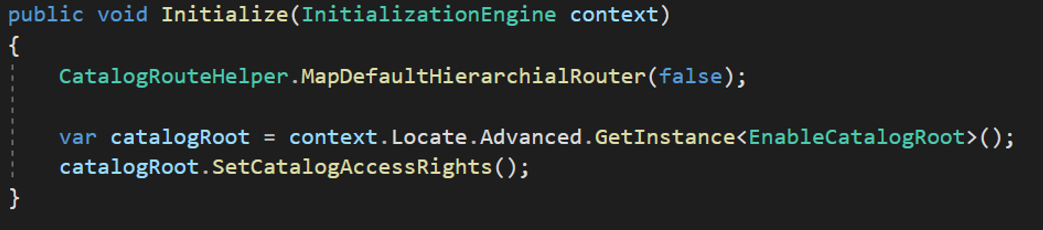
public class EnableCatalogRoot
{
        private readonly IContentLoader _contentLoader;
        private readonly ReferenceConverter _referenceConverter;
        private readonly IContentSecurityRepository _contentSecurityRepository;

        public EnableCatalogRoot(
            IContentLoader contentLoader,
            ReferenceConverter referenceConverter,
            IContentSecurityRepository contentSecurityRepository)
        {
            _contentLoader = contentLoader;
            _referenceConverter = referenceConverter;
            _contentSecurityRepository = contentSecurityRepository;
        }

        public void SetCatalogAccessRights()
        {
            if (_contentLoader.TryGet(_referenceConverter.GetRootLink(), out IContent content))
            {
                var contentSecurable = (IContentSecurable)content;
                var writableClone = (IContentSecurityDescriptor)contentSecurable.GetContentSecurityDescriptor().CreateWritableClone();
                writableClone.AddEntry(new AccessControlEntry(Roles.Administrators, AccessLevel.FullAccess, SecurityEntityType.Role));
                writableClone.AddEntry(new AccessControlEntry(Roles.WebAdmins, AccessLevel.FullAccess, SecurityEntityType.Role));
                writableClone.AddEntry(new AccessControlEntry(EveryoneRole.RoleName, AccessLevel.Read, SecurityEntityType.Role));

                _contentSecurityRepository.Save(content.ContentLink, writableClone, SecuritySaveType.Replace);
            }
        }
}- Register the class into Startup.cs
e.g. services.AddSingleton<EnableCatalogRoot>();
- Call the SetCatalogAccessRights() method into the SiteInitialization.
Now error is no more after the running the site.
Error 2: “An error occurred while starting the application”
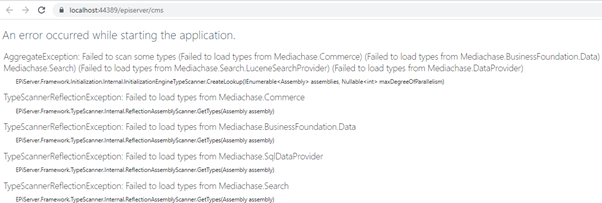
Solution:
Upgrade or downgrade Configuration.ConfigurationManager according to your version 5.0.0.0 or 6.0.0.0 in my case I used 5.0.0.0 version.
Merry Christmas!!!
Good work, I will give a try myself and will let you know if get any issue.
Thanks for sharing.
Nice writeup 👍