
Setting up Continuous Integration with Azure DevOps and Episerver DXC Service
Just so you know, this is going to be a really long post. I wish I could tell you it's as simple as one, two, three, but it isn't, and there are quite a few steps to go through. This is one way to do it, but I'm sure there are other people out there that know how to do it better, or at least differently. Some things outlined in this post is how we do things, and can serve as inspiration, or flame bait, depending on how you choose to view the world.
What, How, and Why?
Azure DevOps, the artist formerly known as Visual Studio Team Services, is a suite of tools for teams that can be used for managing the entire lifecycle of software projects. It is a fully fledged project management platform, containing functionality for VCS, issue tracking, wiki, dashboards, build- and deploy pipelines, and whatever else teams might need. There are of course alternatives, but I like it because it is cloud hosted, simple to set up, and most importantly, free for small teams. Incidentally, it is also the platform that Episerver uses under the hood for facilitating deploys in their DXC Service Platform.
Free you say? Well, it's free for small teams of up to 5 users, and you get 1800 minutes per month of CI/CD. Today, it's not uncommon for partner companies to have large installations of build servers and deployment facilitators, used for all their clients. Modern development processes often rely on the build and deployment as an integral part of the workflow, but these systems are often considered internal, and not covered by any SLA with the respective clients. This might not be the case for you, and it might not be a problem, but again, it might. I'll leave that up to you and your organization to decide.
Continuous Integration is the practice of constantly building and integrating changes made to a piece of software, and paired with Continuous Deployment, means that those changes are deployed to an environment (not neccessarily a production environment). This constant building and deplying is often referred to as Continuous Delivery. Tomato, tomato. What we're trying to achieve is a constant flow of well tested software, being delivered in a timely fashion, making it easy to push changes, and fixes, quickly. If you want to play with the big boys, break things and move fast like a true httpster, this is a practice you'll need to adopt.
We use CI/CD because it helps us sleep at night, and we move the responsibility of delivery to a separate system, instead of relying on a single developer's computer, like using Visual Studio's Publish feature.
So, what do we need to get started?
This guide assumes that you have an active DXC Service subscription, and that you have requested a Tenant ID from Episerver support, so that you can connect your Azure DevOps to that subscription's Integration environment. While you're requesting that Tenant ID, also ask for your SendGrid credentials, as those will come in handy later on.
Go and sign up for Azure DevOps and create your project. Then it's time to set up your build process. This is going to get rather long, so strap in.
Project preparations
In order for Azure DevOps to do things with out project, that Visual Studio shouldn't do in our local development environment, we'll need to add a few lines to our csproj file. You can put them near the end of the file.
  <ItemGroup>
    <None Include="AzureDevOps.targets" />
  </ItemGroup>
  <Import Project="AzureDevOps.targets" Condition="Exists('AzureDevOps.targets')" />
Then create the following file as AzureDevOps.targets in the root of your project. Note: We're building our prototype as a separate process, as you'll see later on, some of the steps in the .targets file won't apply to you, but then again, they might inspire you to do things differently.
<Project DefaultTargets="Build" xmlns="http://schemas.microsoft.com/developer/msbuild/2003">
  <Target Name="MaintenancePage" AfterTargets="PipelineCopyAllFilesToOneFolderForMsdeploy">
    <Copy SourceFiles="..\ui\dist\maintenance.html" DestinationFiles="$(_PackageTempDir)\maintenancepage.htm" />
  </Target>
  <Target Name="MaintenanceToAppOffline" AfterTargets="MaintenancePage">
    <Copy SourceFiles="$(_PackageTempDir)\maintenancepage.htm" DestinationFiles="$(_PackageTempDir)\App_Offline.htm" />
  </Target>
  <Target Name="AssetFilesForPackage" AfterTargets="PipelineCopyAllFilesToOneFolderForMsdeploy">
    <ItemGroup>
      <Files Include="..\ui\public\**\*.*" Exclude="..\ui\public\mock\**\*.*;..\ui\public\*.htm*" />
    </ItemGroup>
    <Copy SourceFiles="@(Files)" DestinationFolder="$(_PackageTempDir)\Assets\%(RecursiveDir)" />
  </Target>
</Project>
The key here is the "PipelineCopyAllFilesToOneFolderForMsdeploy" task that is only performed by Azure DevOps, and not locally. What these tasks do, is copy some build output from a few directories to certain files. In our project we use a separate process for frontend assets, and the build output from tha tprocess is then copied into the deployment package. The specifics aren't that important, as I'm sure your process is different and you'll have to either remove or adapt these steps to suit your needs. But I think you get the gist of it.
If you don't like to include separate files, you can paste the contents of the .targets file directly into the csproj file, and that'll work too.
Next, we'll need to add some transformations and parameters.
The file parameters.xml has a special meaning in Visual Studio and MS Build, as it becomes a SetParameters.xml file after build, that will fit nicely into the process. I'm no expert, but I'm sure there's some documentation around the feature that you can read up on if you'd like.
Add this to the parameters.xml file, in the root of the project, and set its type to "Content". We'll use it later on.
<?xml version="1.0" encoding="utf-8"?>
<parameters>
	<parameter name="Sendgrid.Username" description="The username used for Sendgrid authentication" defaultValue="#{Sendgrid.UserName}#" tags="">
		<parameterEntry kind="XmlFile"
		                scope="obj\\Release\\Package\\PackageTmp\\Web\.config$"
		                match="/configuration/system.net/mailSettings/smtp/network/@userName" />
	</parameter>
	<parameter name="Sendgrid.Password" description="The password used for Sendgrid authentication" defaultValue="#{Sendgrid.Password}#" tags="">
		<parameterEntry kind="XmlFile"
		                scope="obj\\Release\\Package\\PackageTmp\\Web\.config$"
		                match="/configuration/system.net/mailSettings/smtp/network/@password" />
	</parameter>
</parameters>
As for config transforms, Episerver DXC Service will automatically transform Web.Preproduction.config and Web.Production.config, as those are the names of the environments, but since they don't control deployments into the integration environment, Web.Integration.config won't be automatically applied. But, we'll use that name anyway, since it will be a lot less confusing :)
When using Episerver DXC Service, config transforms should be considered as sequencial, meaing that any changes introduced in Web.Integration.config, should be considered as present when doing transforms with Web.Preproduction.config, and so forth into production. This can be a hassle to troubleshoot after the first deploy, but once you get it right, very few changes are probably needed, so it's not that big of a deal.
In my Web.config I have SMTP settings that uses a MailDrop folder for generated emails, but I'd like to change that in Integration, and add some more things not relevant for my local environment, like Azure blob storage and Azure events. Also, I'll remove my local Find configuration. (Remember, an extra index is included in the DXC Service subscription, but you gotta remember to ask for it!)
Web.config (snippet)
  <system.net>
    <mailSettings>
      <smtp deliveryMethod="SpecifiedPickupDirectory">
        <specifiedPickupDirectory pickupDirectoryLocation="C:\Projects\Client\src\Client.Web\App_Data\MailDrop" />
      </smtp>
    </mailSettings>
  </system.net>
Web.Integration.config
<?xml version="1.0" encoding="utf-8"?>
<configuration xmlns:xdt="http://schemas.microsoft.com/XML-Document-Transform">
  <episerver.find xdt:Transform="Remove" />
  <episerver.framework>
    <blob defaultProvider="AzureBlobs" xdt:Transform="Insert">
      <providers>
        <add name="AzureBlobs" type="EPiServer.Azure.Blobs.AzureBlobProvider, EPiServer.Azure" connectionStringName="EPiServerAzureBlobs" container="blobs" />
      </providers>
    </blob>
    <event defaultProvider="AzureEvents" xdt:Transform="Insert">
      <providers>
        <add name="AzureEvents" type="EPiServer.Azure.Events.AzureEventProvider, EPiServer.Azure" connectionStringName="EPiServerAzureEvents" topic="events" />
      </providers>
    </event>
  </episerver.framework>
  <system.net>
    <mailSettings>
      <smtp xdt:Transform="Replace" from="no-reply+integration@client.com" deliveryMethod="Network">
        <network host="smtp.sendgrid.net" port="587" userName="" password="" enableSsl="true" />
      </smtp>
    </mailSettings>
  </system.net>
</configuration>
Web.Preproduction.config
<?xml version="1.0" encoding="utf-8"?>
<configuration xmlns:xdt="http://schemas.microsoft.com/XML-Document-Transform">
  <system.net>
    <mailSettings>
      <smtp xdt:Transform="SetAttributes(from)" from="no-reply+preprod@client.com" />
    </mailSettings>
  </system.net>
  <system.web>
    <httpRuntime enableVersionHeader="false" xdt:Transform="SetAttributes(enableVersionHeader)" />
  </system.web>
  <system.webServer>
    <security>
      <requestFiltering removeServerHeader="true" xdt:Transform="SetAttributes(removeServerHeader)" />
    </security>
  </system.webServer>
</configuration>
OK, that should probably be enough. Next we'll set up the build process.
Step one! We can have lots of fun!
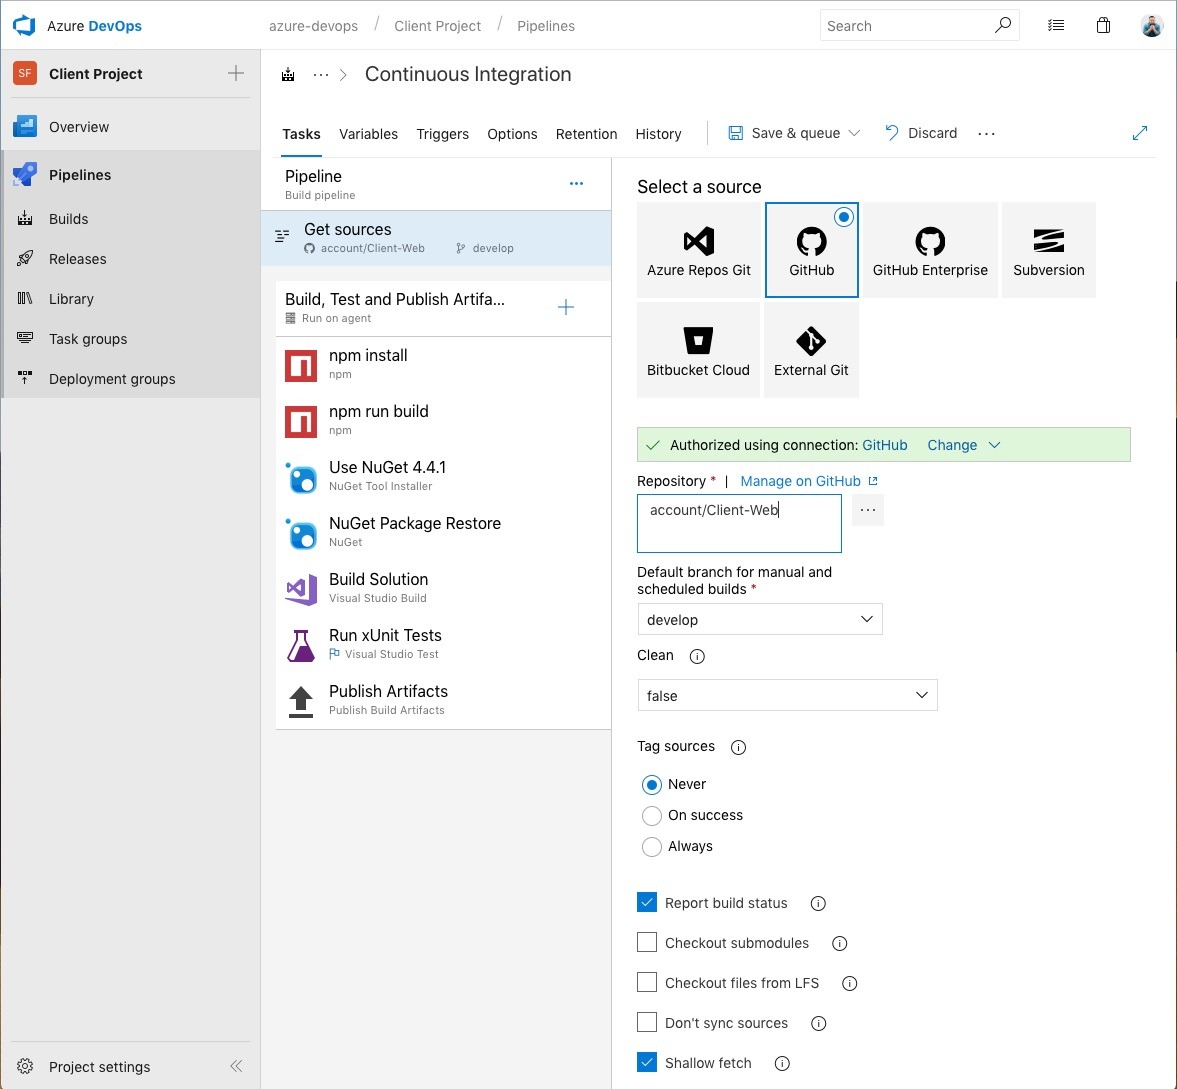
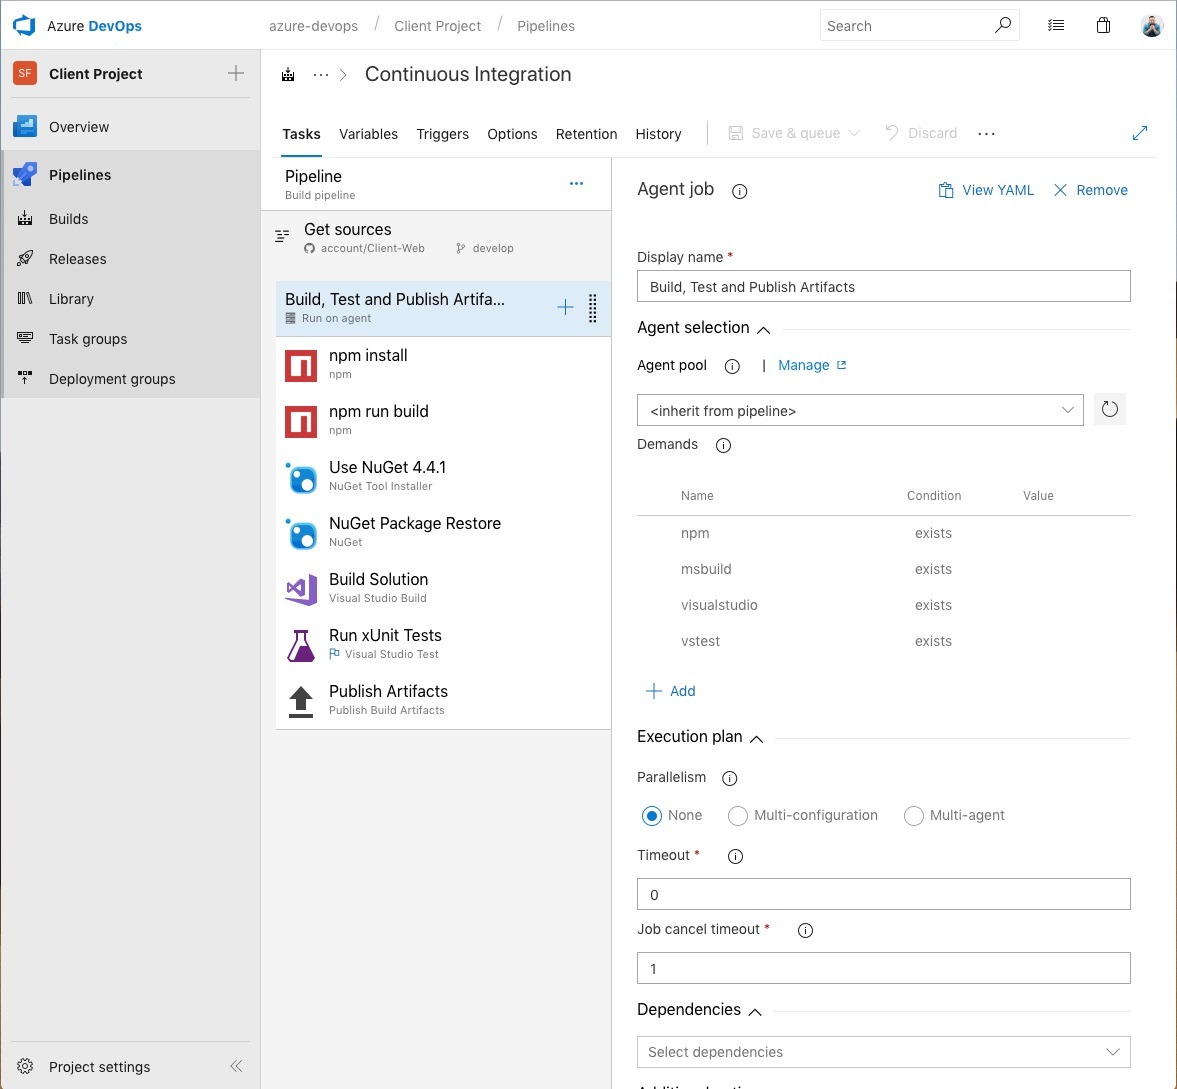
I think I used a guide for setting this up in the first place, but I've forgotten what that looked like. If you're using a guide, you can look at these screen shots as a reference.
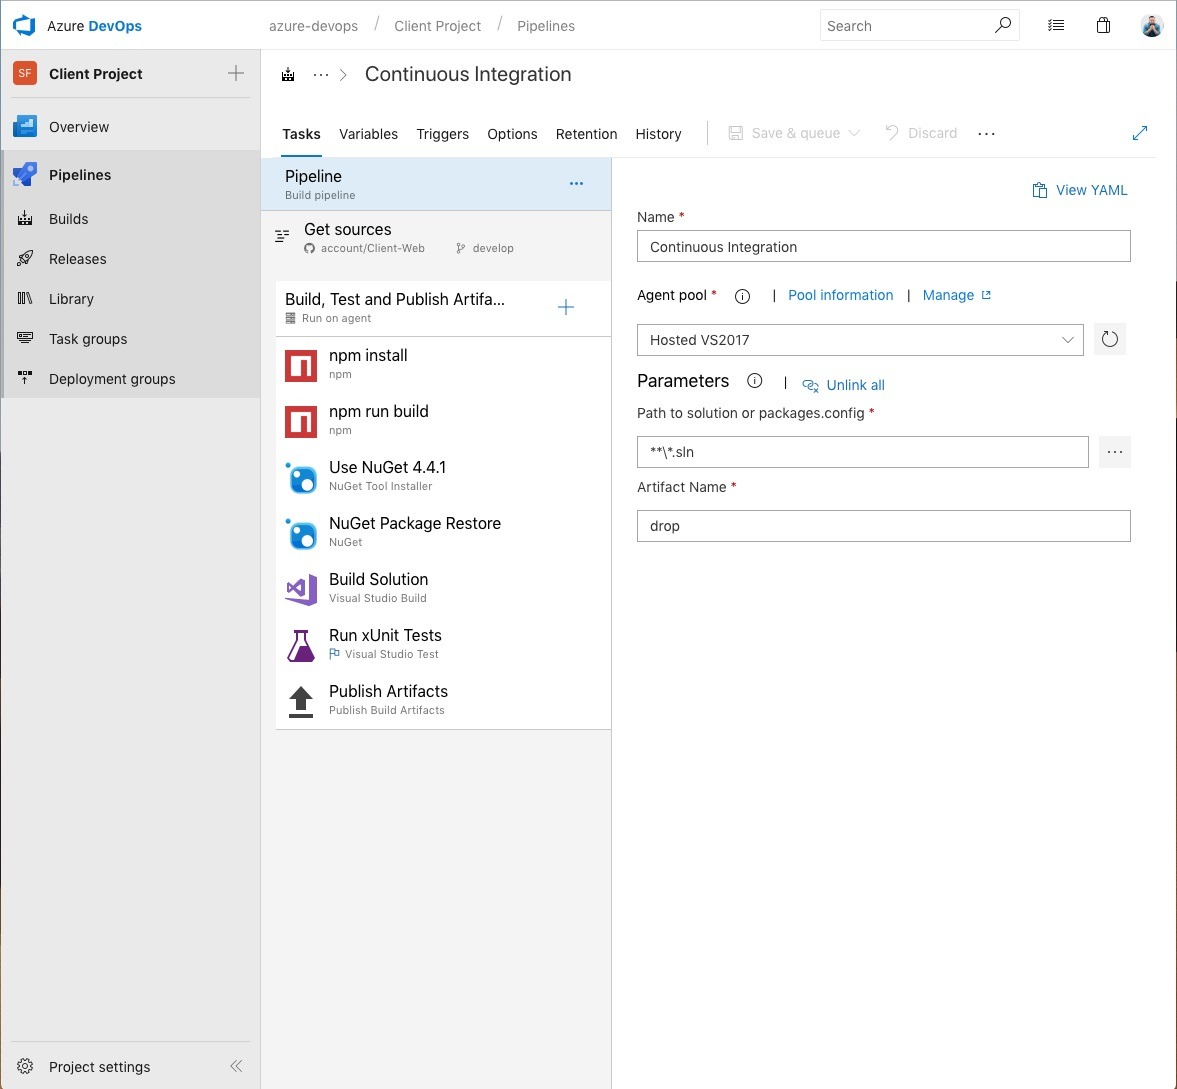
This is the general outline of the build process. Since we're using a hosted VS2017 instance, no caching is done between builds, meaning that the tasks npm install and nuget restore will take some time, but if it's free, we can't afford to be that picky. Relax and enjoy your coworker's company for a few minutes.
For clarification, our project's directory structure looks something like this:
<root>
  - src
    - Client.Web
    - Client.Core
    - <more projects>
    - ui
      - src
        package.json
        <a gazillion other frontend files I can never get my head around>
    Client.Web.sln
    nuget.config
This is what our nuget.config looks like
<?xml version="1.0" encoding="utf-8"?>
<configuration>
  <packageSources>
    <add key="NuGet.org" value="https://api.nuget.org/v3/index.json" />
    <add key="Episerver" value="http://nuget.episerver.com/feed/packages.svc/" />
  </packageSources>
</configuration>
Next, here's what those steps looks like. Pretty straight forward.
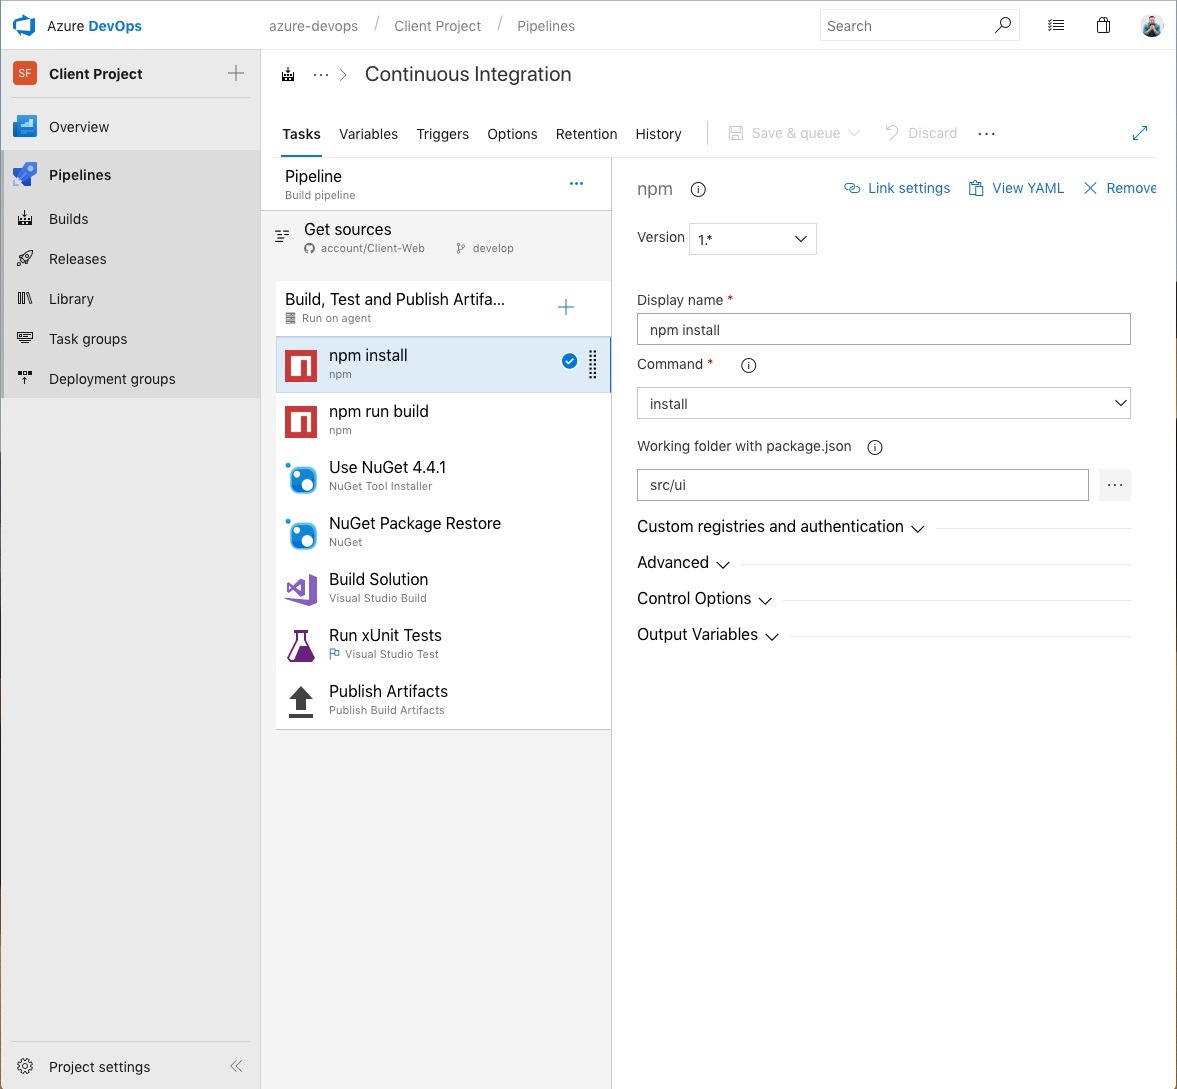
Here's a reference to the root directory for the UI project, ui/src, given that the build process runs from <root>.
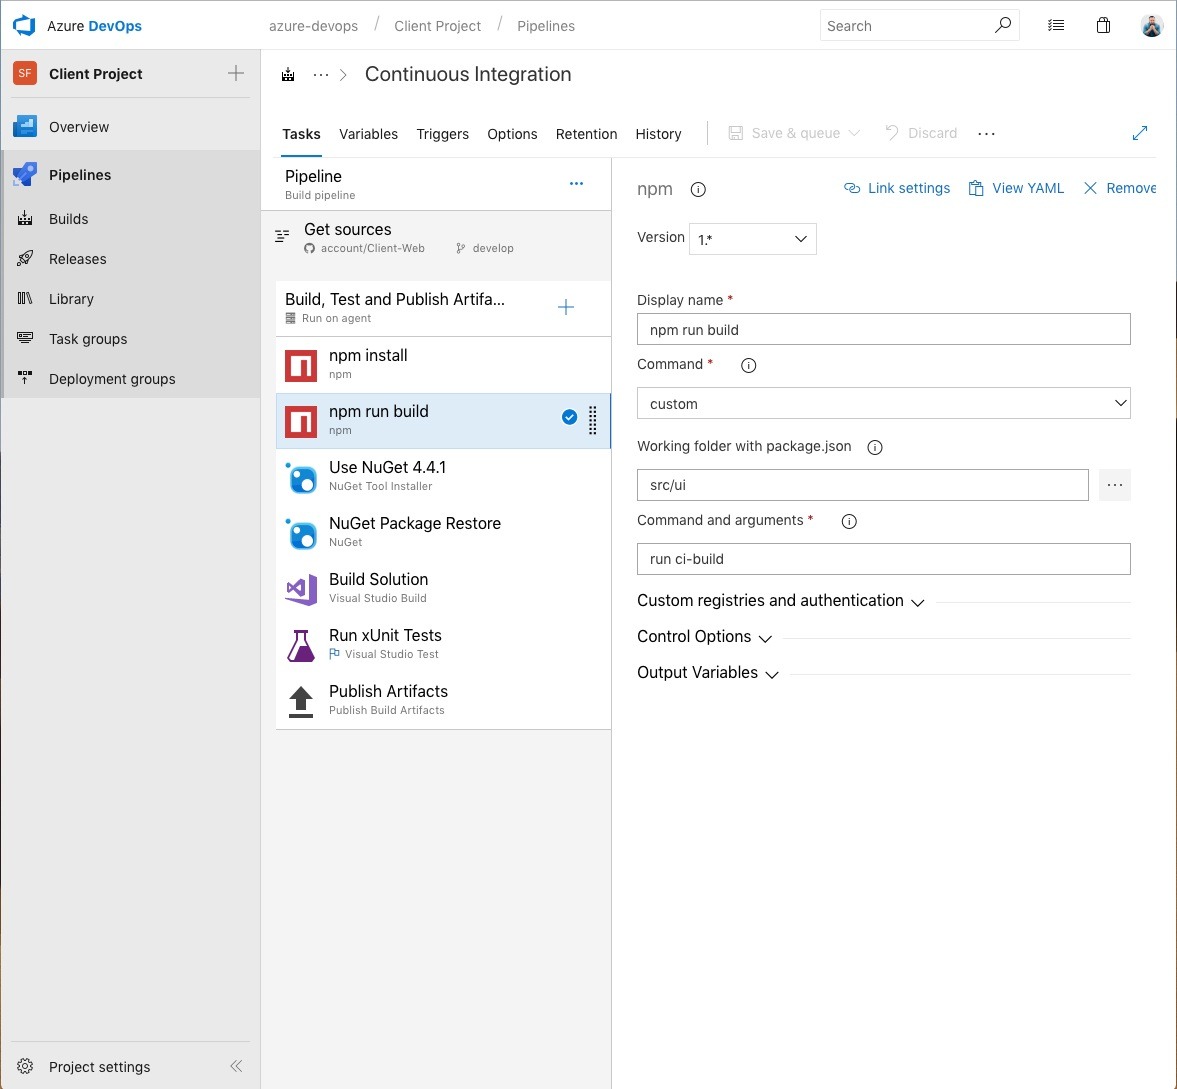
Again, specifying the root directory for the UI project, ui/src, and our specific run command that we've set up for doing things especially for when we run the ci build. That could be unit testing JavaScript, bundling, linting, minification and so on. Apparently, this week, wepback is what the kids use.

We might not need this, I honestly don't know :)

Specifying that src/nuget.config file.
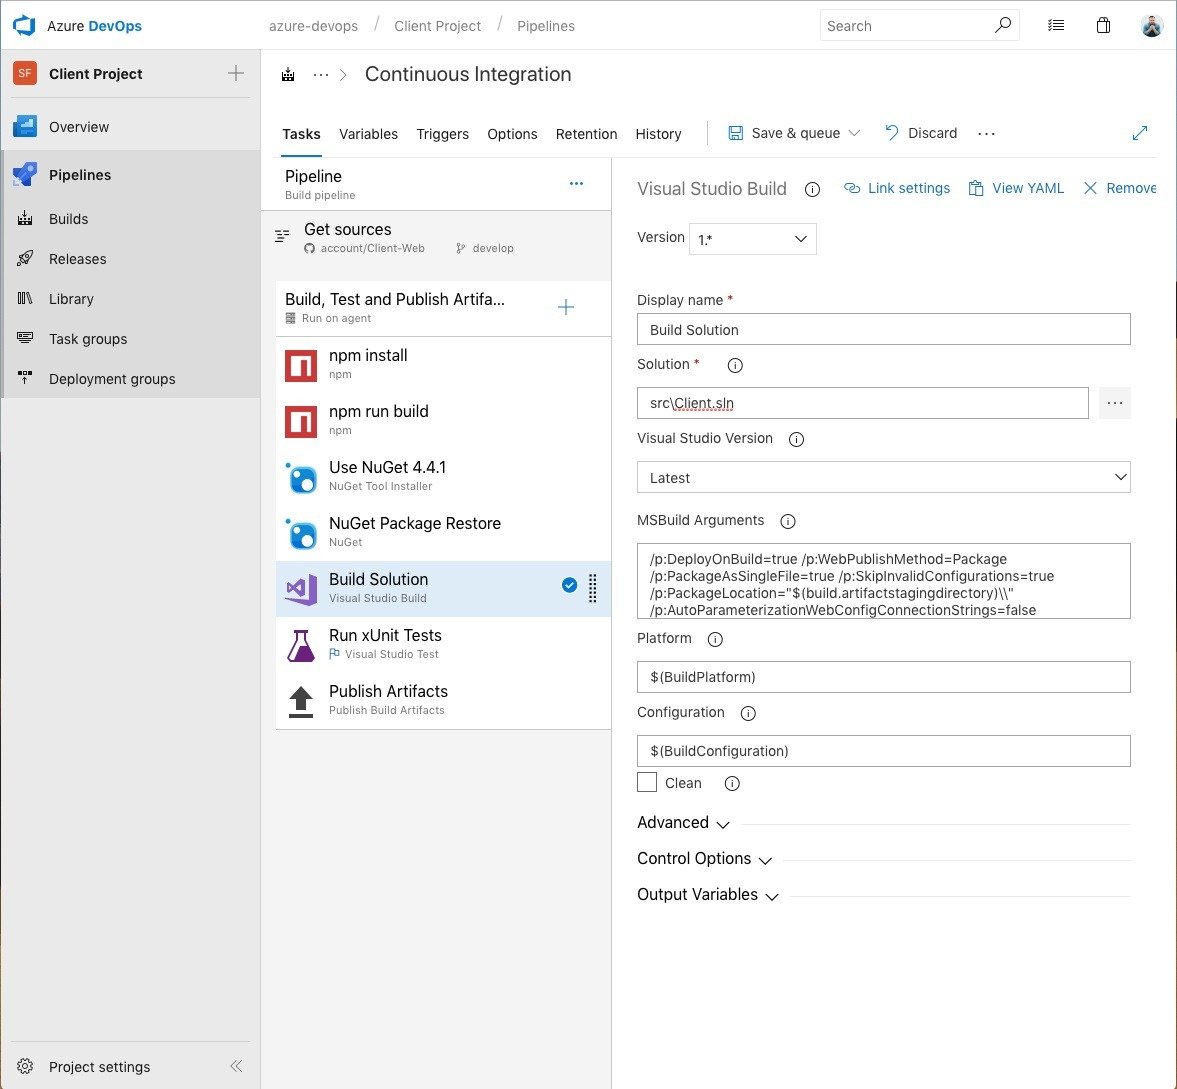
This is where all that stuff with the parameters.xml, and AzureDevops.targets comes into play. Instead of you having to visually decode those arguments, they're here: /p:DeployOnBuild=true /p:WebPublishMethod=Package /p:PackageAsSingleFile=true /p:SkipInvalidConfigurations=true /p:PackageLocation="$(build.artifactstagingdirectory)\\" /p:AutoParameterizationWebConfigConnectionStrings=false
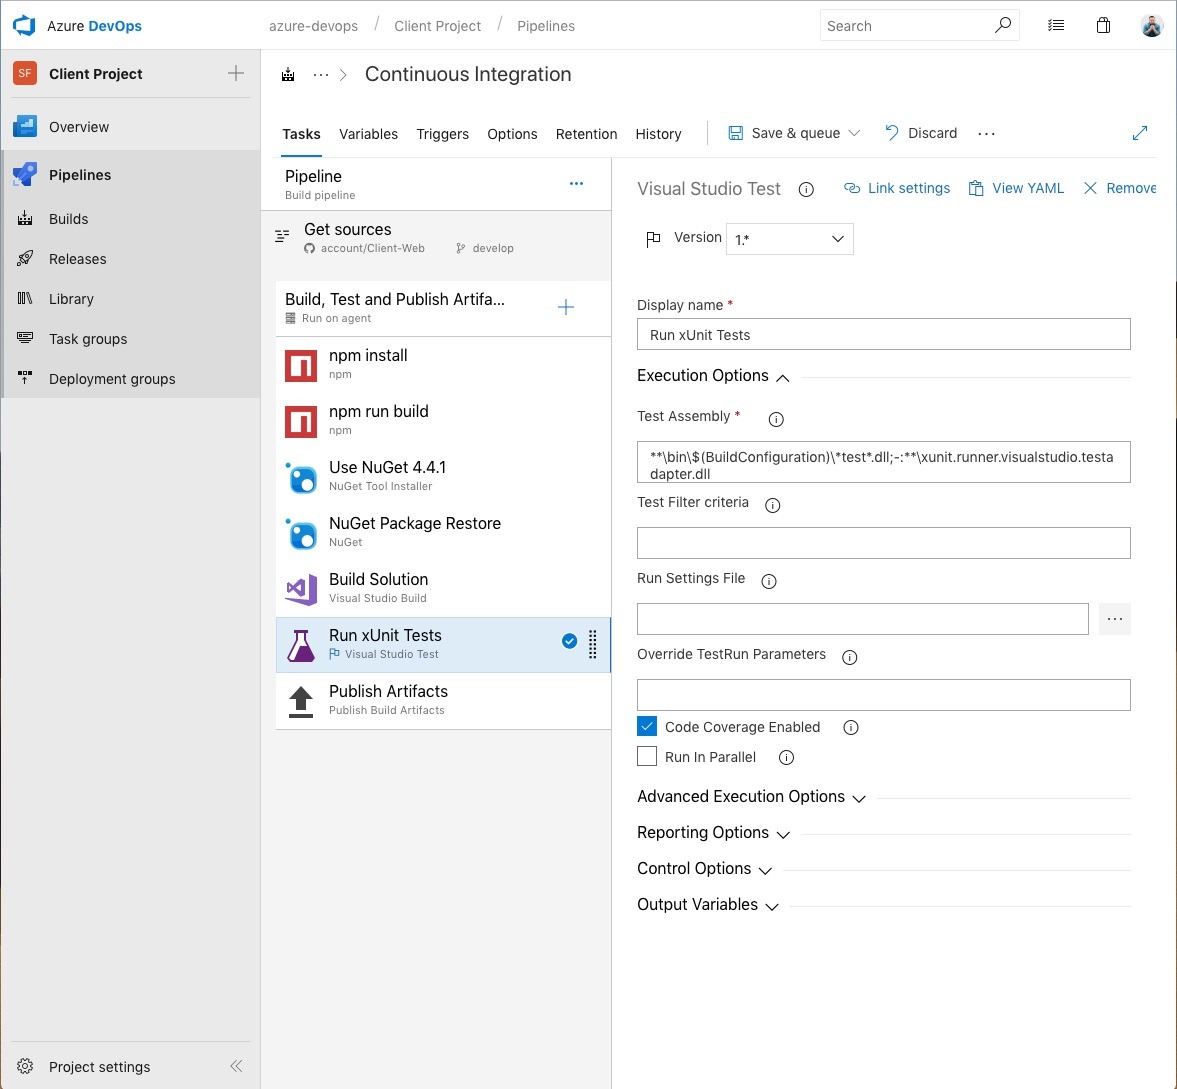
As we all know, tests are totally optional. If you don't have any, or use a different tool than xUnit, do your thing. If you're not using MSTest (who is these days?) you will probalby need a runner, I'm using xunit.runner.visualstudio as a wrapper. It works for me (and not only on my machine!)
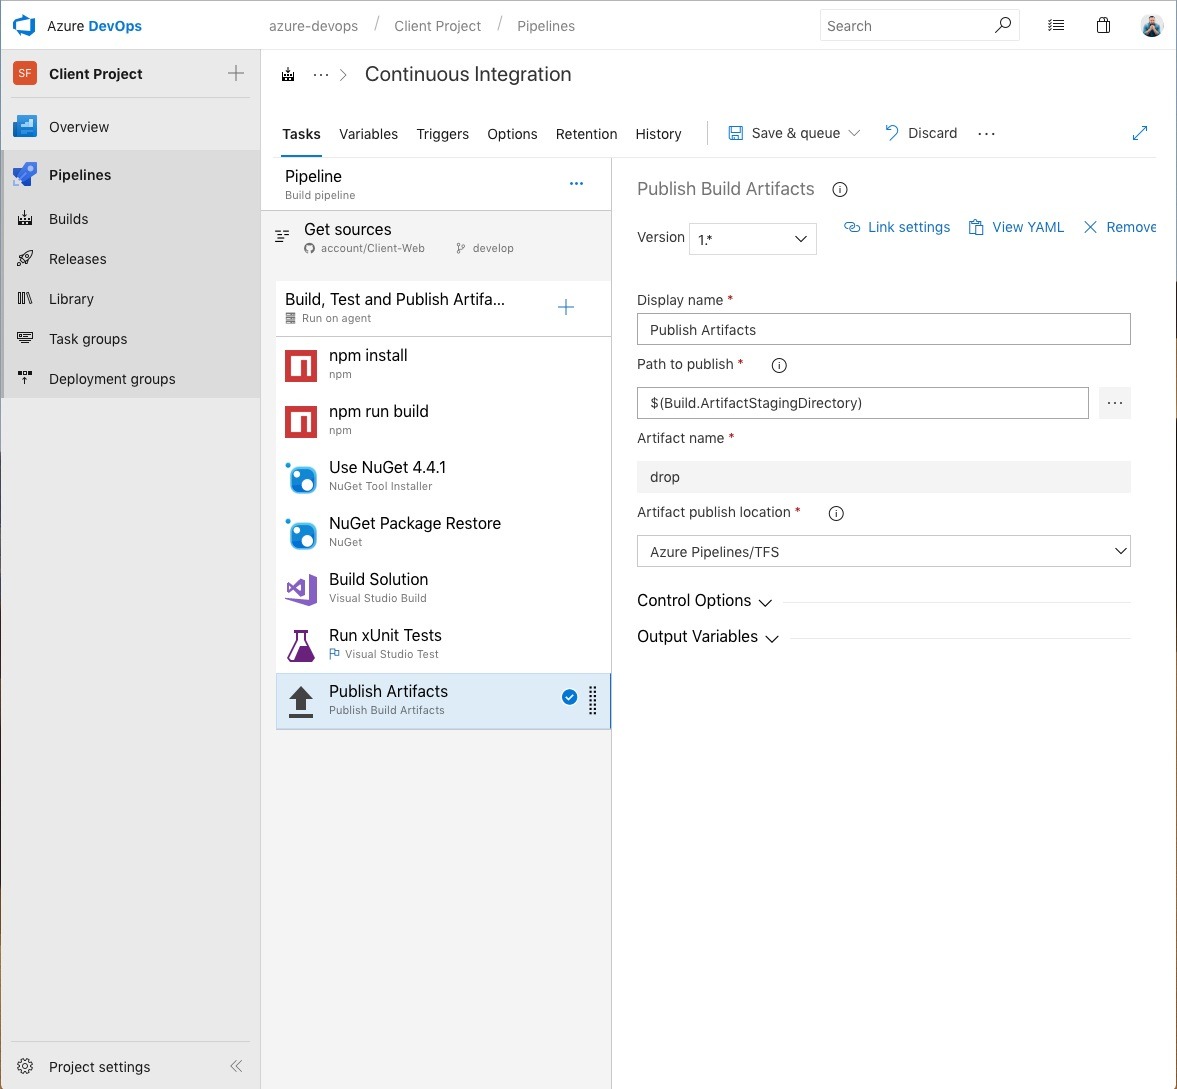
This puts the output artifacts, named "drop", where we can get at it from our Release step.
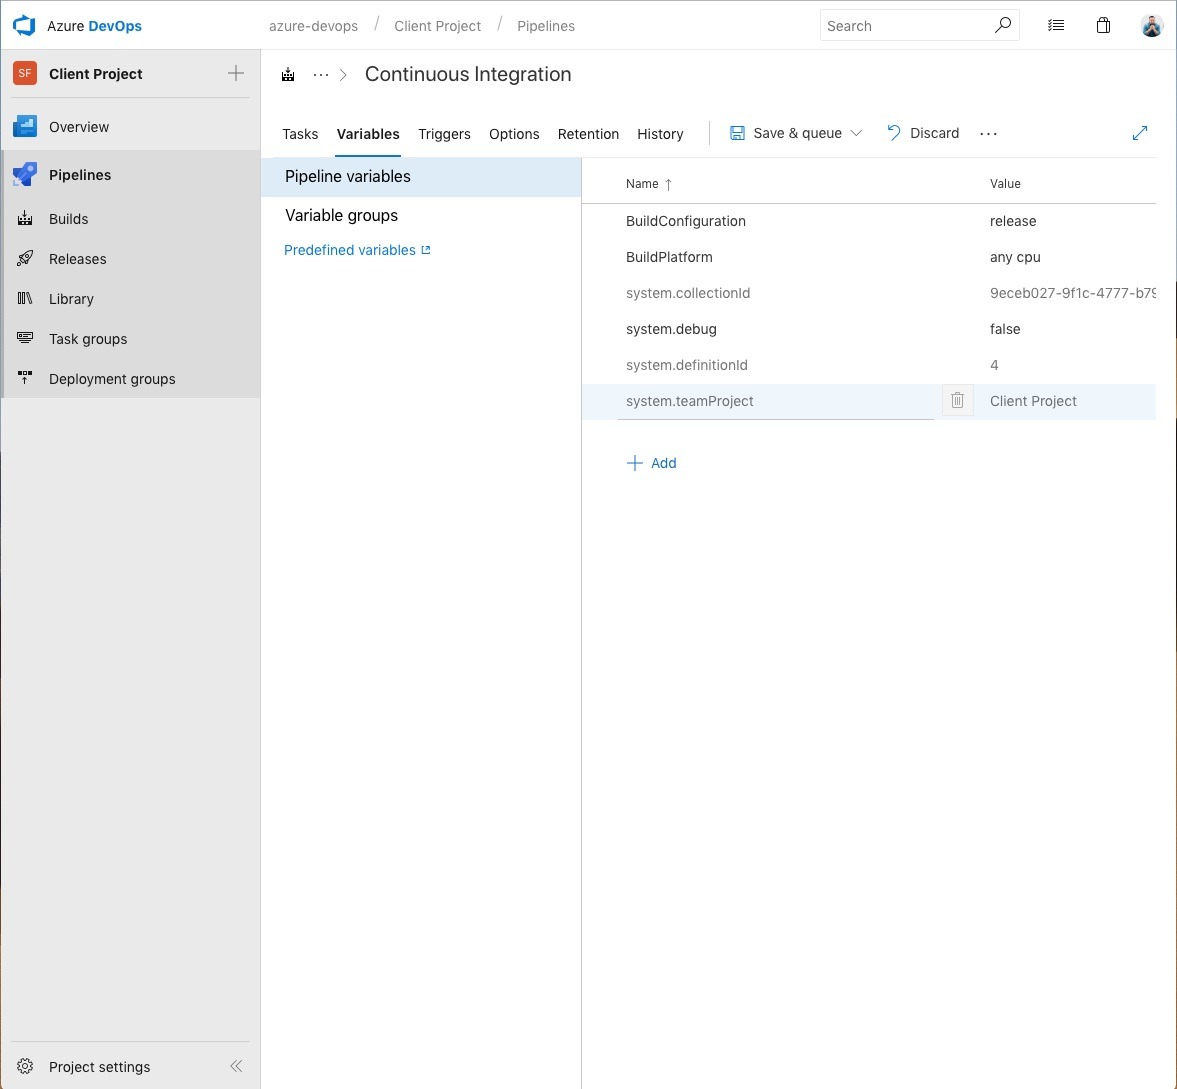
This is just what the variables for the build pipeline looks like, so you have something to compare yours too. I know how we all like to compare things.
On to the release, where we tie things together with the DXC Service, and all our hard work comes to fruition.
Step two! There's so much we can do!

This is our release, called Continuous Deployment, since it is triggered on every build from the develop branch. Essentially, that will deploy all our changes into the Integration environment in DXC Service. Doing this will require us to do all of our feature work in feature branches, and integrate changes with pull-requests, or live with the fact that things break. In my opinion, either way is fine. Things will break any way, having a process that enables us to fix those breaks fast, is better than living in constant fear of failing. Some people say "Go big, or go home", "Fail fast", and things like "Move fast and break things". I like it better when things don't break. So having this process in place enables me to fix things before anybode else notices, which is pretty close to not braking things at all. If a tree falls in the forest, and all that jazz.
I've named my environment "Integration", because, 1. it ties nicely into the whole DXC Service naming of things, and 2. it allows us to have automagic config transforms of Web.Integration.config.
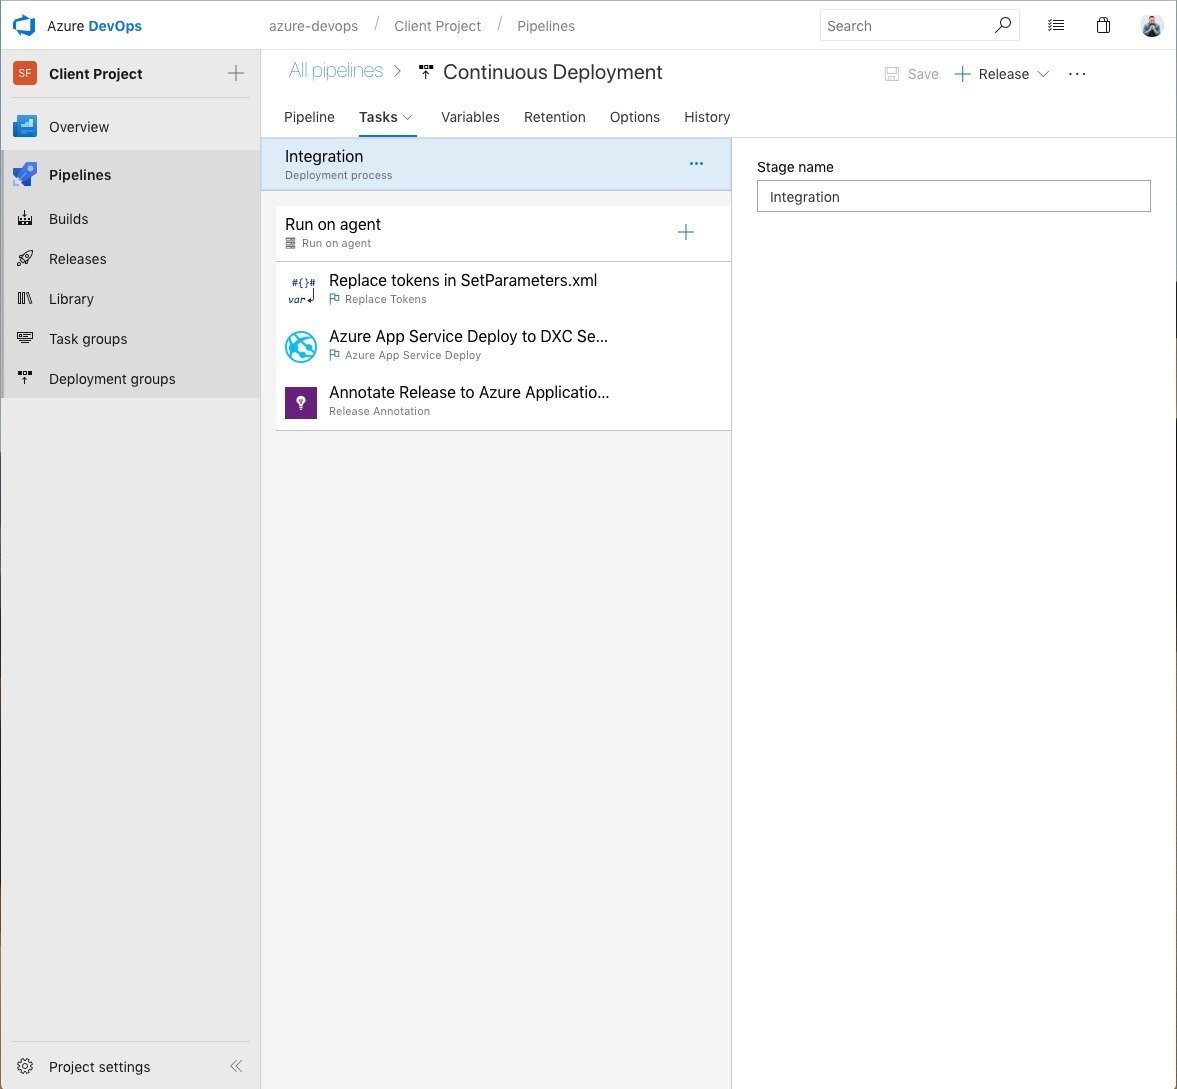
The whole deployment is made up of three steps, one of which is completely voluntary (and probably unnecessary), which is the last one, Annotate Release, which will log the release in Application Insights. The reason it is probably unnecessary, is because it will only annotate it in AI for the Integration environment. That environment is always so painfully slow, it will probably not give me any insights into performance changes in conjuction with the release. But enough ranting about that.
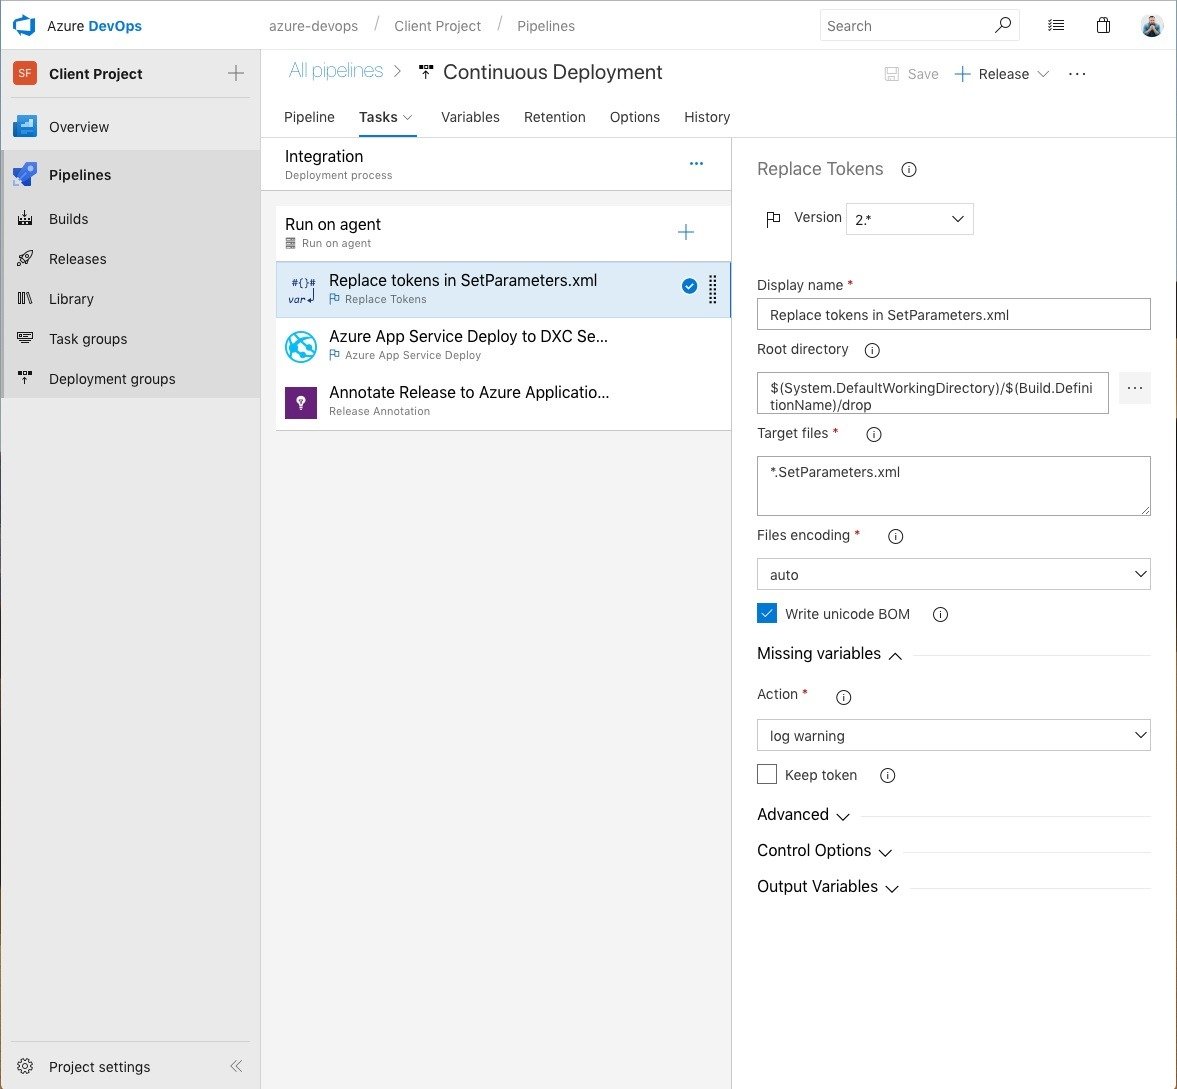
This is an important step, as it will replace tokens in the SetParameters.xml generated by the build, and later applied to Web.config, enabling us to keep our SMTP credentials away from source control, and safely stored as variables in the release. I'm using a custom step from the Marketplace, called Replace Tokens, in the root directory "$(System.DefaultWorkingDirectory)/$(Build.DefinitionName)/drop" for the target files of "*.SetParameters.xml".
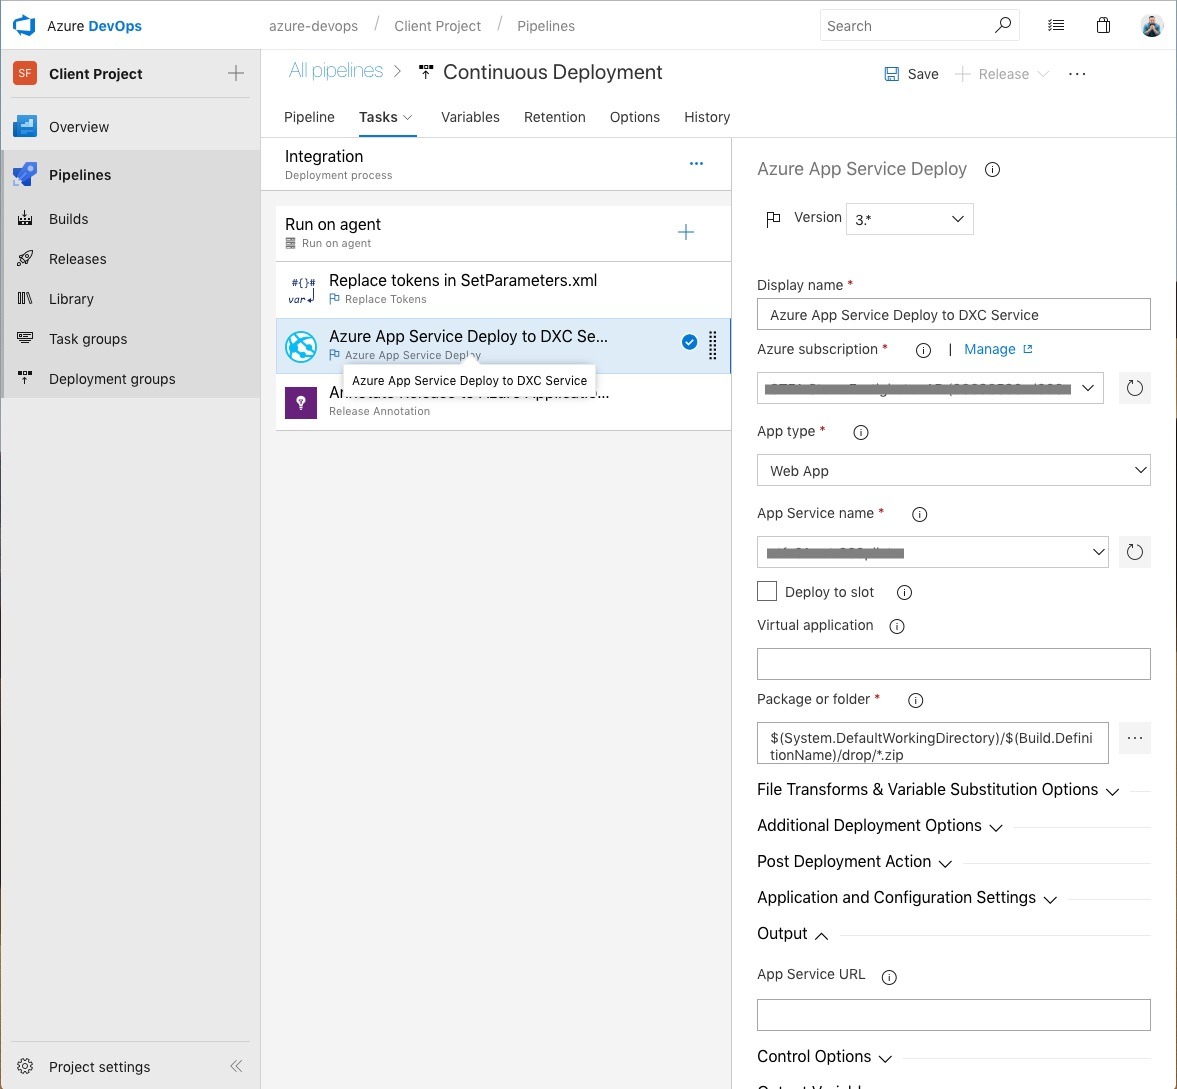
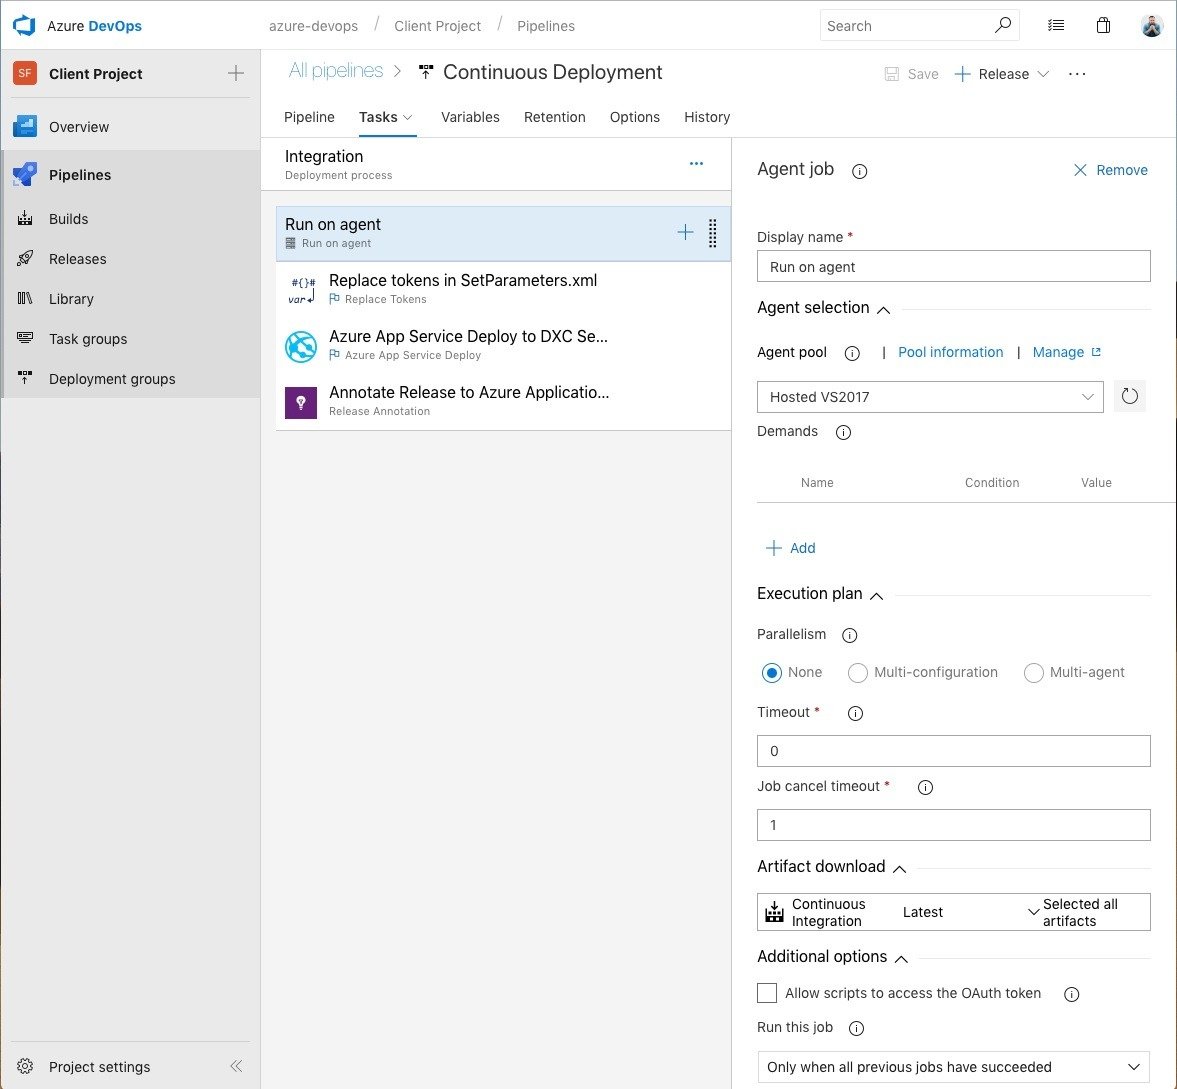
This is where that Tenant ID will come in handy. Using it you can connect Azure DevOps to your DXC Service Azure Subscription, and by specifying the folder "$(System.DefaultWorkingDirectory)/$(Build.DefinitionName)/drop/*.zip" files will be picked up correctly. It's hard of fitting everything in a screenshot, so here's the rest:
Under "File Transforms & Variable Substitution Options" select "XML transformation" and "XML variable substitution".
Under "Additional Deployment Options" select "Take App Offline", "Publish using Web Deploy", "Remove additional files at destination", and "Exclude files from the App_Data folder". In the text box for "SetParameters file" input "$(System.DefaultWorkingDirectory)/$(Build.DefinitionName)/drop/Client.Web.SetParameters.xml" where "Client.Web" is the name of your package, in my case, the main web project.
Under "Post Deployment Action", select "Inline Script" as the "Deployment script type", and put this in the text box to do some post-deploy house keeping.
@echo off
del parameters.xml
del Web.$(Release.EnvironmentName).config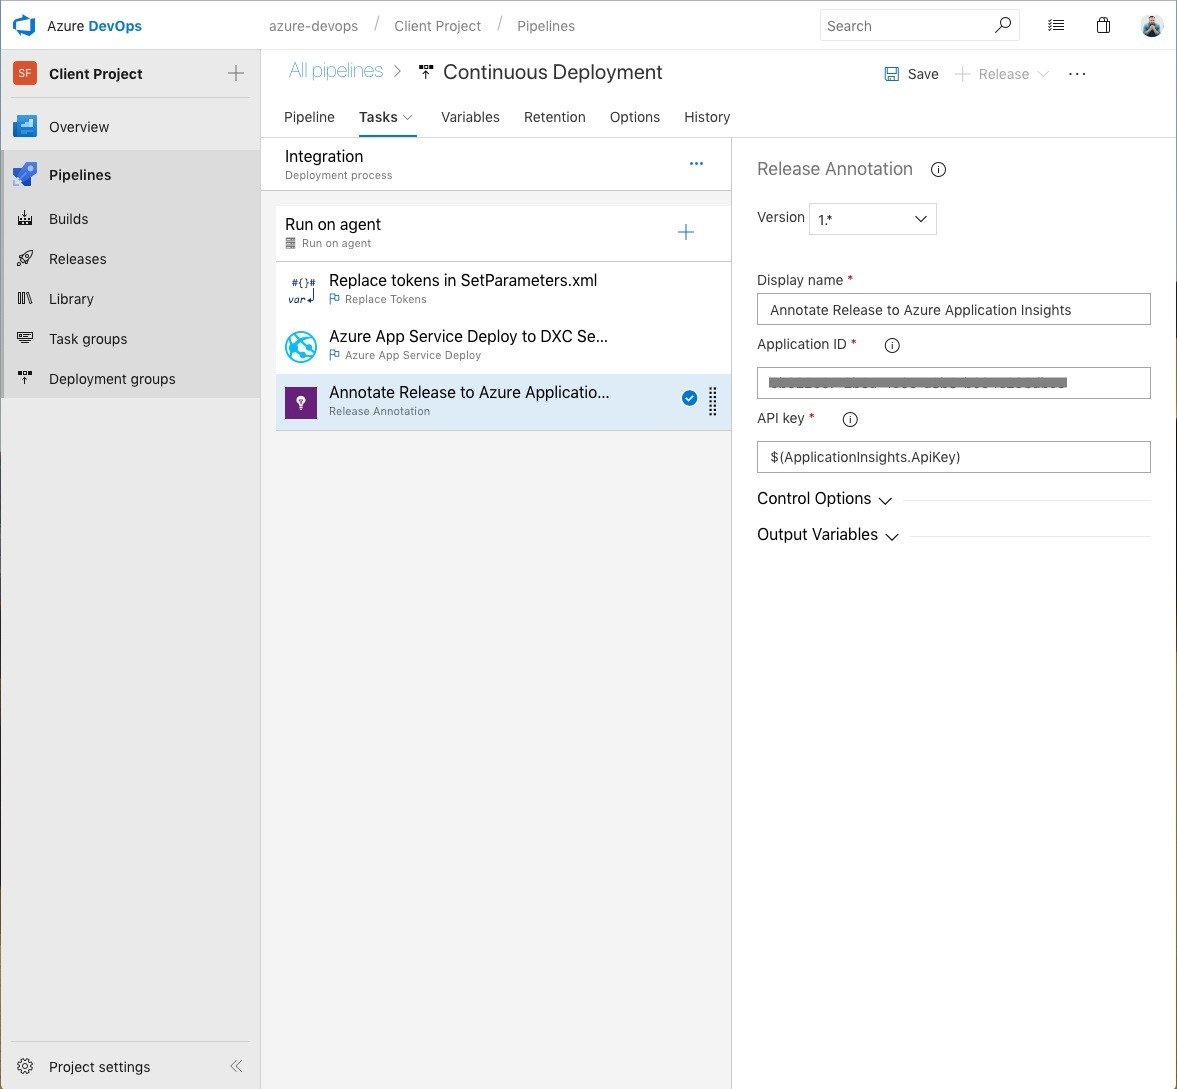
If you too want to do unnecessary annotations in AI, get your appliation ID from your azure portal for the DXC Service subscription, paste it in the "Application ID" field, and add "$(ApplicationInsights.ApiKey)" in the API Key field.
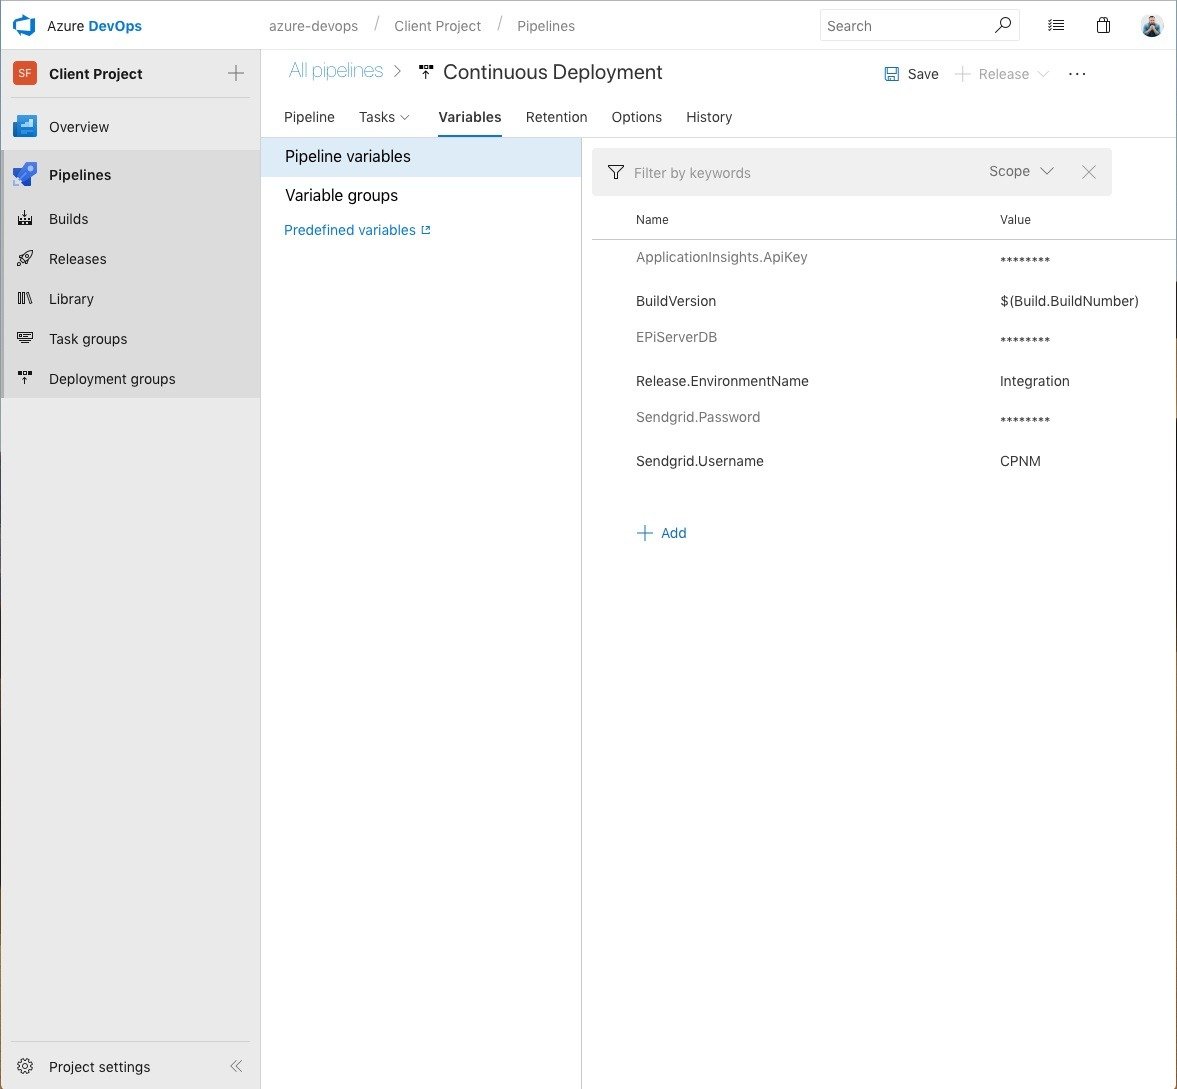
This is the mothership. This is where we store our sensitive information.
- ApplicationInsights.ApiKey is an API key that you can generate yourself from the azure portal for the AI account for the integration environment.
- BuildVersion is a value I use and have an appSetting for, it will automagically be given the value of my $(Build.BuildNumber) variable. Appsettings and ConnectionStrings are like that.
- EPiServerDB is the connectionstring for the integration environment, it, like the appsetting will be automagivally replaced.
- Release.EnvironmentName is Integration, beacuse reasons.
- Sendgrid.Password and Sendgrid.Username are given to you, upon request, from Episerver operations, and are tied to your DXC Service subscription. They are the same for Integration through Production, so no need to store those in source control either. No credentials in source control, ever. Note: CPNM is not my real username for SendGrid. No credentials in screen shots either, ever.
Step three! It's just you and me!
Well, that was it for this time.
In conclusion, setting up a CI/CD toolchain isn't black magic, as you've seen. It's an automated chain of hacks and quirks, that somehow just works™.
As always, comments, discussions and feedback is greatly appreciated.
Step four! I can give you more!
Step five! Don't you know that the time is right! Huh!
P.S. As Scott mentioned in the comments, there's a YAML export/import functionality. So here's the YAML.
resources:
- repo: self
  fetchDepth: 10
queue:
  name: Hosted VS2017
  demands:
  - npm
  - msbuild
  - visualstudio
  - vstest

variables:
  Parameters.solution: 'src\Client.sln'
  Parameters.ArtifactName: 'drop'

steps:
- task: Npm@1
  displayName: 'npm install'
  inputs:
    workingDir: src/ui

    verbose: false


- task: Npm@1
  displayName: 'npm run build'
  inputs:
    command: custom

    workingDir: src/ui

    verbose: false

    customCommand: 'run ci-build'


- task: NuGetToolInstaller@0
  displayName: 'Use NuGet 4.4.1'
  inputs:
    versionSpec: 4.4.1


- task: NuGetCommand@2
  displayName: 'NuGet Package Restore'
  inputs:
    restoreSolution: '$(Parameters.solution)'

    feedsToUse: config

    nugetConfigPath: src/nuget.config


- task: VSBuild@1
  displayName: 'Build Solution'
  inputs:
    solution: '$(Parameters.solution)'

    msbuildArgs: '/p:DeployOnBuild=true /p:WebPublishMethod=Package /p:PackageAsSingleFile=true /p:SkipInvalidConfigurations=true /p:PackageLocation="$(build.artifactstagingdirectory)\\" /p:AutoParameterizationWebConfigConnectionStrings=false'

    platform: '$(BuildPlatform)'

    configuration: '$(BuildConfiguration)'


- task: VSTest@1
  displayName: 'Run xUnit Tests'
  inputs:
    testAssembly: '**\bin\$(BuildConfiguration)\*test*.dll;-:**\xunit.runner.visualstudio.testadapter.dll'

    codeCoverageEnabled: true

    vsTestVersion: latest

    otherConsoleOptions: /InIsolation

    platform: '$(BuildPlatform)'

    configuration: '$(BuildConfiguration)'


- task: PublishBuildArtifacts@1
  displayName: 'Publish Artifacts'
  inputs:
    ArtifactName: '$(Parameters.ArtifactName)'
Thanks for a great and long post! :)
Thanks for sharing. Great post :)
Nice, this is pretty much exactly the same as we are doing although we are moving to YAML definitions as is the new standard for the pipelines so they can be in source control. This way when setting up a new project tof the base you don't need to re-do anything. It's quite easy to move there's an export to YAML in the main build area. It might be worth in your post sharing your YAML so others can set up this process without need to use the UI
Thanks for your input Scott! I have added the YAML to the end of the article, making it even longer :)
Thanks for the post, I'm nearly finished with a similair setup.
I don't think you need the Annoate Release to Azure Application Insights task because the Azure App Service Deployment task does this for you already. I mean, when I look at my deployment logs, one of the last lines says "Successfully added release annotation to the Application Insight : ...............".
Thanks for sharing Stephan. If anyone gets stuck in setting up the Service Connection for the release step, there is a good post here that shows how to access the dialog with all the settings needed to connect (Subscription ID/Tenant ID/Client ID/Key).
Hi Stephen, great post and still relevant.
For the App Service Deploy task, when I try to connect to the DXC Azure subscription I get the error - "Failed to create an app in Azure Active Directory". Any ideas ? Do we need to get Episerver MS give additional permissions or is it an Azure DevOps issue ?
Thanks