
How to Set Up CI/CD Pipeline for Optimizely Frontend Hosting Using GitHub Actions
As I promised in my previous blog post about getting started with Optimizely Frontend Hosting, today I’m delivering on that promise by sharing how to automate your deployment process with GitHub Actions. In this step-by-step tutorial, I’ll show you how to set up a CI/CD pipeline that automatically deploys your frontend app every time you push to the main branch.
Prerequisites
Before you start, make sure you have:
-
A working Optimizely Frontend Hosting setup (with environments like Test1, Test2, Production1)
- Remember to add all necessary env variable before you do deployemnt
-
Your Optimizely Project ID, Client Key, and Client Secret
-
A PowerShell deployment script (see below)
-
A GitHub repo with your project code
Step 1: Add Secrets to GitHub
Go to your GitHub repository → Settings → Secrets and variables → Actions → click New repository secret:
| Name | Value |
|---|---|
| OPTI_PROJECT_ID | Your Optimizely Project ID |
| OPTI_CLIENT_KEY | Your Optimizely Client Key |
| OPTI_CLIENT_SECRET | Your Optimizely Client Secret |
Step 2: Prepare the PowerShell Deployment Script
Create a script called deploy.ps1 in your repo (e.g., under a scripts/ folder).
# scripts/deploy.ps1

# Validate required environment variables
if (-not $env:OPTI_PROJECT_ID -or -not $env:OPTI_CLIENT_KEY -or -not $env:OPTI_CLIENT_SECRET) {
    Write-Host "Missing required environment variables." -ForegroundColor Red
    exit 1
}

# Install and import EpiCloud module
Install-Module -Name EpiCloud -Scope CurrentUser -Force -ErrorAction SilentlyContinue
Set-ExecutionPolicy -ExecutionPolicy RemoteSigned -Scope CurrentUser -Force
Import-Module EpiCloud

# Deployment settings
$projectId = $env:OPTI_PROJECT_ID
$clientKey = $env:OPTI_CLIENT_KEY
$clientSecret = $env:OPTI_CLIENT_SECRET
$targetEnvironment = "Test1"

# Paths
$timestamp = Get-Date -Format "yyyyMMdd-HHmmss"
$zipName = "optimizely-one-github.head.app.$timestamp.zip"
$zipPath = ".\$zipName"

# Create ZIP from current directory excluding ignored files
# (GitHub Actions runners will not include `.git`, so you're safe)
Compress-Archive -Path * -DestinationPath $zipPath

if (-not (Test-Path $zipPath)) {
    Write-Host "Failed to create ZIP file." -ForegroundColor Red
    exit 1
}

# Deploy using EpiCloud
Connect-EpiCloud -ProjectId $projectId -ClientKey $clientKey -ClientSecret $clientSecret
$sasUrl = Get-EpiDeploymentPackageLocation
Add-EpiDeploymentPackage -SasUrl $sasUrl -Path $zipPath

Start-EpiDeployment `
    -DeploymentPackage $zipName `
    -TargetEnvironment $targetEnvironment `
    -Wait
This script will:
-
Zip everything in the repo
-
Authenticate to Optimizely
-
Upload and deploy the package to the selected environment
Step 3: Create GitHub Action Workflow
Create a file at .github/workflows/deploy.yml in your repository:
name: Deploy to Optimizely

on:
  push:
    branches:
      - main

jobs:
  deploy:
    runs-on: windows-latest

    steps:
      - name: Checkout code
        uses: actions/checkout@v3

      - name: Setup PowerShell
        shell: pwsh
        run: |
          Write-Host "PowerShell ready"

      - name: Run deployment script
        shell: pwsh
        run: ./scripts/deploy.ps1
        env:
          OPTI_PROJECT_ID: ${{ secrets.OPTI_PROJECT_ID }}
          OPTI_CLIENT_KEY: ${{ secrets.OPTI_CLIENT_KEY }}
          OPTI_CLIENT_SECRET: ${{ secrets.OPTI_CLIENT_SECRET }}
Step 4: Test It
-
Commit your deploy.ps1 and workflow to the repository.
-
Push to main.
-
Go to GitHub → Actions and check if the deployment workflow ran successfully.
-
Check the Optimizely DXP Portal to confirm the deployment on the Test1 environment.
Result
Here are two screenshots showing the final result:
GitHub Actions
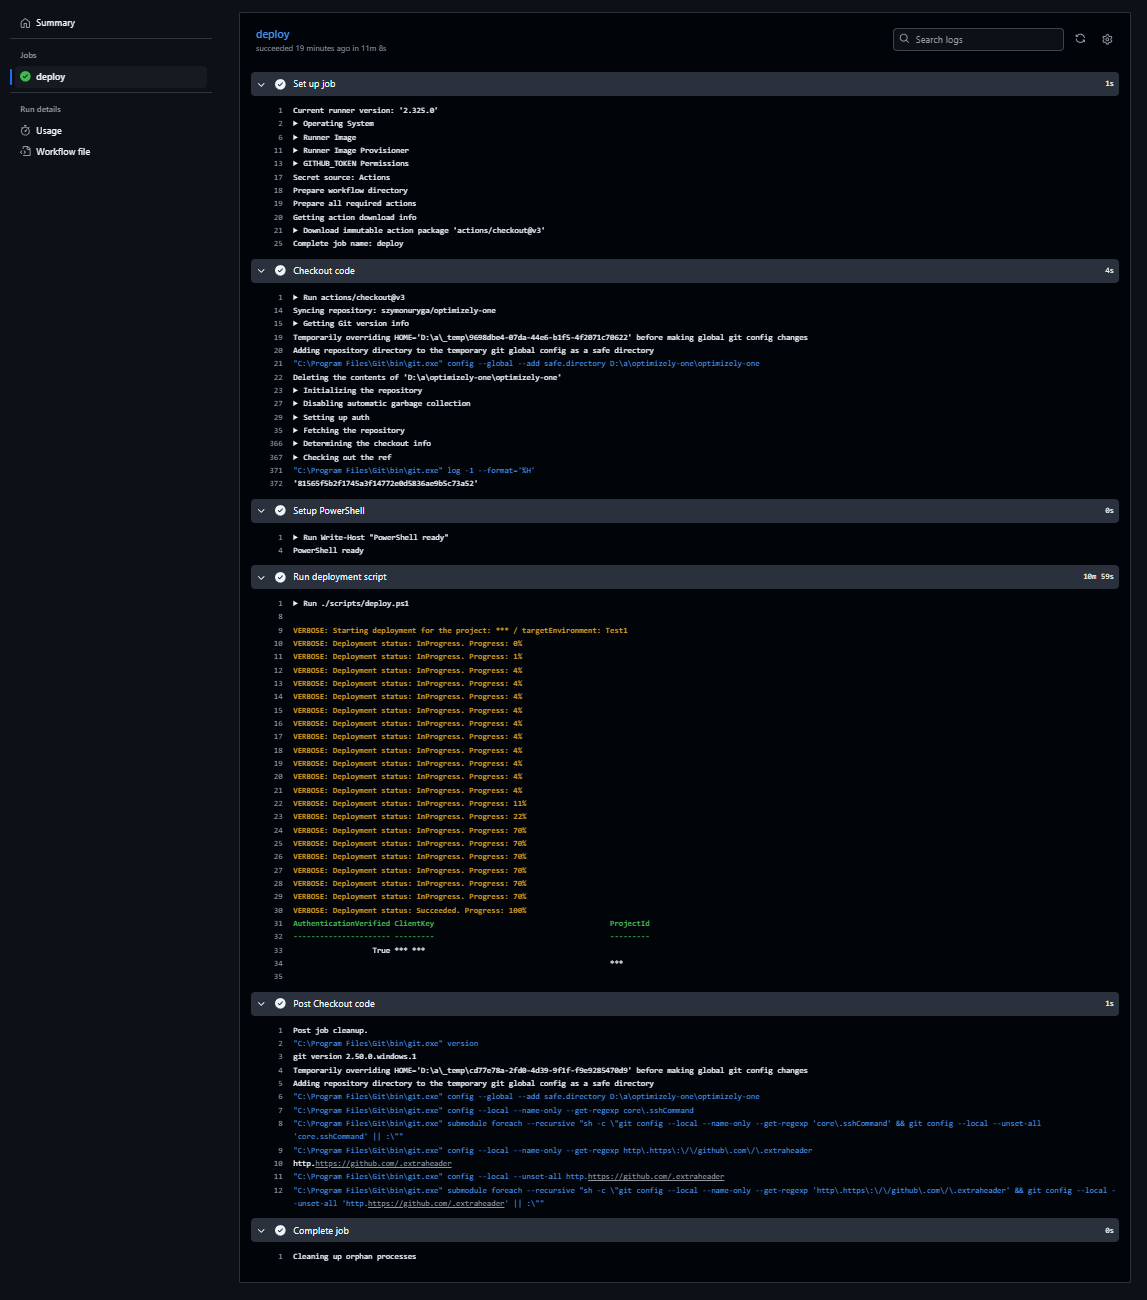
The workflow completed successfully with detailed logs from the PowerShell deployment.
Optimizely PaaS Portal
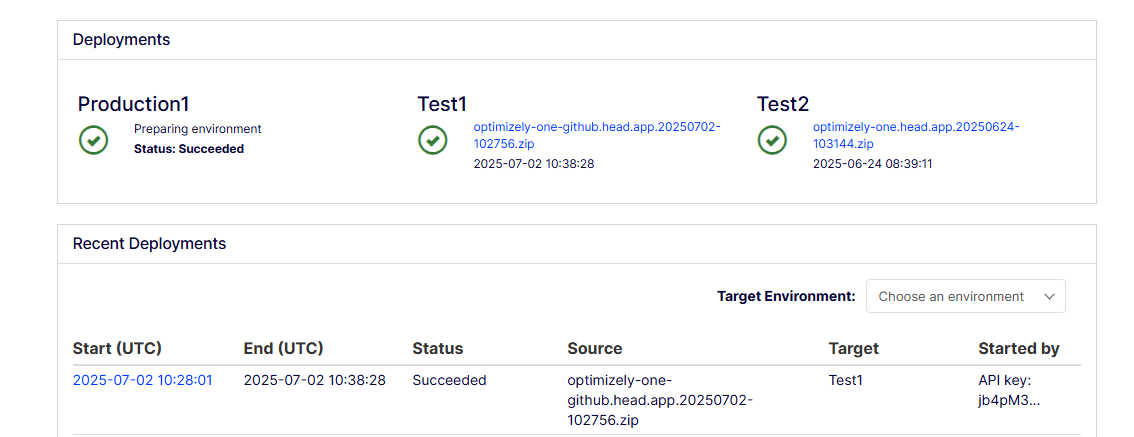
You can see the package optimizely-one-github.head.app.20250702-102756.zip was successfully deployed to the Test1 environment.
Conclusion
With just a few steps, you’ve automated your frontend deployments to Optimizely using GitHub Actions. This approach ensures that your latest changes in main are always deployed to your specifed environment, improving developer velocity and reducing manual errors.
Comments