Deploying Commerce to Amazon
This document describes how to set up an EPiServer Commerce site (8.0 and higher) to run on Amazon Web Services. In this scenario a Commerce core website is installed, and most steps can be applied through NuGet packages.
This document does not describe how to create/update a working EPiServer Commerce website, which is required for the Amazon deployment. Refer to Installing EPiServer updates for more information on how to do this.
Requirements
- The AWS (Amazon Web Services) Management Console requires an account with login details.
- A specific cloud enabled license is required, refer to the EPiServer License Center to get this (add this license to the Commerce website).
- Deploying to cloud based websites requires that each deployed application and module is designed for cloud.
- In order for the website to work properly with Amazon, it is required that the databases are created with collation "SQL_Latin1_General_CP1_CI_AS". When creating a new Commerce site, first create the databases with the correct collation. When you then create the site using Deployment Center, use the "Install site without database" option and make sure to point to these databases instead of creating new ones.
Cloud website setup
Like an EPiServer CMS webite on Amazon, the Commerce website can be run in an AWS Elastic Beanstalk environment with caching and multiple instances. The website instances share the same Amazon SQL instance, and the S3 storage in Amazon is used for storing of the file binary data. Load balancing is applied, and the Amazon SNS manages events between the Commerce websites.
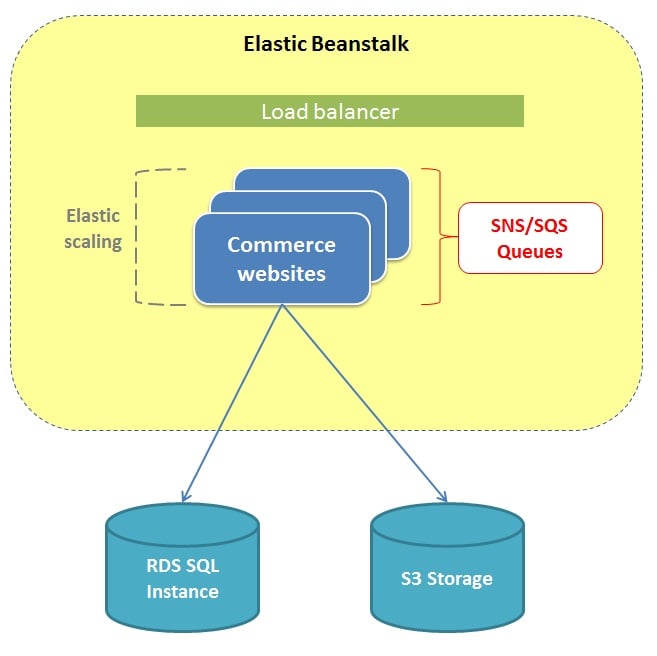
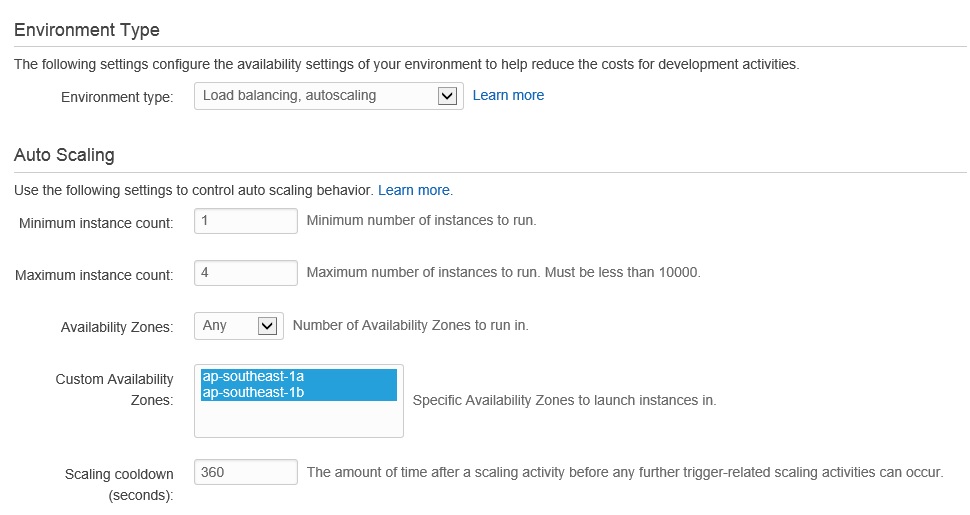
Using Auto Scaling, you can scale automatically through configuration.
Follow the steps below to create an EPiServer Commerce website running in an Amazon environment.
1. Creating Amazon resources
Log in to the AWS Management Console and follow the steps below.
Creating an S3 storage bucket
When running on Amazon, the media (for example images) should be stored in the S3 storage to enable elastic scaling.
- In the AWS Management Console, select S3 from the Services menu.
- Select Create Bucket in the upper right corner, and in the dialog select a region and provide a name.
Refer to Creating a Bucket in the AWS documentation for more information.
Creating an SNS Topic
To scale for running on several instances, we need to set up an SNS Topic to handle messages between site instances.
Do the following to create an SNS topic:
- In the AWS Management Console, and select SNS from the Services menu.
- Click Create New Topic, and in the dialog select a name.
Refer to Create a Topic in the AWS documentation for more information.
Creating an RDS SQL instance
- Open the AWS management console and select RDS in the Services menu.
- Click on Launch a DB Instance, and in the engine selection select "sqlserver-web" (or another Sql server option).
- In the details view, provide the identifier name, size, login user and password.
- In the additonal config, view select the VPC security group previously created, and finish the wizard to create the DB instance.
Refer to Creating a DB Instance Running the Microsoft SQL Server Database Engine for more information.
Creating a Security Group
- Open the AWS management console and select the EC2 option in the Services menu.
- Select Security Groups under Network & Security in the left menu.
- Click Create Security Group, provide a name and a description and click Create.
- In the list, select the created group and select the Inbound tab in the lower panel.
- Select MS SQL from the rule dropdown, click Add Rule, and then Apply Rule Changes.
Refer to Amazon EC2 Security Groups in the AWS documentation for more information.
2. Upgrade and prepare the website
Refer to Installing EPiServer for information on how to install a Commerce website. When you have a project with a working website, continue with the steps below.
- Open the EPiServer Commerce front-end site project using Visual Studio.
- Upgrade the Commerce site to the latest version (or 8.0 at least).
- Install the Nuget package EPiServer.Packaging.UI. Then run Move-EPiServerProtectedModules in the Package Manager Console.
- Install the NuGet package EPiServer.Amazon to the project.
- Continue with 3. Configuration updates below.
If you are installing CommerceManager besides the EPiServer Commerce Core, some extra steps are needed:
- Install the NuGet package EPiServer.Commerce.UI.ManagerIntegration to the front-end site.
- Open the Mediachase.ConsoleManagerUpdate project, and upgrade it to the latest version (or 8.0 at least, refer to Installing EPiServer updates for more information on this).
- Install the NuGet package EPiServer.Amazon to the Mediachase.ConsoleManagerUpdate project, and continue with 3. Configuration updates below.
3. Configuration updates
Mapping of BLOB and Event providers
Open EPiServerFramework.config and note the configuration under the episerver.framework section to map Blob/Event providers to Amazon.
<blob defaultProvider="s3blobs">
<providers>
<add name="s3blobs" type="EPiServer.Amazon.Blobs.AmazonBlobProvider,EPiServer.Amazon"
accessKey="{your_access_key}" secretKey="{your_secret_key}"region="{region_code}"bucket="mysitemedia"/>
</providers>
</blob>
<event defaultProvider="amazonevents">
<providers>
<add name="amazonevents" type="EPiServer.Amazon.Events.AmazonEventProvider,EPiServer.Amazon"
accessKey="{your_access_key}" secretKey="{your_secret_key}"region="{region_code}"topic="mysiteevents"/>
</providers>
</event>
Configuring search
Note that when hosting in Amazon, the recommendation is to use a scalable search solution such as EPiServer Find. Since this is also a hosted service that you connect to, it will work the same way as when your site runs on-premise. Refer to Configuring EPiServer Find search provider, for more information on how to install and configure EPiServer Find for Commerce.
The Commerce website is now ready for deployment to Amazon.
4. Deploying
Migrating the database to Amazon RDS SQL instance
Note that in EPiServer Commerce, two databases need to be migrated and both the connectionStrings.config in the front-end and back-end sites need to be changed. Refer to Migrating Commerce databases to Amazon for more detailed information.
Open connectionStrings.config, change the connection string for EPiServerDB, EcfSqlConnection to the connection string from Amazone RDS SQL Database. Remember to keep the setting MultipleActiveResultSets=true.
<connectionStrings>

<add name="EPiServerDB" connectionString="Data Source={your_database_server_for_front_end};Initial Catalog={database_name_for_front_end};

Integrated Security=False;User ID={user_id};Password={password};MultipleActiveResultSets=True" providerName="System.Data.SqlClient" />

<add name="EcfSqlConnection" connectionString="Data Source={your_database_server_for_back_end};Initial Catalog={database_name_for_back_end};

Integrated Security=False;User ID={user_id};Password={password};MultipleActiveResultSets=True" providerName="System.Data.SqlClient" />

</connectionStrings>
Deploying website to Windows AWS Elastic Beanstalk
Refer to the For .NET Developers section in the AWS Elastic Beanstalk - Getting Started, for more information.
Note that two websites are needed, one for the EPiServer Commerce front-end site, and one for Commerce Manager.
Transfering the BLOBs to the S3 storage bucket
Transfer the website BLOBs to the S3 Bucket, usually, EPiServer BLOBs are stored in C:\EPiServer\<MyEPiServerSite>\appdata\blobs.
Refer to Add an Object to a Bucket for more information.
5. Activating the cloud license
- Refer to the Changing the site URL section in Deploying to Amazon websites for more information on how to configure the website URL.
- Go to the Admin view in CMS, then the Config tab, Manage Websites and the Cloud License tab, to activate the cloud license.
6. Building the site index
Building the content index
Refer to Search in Amazon section on Deploying to Amazon for more information about how to build content index.
Rebuilding the catalog index
- Go to Commerce Manager, and Administration > System Settings > Search Index. Click Rebuild Index, the catalog index will be restored on your EPiServer Find indexes.
See also
- Configuring EPiServer Find search provider
- Deployment
- Deployment scenarios
- Deploying to Amazon websites
- BLOB storage and and BLOB providers
- Event management and event providers
Last updated: Sep 15, 2014