Installation Instructions - EPiServer CMO 2.0
Installation of EPiServer CMO 2.0 is done with EPiServer Deployment Center, which is used to handle installation of EPiServer products. This document describes how to upgrade, install and delete EPiServer CMO 2.0.
Table of Contents
Prerequisites
The following prerequisites exist for EPiServer CMO:
-
Statistics collecting requires the Friendly URL Rewriter module as the injection is done by the handler of this event
- How to Configure Live Monitor for Websites with Multiple Bindings
Upgrading to EPiServer CMO 2.0
Upgrade to EPiServer CMO 2.0 as follows:
-
If you are running EPiServer CMS 5, you need to upgrade to EPiServer CMS 6. See the blog article How to Upgrade from EPiServer CMS 5 to 6.
-
Upgrade EPiServer CMO 1.1 or 1.1 SP1 to EPiServer CMO 2.0, see below.
Installing EPiServer CMO 2.0
Install EPiServer CMO 2.0 by following the steps below.
Step 1: Download EPiServer CMO
Download and install EPiServer CMO as follows:
- Download and run the EPiServerCMO_20__CMS_60.msi file from EPiServer World (login access required).
- Open EPiServer Deployment Center (Start > Programs > EPiServer).
- Expand the folder EPiServer CMS 6.0.530.0, and select Install EPiServer CMO 2.0 and click Run.
Information about how installation and deployment works in EPiServer CMS, refer to the technical note EPiServer CMS Installation and Deployment System Overview.
Step 2: Select Services
Campaign Monitor and Optimization Core containing the core files of the module (database, pages, logic etc) is mandatory and will be installed automatically.
- Select the optional services you want to install. All are selected by default.
- Campaign Monitor and Optimization UI is the user interface of the module to support load balanced hosting environment. Optional, clear it if you do not want to provide CMO user interface (for example, a public site).
- Statistics Handler is a HTTP web handler which is used to gather statistics. You can clear it if you want to install it manually afterwards.
- Aggregation Service is a windows system service which will be used to aggregate gathered statistics. You can clear it if you want to install it afterwards or just want to control all features on your operation system.
- Thumbnail Service is a windows service which will be used for creating thumbnail images of CMS pages. If not selected, no thumbnails will be generated. It can be installed manually on a separate server.
- Click Next.
Note! The aggregation service can write logs during the aggregation process. To activate this feature, you must grant permission to modify the aggregation service folder for the user who will run aggregation service (by default local service). See default installation folder in the section Configuring after the Installation.
Step 3: Select Website
Select the EPiServer website in EPiServer Deployment Center on which you want to install EPiServer CMO and click Next.
Step 4: Define Database Settings
Define the database settings in EPiServer CMO as follows:
- In Select SQL Server Instance, name the database instance. You have the following options:
- Select an existing database instance from the list, if you want it to contain the CMO database scheme, for example, using EPiServer in a web farm or load balanced hosting environment.
- Create a new database by typing the name, if you want to install EPiServer CMO separately.
- Select Windows Authentication or SQL Server Authentication for the database instance. Also type the login credentials.
- In Enter the name of the database... you have the following options to specify connection to the database server:
- Type the name of the new database you have created
- Select an existing database from the list
- Select Windows Authentication or SQL Server Authentication for the database. Also type the login credentials.
- Click Next.
Step 5: Set Up the EPiServer CMO User Interface
Set up the user interface of EPiServer CMO as follows:
- In Relative Path, type the relative path to the CMO folder.
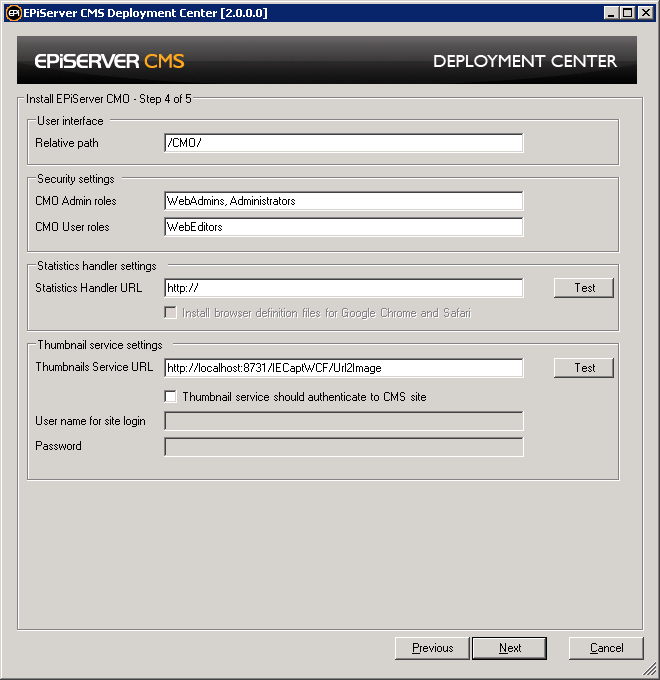
- In CMO Admin Roles, type which EPiServer CMS user groups (roles) can create, edit and delete campaigns and landing page optimization tests.
- In CMO users Roles, type which EPiServer CMS user groups (roles) can create, edit and delete campaigns and view landing page optimization tests.
- In Statistics Handler URL, type the URL to the HTTP web handler to be used to gather statistics. If it is installed separately (if you have cleared the Statistics Handler feature in step 2, you will need to select it first). You can click Test to check if the connection to the service works (the button is conditional, and will only show if you enter a URL).
- In Thumbnail Service URL is the URL to web-based service which will be used to create thumbnails of EPiServer CMS pages included in campaigns and/or landing pages optimization tests. You can click Test to check if the connection to the service is working (the button is conditional, and will only show if you enter a URL). Select Thumbnail service should authenticate to CMS site to create thumbnails of LPO test variations and other pages that are not visible for the anonymous user. Provide the name and password of the user with corresponding access rights in CMS.
- Click Next.
Step 6: Select the License File
To run EPiServer CMO in a production environment, select the EPiServerCmoLicense.config file (which contains the license information for this module installation) and click Install. This step is optional, you can select the license file afterwards (for example, if you want to run tests in EPiServer CMO first).
Step 7: Finish Installation
Click Close to complete the installation.
Configuring after the Installation
The default installation folder is [Path to your EPiServer installation]\Shared\Services\[Name of the CMO Service]\.
Example: C:\Program Files\ EPiServer\ Shared\ Services\ CMO Aggregation Service\.
Check the logging configuration, aggregation service and thumbnail service for EPiServer CMO as follows:
- Check that the applications have required permissions to create log files in destination folders and so on. Go to the applications folder, right-click the file, go to the Security tab and find the account. You can add module logging settings to common CMS logging settings in the file EPiServerLog.config. See the tech note How to Configure the Logging (EPiServer CMS 6.0).
- Check that the Aggregation Service logging settings are contained in the file EPiServer.Cmo.AggregationService.exe.config in the folder where this service is installed. The CMO Admin can turn on DEBUG logging or less detailed logging for this file. See Installing and Configuring the Aggregation Service.
- Check that the Thumbnail Service logging settings are defined in the file IECaptSvc.exe.config in the folder where this service is installed.
Deploying the CMS Website to the Production Environment
Change the website’s URL and the URLs to the Thumbnail Service and Statistics Handler will be immediately updated on the CMO Admin page.
Uninstalling EPiServer CMO 2.0
Uninstallation can be performed manually in the following steps:
- Deleting files related to CMO module
- Removing CMO-specific web.config and connectionStrings.config entries
- Deleting database and SQL Server logins
- Deleting statistic handler
- Deleting thumbnail service (if not needed for other sites)
- Deleting aggregation service (if not needed for other sites)
- Uninstalling the module
The count of uninstallation steps may vary depending on particular module configuration and whether you want to remove the CMO module from one site or from the whole web server. Let’s consider each step in details.
Step 1: Deleting Files Related to EPiServer CMO
Delete the following files:
|
On EPiServer site root folder |
Note! CMO pages and controls stored in Program files\EPiServer\{your_episerver_cms_version}\ Install\Modules\CMO2.0.0.0\CMO. Do not delete this folder manually, because it is used on all sites with CMO module installed. |
|
From the lang folder |
|
|
From the bin folder |
Note! The files marked with * can be used by other EPiServer modules. By deleting these files, the modules might not work properly. |
.
Step 2: Removing CMO-specific web.config and connectionStrings.config Entries
Remove the following from the web.config file:
- Remove the following string from /configuration/system.web/compilation/assemblies node:
<add assembly="System.Data.Entity, Version=3.5.0.0, Culture=neutral, PublicKeyToken=b77a5c561934e089" /> - Unregister EPiServer CMO tagPrefix by deleting the following string in /configuration/system.web/pages/controls node:
<add tagPrefix="cmo" namespace="EPiServer.Cmo.UI.Units" assembly="EPiServer.Cmo.UI"/> - Unregister EPiServer CMO HTTP module.
IIS 6: Delete following string in /configuration/system.web/httpModules node:<add name="CMOModule" type="EPiServer.Cmo.Cms.HttpModule.Module, EPiServer.Cmo.Cms" />
IIS 7: Delete the following string in /configuration/system.WebServer/modules node:<add name="CMOModule" type="EPiServer.Cmo.Cms.HttpModule.Module, EPiServer.Cmo.Cms" preCondition="managedHandler" /> - Unregister CMO HTTP handler by removing the definition for ChartImageHandler.
IIS 6: Delete the ChartImageHandler section in /configuration/system.web/httpHandlers node.
IIS 7: Delete the ChartImageHandler section in /configuration/system.webServer/handlers node.
<add verb="GET,HEAD" name="ChartImageHandler" path="ChartImg.axd" type="System.Web.UI.DataVisualization.Charting.ChartHttpHandler, System.Web.DataVisualization, Version=3.5.0.0, Culture=neutral, PublicKeyToken=31bf3856ad364e35" /> - Remove the CMO VPP configuration in /configuration/episerver/virtualpath/providers/ by deleting the following string:
<add name="CMO" virtualPath="{cmo-ui-path}" physicalPath="C:\Program Files (x86)\EPiServer\CMS\5.2.375.236\Install\Modules\CMO2.0.0.0\CMO" type="EPiServer.Web.Hosting.VirtualPathNonUnifiedProvider,EPiServer" /> - Remove the DownloadKPI handler.
IIS 6: Remove the following string in /configuration/system.web/httpHandlers:
<add verb="GET" path="DownloadKpi.axd" type="EPiServer.Cmo.Core.Statistics.DownloadHandler, EPiServer.Cmo.Core" />
IIS 7: Remove the string in /configuration/system.webServer/handlers:<add verb="GET" name="CmoDownloadHandler" path="DownloadKpi.axd" type="EPiServer.Cmo.Core.Statistics.DownloadHandler, EPiServer.Cmo.Core" />
Uninstall Live Monitor as follows:
- Remove the service section in /configuration/system.serviceModel/services node:
<service behaviorConfiguration="EPiServer.Trace.Services.TraceServiceBehavior" name="EPiServer.Cmo.Cms.Trace.Services.CmoTraceService">
<endpoint address="" binding="basicHttpBinding" contract="EPiServer.Trace.Services.ITraceService" />
<endpoint address="mex" binding="mexHttpBinding" contract="IMetadataExchange" />
</service> - Remove the behavior section in /configuration/system.serviceModel/behaviors/serviceBehaviors:
<behavior name="EPiServer.Trace.Services.TraceServiceBehavior">
<serviceMetadata httpGetEnabled="true"/>
<serviceDebug includeExceptionDetailInFaults="false"/>
</behavior> - Remove (edit) the serviceHostingEnvironment section in the /configuration/system.serviceModel node:
<serviceHostingEnvironment aspNetCompatibilityEnabled="true" /> - Remove the location section with path=”Cmo-ui-path”:
<location path="CMO">
<system.web>
…
</system.web>
</location> - Remove the location sections in /configuration node:
<location path="{cmo-ui-path}/Trace">
<system.web>
<authorization>
<allow roles="WebEditors, WebAdmins, Administrators"/>
<deny users="*"/>
</authorization>
</system.web>
<system.webServer>
<handlers>
<remove name="svc-Integrated" />
<add name="svc-Integrated" path="*.svc" verb="*" type="System.ServiceModel.Activation.HttpHandler, System.ServiceModel, Version=3.0.0.0, Culture=neutral, PublicKeyToken=b77a5c561934e089" resourceType="Unspecified" preCondition="integratedMode" />
</handlers>
</system.webServer>
</location>
<location path="{cmo-ui-path}/Trace/Handlers">
<system.web>
<authorization>
<allow users="*"/>
</authorization>
</system.web>
</location>
Remove the following from the connectionStrings.config file:
- Remove the connectionString to CMO database named CmoEntities:
<add name="CmoEntities" connectionString="provider connection string="Data Source=.\sqlexpress;Initial Catalog=Cmo;Integrated Security=False;User ID=dbUserCMO;Password= dbUserCMO;Connect Timeout=10";metadata=res://*/Entities.CmoModel.csdl|res://*/Entities.CmoModel.ssdl|res://*/Entities.CmoModel.msl;provider=System.Data.SqlClient" providerName="System.Data.EntityClient" /> - Remove the CmoLiveMonitor connection string:
<add name="CmoLiveMonitor" connectionString="Data Source=.\sqlexpress;Initial Catalog= Cmo;Integrated Security=False;User ID=dbUserCMO;Password= dbUserCMO;Connect Timeout=10" providerName="System.Data.SqlClient" />
Step 3: Deleting Database and SQL Server Logins
Delete the database and its logins as follows:
- CMO module database
- Live Monitor database (if it was installed separately from the CMO database)
- SQL server logins used to access the CMO database and Live Monitor database
Step 4: Deleting the Statistic Handler
Delete the Statistic Handler as follows:
- If the Statistics Handler has been hosted inside the EPiServer CMS site (this is default scenario if you have installed Statistic handler by CMO module installer), you need to remove the following record from web.config:
IIS 6: Delete the string in /configuration/system.web/httpHandlers node.
IIS 7: Delete the string in /configuration/system.webServer/handlers node.<add verb="GET" name="StatisticsHandler" path="StatisticsHandler.axd" type="EPiServer.Cmo.Core.Statistics.StatisticsHandler, EPiServer.Cmo.Core" /> - Delete the browser detection files from your web site App_Browsers folder: safari.browser and chrome.browser.
- If the Statistics Handler has been installed on separate web site, you need to delete this site from IIS.
Step 5: Deleting the Thumbnail Service (if not needed for other sites)
Delete the Thumbnail Service as follows:
- Stop the Thumbnail service from Control Panel/Administrative tools/Services > EPiServer CMO Thumbnail Service.
- Uninstall the service by using standard .NET Framework utility InstallUtil (usually can be found here c:\Windows\Microsoft.NET\Framework\v2.0.50727):
– Type InstallUtil.exe /u [Path to your thumbnail service files]\IECaptSvc.exe
– Delete the Thumbnail Service files. If the service was installed by CMO module installer, all service files can be found in C:\Program Files\EPiServer\Shared\Services\Thumbnail Service\.
Step 6: Deleting the Aggregation Service (if not needed for other sites)
Delete the Aggregation Service as follows:
- Make sure that the Aggregation Service is not used by other sites before uninstalling it.
- Stop the Aggregation Service from Control Panel/Administrative tools/Services > EPiServer CMO Aggregation Service.
- Uninstall the service by using standard .NET Framework utility InstallUtil (usually can be found here c:\Windows\Microsoft.NET\Framework\v2.0.50727):
– Type InstallUtil.exe /u [Path to your aggregation service files] \EPiServer.Cmo.AggregationService.exe
– Delete the Aggregation Service files. If the service was installed by CMO module installer, all service files can be found in C:\Program Files\EPiServer\Shared\Services\ CMO Aggregation Service\.
Step 7: Uninstalling the EPiServer CMO Module
Uninstall the EPiServer CMO module as follows:
- Uninstall the module from the server.
- Remove the module from EPiServer CMS Deployment Center by uninstalling the application EPiServer CMS <your CMS version> > EPiServer CMO 2.0.0.0 from the Control Panel / Uninstall Programs.