Upgrading the Klarna Invoice and Part Payment module from EPiServer Commerce version 1 SP1 to 1 R2 SP1
|
Product version:
|
Klarna for EPiServer Commerce 1 SP1/1 R2 SP1
|
|
Document last saved:
|
|
Introduction
This document describes how to upgrade the Klarna Invoice and Payment module for EPiServer Commerce, after upgrading EPiServer Commerce from 1 SP1 to 1 R2 SP1.
Prerequisites
Before you start the upgrading process, download the Klarna Invoice and Part Payment module project files for EPiServer Commerce 1 R2 SP1.
Upgrading Procedure
Follow these steps to upgrade your system.
- Before upgrading, remove the EPiServer.Business.Commerce.Payment.Klarna.dll from the bin folder of the Commerce front-end site, to avoid any assembly conflict that might occur.
- Upgrade the EPiServer Commerce front-end site to EPiServer CMS 6 R2.
- Upgrade EPiServer Commerce to version 1 R2 SP1.
- If you have previously installed the EPiServer Commerce Sample site on your front-end site, you need to upgrade the sample package to version 1 R2 SP1.
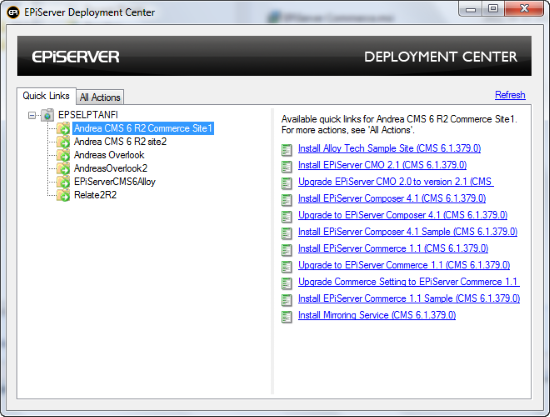
- Upgrade the Commerce Setting to EPiServer Commerce 1 R2 SP1. This is done by selecting “Upgrade Commerce Setting to EPiServer Commerce 1.1” in Deployment Center.

This will change the configuration under Commerce/Setting in the global navigation, by updating the DDS to use the correct assembly version of EPiServer Commerce.
- Download the Klarna Invoice and Part Payment module project files for EPiServer Commerce R2 SP1 (see prerequisites).
- Copy the following assemblies from the Bin folder of the Commerce font-end site to the Lib folder of the Klarna Payment project:
- EPiServer.dll
- EPiServer.Data.dll
- EPiServer.Business.Commerce.dll
- EPiServer.Business.Commerce.Sample.dll
- Mediachase.BusinessFoundation.Data.dll
- Mediachase.Commerce.dll
- Mediachase.Commerce.Plugins.Payment.dll
- Mediachase.Commerce.Website.dll
- Mediachase.DataProvider.dll
- Mediachase.MetaDataPlus.dll
- Mediachase.WebConsoleLib.dll
- System.Web.DataVisualization.dll
- Build the project EPiServer.Business.Commerce.Payment.Klarna in the download.
- Copy the EPiServer.Business.Commerce.Payment.Klarna.dll to the bin folder of both the EPiServer Commerce front-end and back-end sites.
- Copy the CookComputing.XmlRpc.dll and kreditor.dll in the Klarna /Lib folder to the bin folder of the Commerce front-end site.
- Copy the files in the /lang folder of EPiServer.Business.Commerce.Payment.Klarna to the /lang folder of the Commerce front-end site.
- Copy the following folders to the \Templates\ClickTalk\Units\Placeable\plugins\payment\ folder of the Commerce front-end site:
- Klarna Invoice: folder KlarnaInvoice (only the files PaymentMethod.ascx, KlarnaInvoice.css and images files are required)
- Klarna Part Payment: folder KlarnaPartPayment (only the files PaymentMethod.ascx, KlarnaPartPayment.css and all image files are required)
- Copy the following folders to the Plugins folder of the installed Commerce Framework, for example: C:\Program Files (x86)\Mediachase\eCommerceFramework\5.1\eCommerceFramework\Shared\Apps\Order\Payments\Plugins\:
- Klarna Invoice: folder KlarnaInvoice (only ConfigurePayment.ascx is required)
- Klarna Part Payment: folder KlarnaPartPayment (only ConfigurePayment.ascx is required)
- Copy the following folders to the MetaData folder of the installed Commerce Framework, for example: C:\Program Files (x86)\Mediachase\eCommerceFramework\5.1\eCommerceFramework\Shared\Apps\Order\Payments\MetaData\:
- Klarna Invoice: folder MetaData\KlarnaInvoice
- Klarna Part Payment: folder MetaData\KlarnaPartPayment
Configuration
Refer to the Installation and User Guide for the Klarna Invoice and Part Payment module, for more information about post-installation setup and configuration.
Related Information

