Installation Instructions for Episerver Connect for CRM
| Product version: | Episerver Connect for CRM 1.1 |
|---|---|
|
Document last saved: |
|
Introduction
This document describes the necessary steps to install the EPiServer Connect for CRM demo package for EPiServer CMS 5 R2. Installing the CRM demo package is completed by using the EPiServer Deployment Center.
Contents
- Prerequisites
- Installation Packages
- Installing Connect for CRM Module
- Installing Connect for CRM Template Package
- Configuration of EPiServer Connect for CRM
- Salesforce - an edition with API required
Prerequisites
The following conditions must be met before installing the CRM demo package:
- EPiServer CMS 5 R2 SP1 is required.
- Templates from the Demo Template package must be installed, since these templates are also used by the CRM demo templates (“My settings” page).
- .NET Framework 3.5 SP 1 must be installed; this can be downloaded from here.
Note that if you have modified the templates from Demo Template package, you may receive unexpected results when compiling or viewing the Web site. The CRM demo package installation does not overwrite any files included in the Demo Template package.
Installation Packages
There are two packages included in the installation of EPiServer Connect for CRM: the Connect for CRM module package and the Templates package; see below for more information.
Connect for CRM package - ConnectForCRM.msi
This package is the actual module Connect for CRM. It contains all runtime assemblies of EPiServer Connect for CRM. They implement functionality such as: load/save information from/to CRM application, providing Role management based on CRM entity properties (Virtual Role Provider), storing user profile information in CRM application and so on. This package does not install any pages to EPiServer CMS. Depending on your needs you may install Templates package (see below) which contains ready for use UI components.
Templates package - ConnectForCRM.Template.msi
This package contains UI components: User Registration Wizard control and page template to host it. The package should be installed on top of Connect for CRM. User Registration Wizard is a control which gives the ability for new users to register on EPiServer Web site.
Installing Connect for CRM Module
- Run the ConnectForCRM.msi file to start the installation. After installation is complete the installation window will be closed automatically.
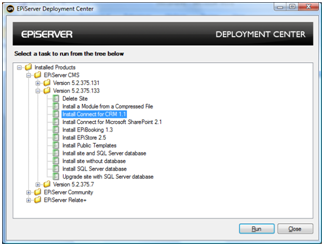
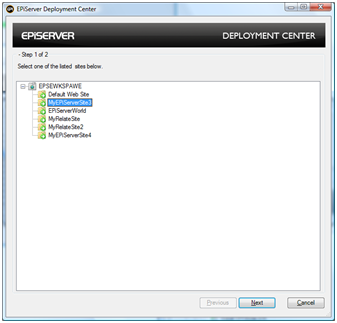
- Run the EPiServer Deployment Center.
- Select “Installing Connect for CRM” node and double click it. The installation process will then begin.
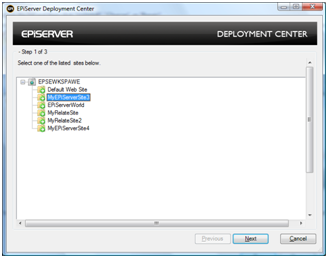
- Select EPiServer Web Application to install the module on.
- Fill the form with settings (see below):
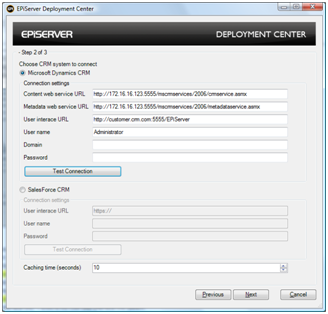
a. For Microsoft CRM you are required to fill in the following fields (PLEASE NOTE use the 2006 services see below):
i. “Content web service URL” – a link to MS CRM web service.
Currently it is:
http://customer.crm.com:5555/mscrmservices/2006/crmservice.asmx
ii. “Metadata web service URL” – a link to MS CRM metadata web service.
Currently it is:
http://customer.crm.com:5555/mscrmservices/2006/metadataservice.asmx
iii. “User interface URL” – a link to MS CRM user interface URL pattern.
Currently it is:
http://customer.crm.com:5555/ or http://customer.crm.com:5555/EPiServer
iv. “User name” – a login name for MS CRM application (optional).
v. “Domain name” – a login domain name for MS CRM application (optional).
vi. “Password” – a password for MS CRM application (optional).
b. For SalesForce you are required to fill in the following fields:
i. “User interface URL” – A URL to your SalesForce web site. Used to create links to Web site data (for example links to new registered user). You can get URLfrom SalesForce Web site. Log in with your account. Look in the address line in your browser. Copy the first part of the address and enter it in to the User interface URL field. For example: . This will not affect the Test connection operation.
ii. “User name” - a login name for Sales Force service.
iii. “Password” – a password+token for the Sales Force service.
Password – is the password + token for the SalesForce web service. You can request a token from the Sales Force Web site. You must log in with your account. Open Setup-Personal Setup-My Personal Information-Reset My Security Token and follow the instructions present there. After receiving an email with your token enter the password and security token in the password field. For example, if your password is "myPassword" and your security token is "XXXXXXX", you will enter "myPasswordXXXXXXX" into the password field.
c. You could test the connection with the "Test Connection” button, in order to verify your connection settings.
d. Enter caching time (in seconds) for data from the CRM system. You could enter 0 to work without a cache. We are using a standard Microsoft ASP.NET cache for EPiServer Connect for CRM data.
e. Press “Next” button. - Enter the path to the License file for EPiServer Connect for CRM module. You can leave it empty if you already have copied it into the Web application folder or are planning to do that later. Click on the ”Install” button and wait until installation finishes.
Installing Connect for CRM Template Package
-
Run the ConnectForCRM.Template.msi file and wait until its window disappears.
-
Run the EPiServer Deployment Center..
-
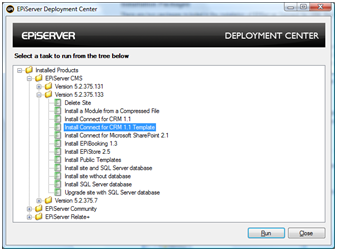
Select “Installing EPiServer CMS Connect for CRM Template” node and double click it or press “Run” button. The installation process begins
-
Choose the EPiServer CMS web application to install Connect for CRM module and press “Next” button.
-
Fill the form with settings (see below) and click next to finish the installation.
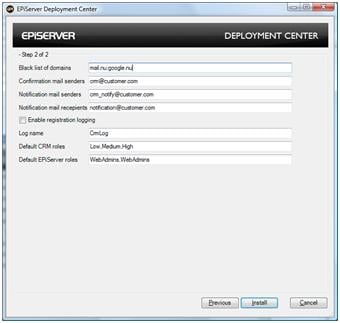
a. “Black list of domains”
– a list of public email domains delimited with colon or semicolon. These public domains should not be used to find an existing company in registration form.
b. “Confirmation mail sender”
- an email address from which a confirmation letter to a user will be sent.
c. “Notification mail sender”
an email address from which a notification letter to a user will be sent.
d. “Notification mail recipient”
- list of email addresses (delimited with comma or semicolon) where notification letter will be sent after new user registered.
e. “Enable registration logging”
- the checkbox enable logging during registration to EPiServer CRM logs.
f. “Log name”
- the name for log items of EPiServer Connect for CRM which are present in the EPiServer CMS log file.
g. “Default CRM roles”
- a list of CRM role which new user will be automatically added to. You can use predefined roles: Low, Medium and High.
h. “Default EPiServer roles”
- a list of groups of EPiServer CMS Web site like “WebEditors” or “WebAdmins” which new user will be automatically added to.
Configuration of EPiServer Connect for CRM
In order to configure EPiServer Connect for CRM, please refer to the Tech Note Configuring EPiServer Connect for CRM.
Salesforce Application Requires API support
Please check that the Salesforce application edition used as part of the solution has API support, the API support is required in order to communicate with EPiServer CMS. Some editions of Salesforce do not have API support, check with the Salesforce sales agent regarding this.
For development/test/demo proposes it is possible to create Salesforce developer accounts - contact Salesforce regarding this.