Episerver Connect 2.4 for SharePoint 2007 and 2010
Installation Instructions
| Product version: | CMS 6 R2 |
|---|---|
|
Document last saved: |
Introduction
This document describes the installation procedure for EPiServer Connect 2.4 or Microsoft SharePoint 2010 on an EPiServer CMS 6 R2 website performed in the following steps:
- Installation of the EPiServer Connect for SharePoint 2.4 module on the EPiServer CMS application
- Deployment and configuration of the Microsoft SharePoint application
Contents
- Prerequisites
- Components
- Installing the Connect for SarePoint Module on EPiServer CMS
- VPP Installation, Configuration and Verification
- Upgrading EPiServer Connect for SharePoint Module
- Deploying the SharePoint Solution
- Configuring the Web Parts
- Configuring the Content Channels
- Configuring the Web Services Authentification
- Configuring the SharePoint Website
- Uninstalling the SharePoint Solution
Prerequisites
Listed below are the prerequisites that must be fulfilled before installing the EPiServer Connect for SharePoint module:
- Installation of the EPiServer CMS 6 R2 assemblies and its prerequisites.
- EPiServer CMS 6 R2 website creation and its prerequisites.
- Microsoft Office SharePoint Server 2010 or Microsoft SharePoint Foundation 2010 or SharePoint Server 2007 or Windows SharePoint Service 3.0 must be installed.
Components
- SharepointConnector.wsp is an Windows SharePoint Services Solution Framework File, and is used to deploy the EPiServer Connect for Microsoft SharePoint 2.4 solution onto Microsoft SharePoint Services. Information about using this file (Windows SharePoint Services Solution Framework File) can be found in the SharePoint Solution Deployment section in this document.
- The MSI file installs the module.
- EPiServer.SharePointWebParts.zip contains the source code for Web Parts used by the WSP file.
Installing the Connect for SharePoint Module on EPiServer CMS
- Download and run the installation package (MSI file) on the computer where you want to install the module. Wait until the installation process is complete.
- Open EPiServer Deployment Manager.
- Select Install Connect for Microsoft SharePoint 2.4 from the list and click Run.
- Select Web service for Web Parts feature, if you plan to use Connect for SharePoint Web Parts.
- Select the EPiServer CMS website where you want to install the module and click Next.
- Configure the settings for the EPiServer Connect for Microsoft SharePoint module. Enter the following groups of module parameters:
a) Virtual Path parameters:
• The Virtual root path is the path of the virtual path provider for Microsoft SharePoint.
• Select Allow to open any file from this virtual path if you want to enable access to the files of any type using this virtual path provider.
b) SharePoint configuration:
• By selecting one of the SharePoint environment radio buttons you indicate whether the WSS or MOSS environment is used by this module. This option is important for Search operations in the virtual path provider for SharePoint.
• Site URL is the URL to the SharePoint site for connection.
• Domain is the domain name connection to SharePoint. This is an optional parameter.
• User login is the user name for connection to SharePoint.
• Password is the password for connection to SharePoint.
• Target library or folder on SharePoint which will be used as the root directory for the virtual path provider. If this parameter is not filled in then all directories will be accessible through the virtual path provider.
• Use the Test connection button to test if your connection settings are accessible.
• Select Use impersonation mechanism if you want to use an impersonation authorization mechanism based on Kerberos protocol. See the tech note Security and Delegation for information regarding this.
c) Caching configuration:
• Select Enable cache if you want the metadata and file content from SharePoint to be cached on the EPiServer CMS website machine.
• Cache expiration time is the time span in seconds to store values in the cache.
• The ASP.NET application must have read/write access to the files in the temporary files folder.
• The Temporary files folder is the folder on the file system which will be used to store temporary cached file content. Click the button to the right to choose this directory through the open folder dialog. If this field is blank, a temporary system folder will be used.
Add the relevant information and click Next. - Provide a full path for the EPiServer Connect for SharePoint license file. Leave the path blank if you already have copied the license file into the web application folder or will do so after installing the module.
- Click Install and wait until installation is complete.
VPP Installation, Configuration and Verification
-
Open your EPiServer CMS 6 website.
-
Log in with a user account with sufficient rights to enter Edit mode.
-
Go to Edit mode.
-
Open the File Manager.
-
Browse SharePoint and the Starting points section.
-
List the SharePoint libraries and folder, open files and edit file meta data.
Upgrading EPiServer Connect for SharePoint Module
- Run the EPiServer Connect for Microsoft SharePoint installation package (MSI file) on the computer where you want to install the module. Wait until the installation process is complete.
- Open EPiServer Deployment Manager.
- Select Ugrade Connect for Microsoft SharePoint to version 2.4 in the list and click Run.
- Select Web service for Web Parts feature, if you plan to use Connect for SharePoint Web Parts.
- Select the EPiServer CMS website where you want to upgrade the module and click Next.
Deploying the SharePoint Solution
-
Uninstall existing SharePoint solution if you have it installed on your system.
-
Download the SharepointConnector.wsp file and save it in a location available to Windows SharePoint Services or the Microsoft Office SharePoint Server.
-
Make sure that the Windows SharePoint Services Timer service is running (by selecting Start > Control Panel > Administrative Tools > Services).
-
Open Microsoft Windows Command Prompt (by selecting Start > Programs > Accessories > Command Prompt).
-
From the command prompt run the following commands in the following order:
a) cd <system drive>:\Program Files\Common Files\Microsoft Shared\web server extensions\12\BIN changes the current directory to the directory that contains stsadm.exe tool (administrative tool for SharePoint). The parameter <system drive> must be replaced with the actual system drive on the computer that runs SharePoint. In case of SharePoint 2010 the path should be <system drive>:\Program Files\Common Files\Microsoft Shared\web server extensions\14\BIN
b) stsadm -o addsolution -filename <path to file>\SharepointConnector.wsp adds the EPiServer Connect for SharePoint 2.4 solution to the Microsoft SharePoint application.
c) stsadm -o deploysolution -name SharepointConnector.wsp –immediate –allowGacDeployment –url <application url> deploys the solution onto the Microsoft SharePoint website. The <application url> parameters must be replaced with the actual URL of the Microsoft SharePoint website. Note! As this command runs asynchronously, you are required to enter the command described below in d) until checking of the deployment status is complete.
d) stsadm -o displaysolution -name SharepointConnector.wsp shows the status of the deploying process, when the command described in c) is complete you should be able to find the result under the <LastOperationResult> section (only for Windows SharePoint Services). "DeploymentSucceeded" will appear if the deployment is successful or “DeploymentFailedXXXX” will be displayed if the deployment failed (XXXX will show the error code).
e) stsadm -o copyappbincontent copies content to SharePoint. Do not run this command until the command descibed under d) is complete and deployment has been successful. -
After installation has been completed, add Web Parts to the website's Web Parts gallery in the following way:
a) On the Documents toolbar, go to Site Actions > Site settings > Galleries > Web Parts > New Document.
Select EPiServer.SharePointWebParts.PageListWebPart and EPiServer.SharePointWebParts.PageViewWebPart and click Populate Gallery.
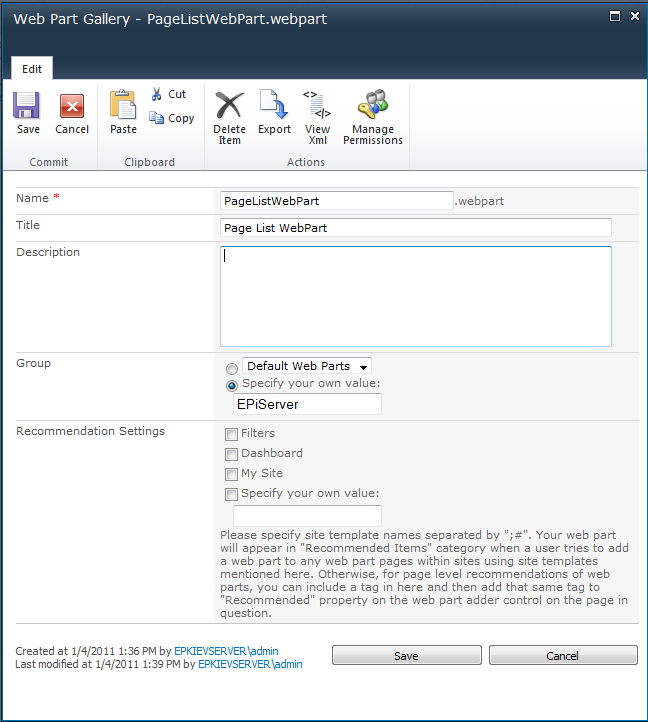
b) Locate and select the new PageListWebPart and PageViewWebPart from the list in the Web Part Gallery:
c) Click Edit document properties and enter Title, Description and Group boxes and click Save.
Configuring the Web Parts
After adding Web parts on the page you need to configure it to establish a connection to the EPiServer CMS website. Click Edit\Modify Shared Web Part.
Web Parts consist of the following connection parameters:
-
Web service URL is the address of the EPiServer PageStore Web service (for example, http://website.com/SharePointConnector/Services/PageService.asmx).
-
User name is the EPiServer user name.
-
User password is the EPiServer user password. Click Change password if you want to change the existing password.
-
Root Page ID (only for PageListWebPart) is the id of the EPiServer page that will be used as the root of the page tree.
-
Page ID (only for PageViewWebPart) is the id of the EPiServer page to display.
-
EPiServePageProperties (only for PageViewWebPart) allows you to choose which properties will be displayed. Note! The list of available properties appears only when the connection parameters properly configured and Page Id points to existing EPiServer page. PageListWebPart and PageViewWebPart can be connected to each other. If connection between these parts is established then the PageViewWebPart displays the content of the page selected in PageListWebPart. Both Web Parts need to have correctly configured connection parameters.
Configuring the Content Channels
-
EPiServer Connect stores information about channels in an XML configuration file. The application automatically creates this file the first time it is required if it does not already exist. The path to where this file should be stored needs to be entered into the web.config file for the SharePoint Web application hosting the connector. The following configuration needs to be added to the web.config file:
a) Locate the web.config file for the SharePoint Web application, you can find it at <drive>\inetpub\wwwroot\wss\VirtualDirectories\<port> (<drive> is the drive where IIS is installed and <port> is the port number for the web application to be used, for example, 80).
b) Add the next line to <configuration> > <appSettings> section. If this section does not exist, also add the following:<add key="EPiServerConnectorConfigRelativePath" value="EPiServerSharePointConnector.config" />
c) Modify or add the value above if you choose to place the configuration file in another location.
d) Make sure that SharePoint application pool process has read and write access rights for the directory where specified EPiServerSharePointConnector.config file is going to be located. -
Create and make sure that the Content Channel exists and is correctly configured on the EPiServer CMS website as follows:
a) Log on to the EPiServer CMS website with an account that has Administrator rights for the website.
b) Switch to Admin mode.
c) On the Admin tab, select Content Channels.
d) Click Add if you need to add a Content Channel, or click the Edit button to change the parameters of an existing one. Configure the following Content Channel parameters:
Channel name. The name of the content channel. This name will be used then you set up connection parameters on the SharePoint website.
Page root. The EPiServer CMS page that the imported pages will be created under.
Default Page Type. The default page type to use if one is not specified when creating imported pages.
Save Action. The save action to use when creating imported pages.
Mapped page types. One or several sets of mappings between a page type's properties to alternative names.
Unmapped page types. Page types that do not yet have a mapping of its properties to alternative name. See the text Importing SharePoint Items Issues below about issues when importing SharePoint items.
e) Click Save to apply your configuration.
Importing SharePoint Items Issues
Ensure to map the field names to be exported for SharePoint items to the desired page types for each EPiServer CMS Content Channel to be used. Note! Create a mapping in the EPiServer Content Channel from a field on the SharePoint item to the EPiServer PageName property. If no mappings are created then EPiServer will only import properties whose names match that of the properties of the page type being used.
Configuring the Web Services Authentification
Configure the following on the EPiServer CMS website:
-
Open the web.config file for the EPiServer CMS website.
-
Find the section <configuration> > <system.web> > <httpModules>. If this section does not exist, also add the followingEPiServer CMS Basic Authentication Module:
<add name="BasicAuthentication" type="EPiServer.Security.BasicAuthentication, EPiServer" /> -
Find the section <configuration> > <location path=”WebServices”>. Ensure that EPiServer Basic authentication is switched on in this location. If this section does not exist, also add the following:
<EPiServer.basicAuthentication sendBasicChallenge="true" basicRealm="" /> -
Find the section <configuration> > <location path=”WebServices”> > <system.web> > <authorization>. Ensure that the User you chose to connect from SharePoint is allowed to enter this location (or group which contains that particular user).
Change he following to the Authentication mode for the website on the Internet Information Services:
-
Open the IIS Manager (Start > Settings > Control Panel > Administrative Tools > Internet Information Services (IIS) Manager).
-
Open the EPiServer CMS website properties.
-
Select the Directory Security Settings tab.
-
Under Authentication and access control, click Edit.
-
Select Basic authentication (password is sent in clear text. Ensure that the other check boxes are cleared.
-
Click OK .
-
Restart the website to save the configuration.
Ensure that the user has the appropriate permissions and can act as a web service user on the EPiServer CMS website as follows:
-
Log on to the EPiServer CMS website with an account that can provide administration access for the website.
-
Switch to Admin mode.
-
On the Config tab, select Permissions for Functions.
-
Click the Edit button for the Allow the user to act as a web service user function.
-
Ensure that the user or user group are given permission to act as web service and listed on his page. If user or user group does not have permission, click Add Users/Groups and select users or groups that must have permission to act as web service.
Configuring the SharePoint Website
Configure SharePoint website as follows:
-
a) Go to Site Actions > Site Settings > Site Actions > Manage site features.
b) Click Activate for the EPiServer Connect for SharePoint Administration item.
c) Click Activate for the EPiServer Connect for SharePoint Event Listener item.
d) Verify that they have the status Active. -
On this page you can manage the content channels that are used for the connection to the EPiServer CMS system. If you do not have any content channels configured or want to create a new one configure as follows:
a) Go to Site Actions > Site Settings > Site Administration > EPiServer Connect for SharePoint.
b) Click Add new. Here you are also able to edit any existing content channel to work with your EPiServer CMS website.
c) Click Test connection to verify the properties.
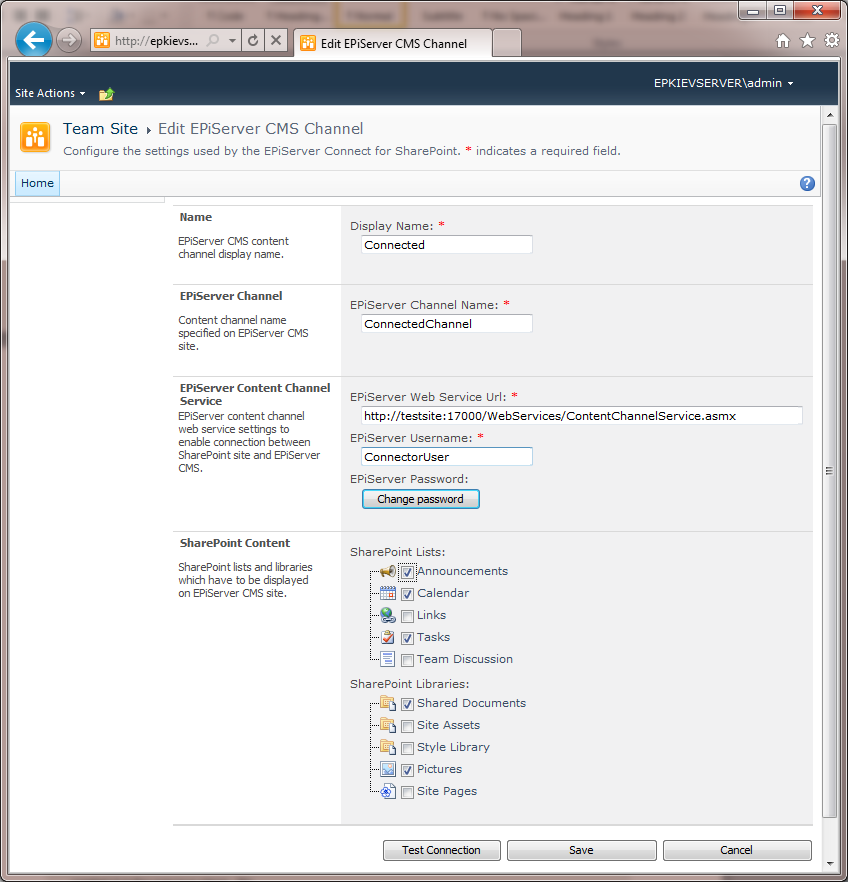
The EPiServer CMS Content Channel configuration consists of the following parameters:
-
Display Name. The name of the content channel to display on the EPiServer CMS Channel page.
-
EPiServer Channel Name. The name of the existing content channel on the EPiServer CMS website (you may have created it in the previous stage - 2b).
-
EPiServer Content Channel Service . The connection settings to the EPiServer CMS.
EPiServer Web Service URL. A valid URL to the EPiServer CMS Content Channel web service, for example, http://website.com/WebServices/ContentChannelService.asmx.
EPiServer Username . The name of the user that will be used to connect to EPiServer CMS.
EPiServer Password. The password to connect to EPiServer CMS. If you are editing an existing content channel, you the Change password button is available instead of an input field, click it if you want to change the password for the connection. -
SharePoint Content. The content that will be accessed through the channel.
SharePoint Lists. The types of items that should be exported to EPiServer by the channel.
SharePoint Libraries. The document folders that should be exported to EPiServer by the channel.
Uninstalling the SharePoint Solution
Note! If you installed the connector with a custom name forgot its name then you can use the STSADM to view a list of solutions deployed to the server using the enumsolutions operation (stsadm.exe -o enumsolutions).
- Ensure that the Windows SharePoint Services Timer service is running (Start > Control Panel > Administrative Tools > Services).
- Open the Microsoft Windows Command Prompt (Start > Programs > Accessories > Command Prompt).
- Run the following commands from the command prompt:
• stsadm -o retractsolution -name SharepointConnector.wsp –immediate –url <application url>. Retracts the solution from the SharePoint website. The <application url> parameters must be replaced with the actual URL of the Microsoft SharePoint website. This command runs asynchronously, so you are required to enter the next command until it finishes checking the status of deploying solution.
• stsadm -o displaysolution -name SharepointConnector.wsp. Shows the status of the deploying process, when the previous command is completed, you can find the result under the <LastOperationResult> section (for Windows SharePoint Services only). “RetractionSucceded” will appera if the deployment is successful or “RetractionFailedXXXX” if the deployment failed (XXXX will show the error code).
• stsadm -o deletesolution -name SharepointConnector.wsp. Removes the solution from SharePoint. Do not run this command until the previous command shows “RetractionSucceded”.