Installing Episerver 7.5
This section describes the installation of the Episerver 7.5 platform to Episerver Deployment Center, from where you will manage further product installations and upgradings.
The zipped file package contains the following:
- Setup.exe - executable file which checks and installs required components.
- Setup.exe.config - configuration file for setup.
- EPiServerShared.msi - components shared by all EPiServer products.
- EPiServerSearch.msi - the EPiServer search feature included by default.
- EPiServer.Framework.msi - components for the EPiServer platform foundation.
- EPiServerCMS.msi - components for EPiServer CMS.
- EPiServerCommerce.msi - components for EPiServer Commerce.
- EPiServerCommerceSample.msi - sample site for EPiServer Commerce.
- EPiServerRelate.msi - components for EPiServer Relate.
- EPiServerCommunity.msi - community part of EPiServer Relate.
- EPiServerMail.msi - components for EPiServer Mail.
- EPiServerCMO.msi - components for EPiServer CMO.
- Live Monitor.msi - components for Live Monitor.
- Powershell Redist - Microsoft Powershell installation files.
Install EPiServer 7.5 as follows:
- Download the installation package and extract the files included.
- Run the Setup.exe file.
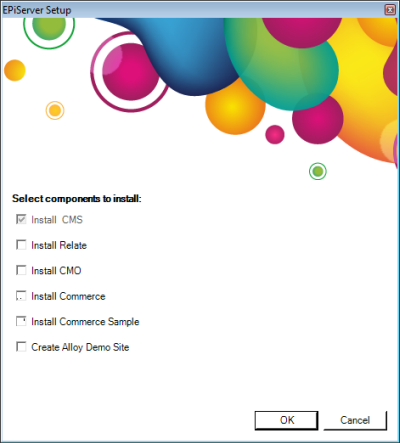
- Select the desired components to install and click OK:
- Install CMS - installs Episerver CMS (default since this is required for all).
- Install Relate - installs Episerver Relate (Community), including EPiServer Mail.
- Install CMO - installs Episerver CMO.
- Install Commerce - installs Episerver Commerce.
- Install Commerce Sample - installs Commerce sample site.
- Create Alloy Demo Site - express installation creating a website based on the Alloy sample templates. - Accept the End User License Agreement terms and continue.
- The installation will start by checking if the required software components and versions are installed on your machine. If any of the components are missing, a dialog will appear informing you of the software that is required to be installed or updated. When the required software has been verified the installation will continue.
- When the platform installation has finalized, continue the installation of desired components as described below.
Other
If you chose to install the Alloy demo site for CMS, the website will open in a browser. See below for information on how to log in. Refer to Modules and Alloy Templates Configuration for more information, if you plan to do development on the Alloy templates, or if you want to install modules on a site with the Alloy templates installed.
Refer to Setting up IIS for EPiServer for information on how to configure IIS for Episerver.
License management
Licenses for all Episerver products are stored in a shared file called License.config. Visit the Episerver License Center to download a license. During installation of Episerver products, the license file will be added to the site root where it will be picked up by all products.