Configuring EPiServer CMS Enterprise Edition
|
Product version: |
EPiServer CMS 4.62 |
|
Document version: |
1.0 |
|
Document creation date: |
05-06-2006 |
|
Document last saved: |
04-10-2007 |
Purpose
EPiServer CMS Enterprise Edition is a solution that, among other things, shares the same files and stores all information in the same database. This technical note describes the configuration of, and the technology behind, the Enterprise CMS Edition.
Table of Contents
License Requirements
Installation- Install the First Enterprise Web Site
- Install Multiple Enterprise Web Sites
Configuration
- Start Page Setup
Technical Details
- web.config
- Load Balancing
- Local Cache Update
Additional Information
- Security
Overview
EPiServer CMS Enterprise Edition is a solution that, among other things, shares the same files and stores all information in the same database. Enterprise Edition is mainly intended for environments where several similar Web sites are set up and want to have the possibility to share information. All Web sites can be edited from the same Edit mode and it is possible to link information between the different Web sites.
License Requirements
You need an EPiServer CMS Enterprise license to enable the Enterprise functions. All sites for a single Enterprise license must run on a single server. With the purchase of an EPiServer CMS Enterprise license you can also request up to three load-balancing licenses. Each site running on the “master” Enterprise license can be deployed on up to three additional load-balancing servers.
Note The load-balancing licenses are only valid for sites running on a “master” Enterprise license.
Installation
To install EPiServer CMS Enterprise Edition you need to perform a few extra actions compared to the EPiServer CMS Professional installation.
Install the First Enterprise Web Site
- Install the first site with the installation program, just like a regular EPiServer CMS installation. (See the technical note, "EPiServer CMS 4.52 Installation Instructions" for installation instructions.)
- When the installation program opens a Web browser to allow you to import initial content, close the Web browser.
- Add the following configuration handler and enterprise section to web.config immediately after the opening <configuration> tag.
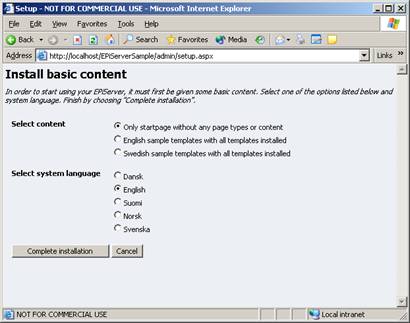
Note <configSections>, <sectionGroup> and <episerver> sections may already exist. In that case, add the relevant information without creating duplicate sections. - Open a Web browser and navigate to the new Web site. You will be redirected to the setup page where you previously aborted the installation process.
- Select the content and system language to import and click Complete installation.
- Go to System Settings in Admin mode and check that the Address to your Web site has the same URL as the site that you have installed. Save System Settings to make sure that EPsHostUrl gets saved to web.config.
<sectionGroup name="episerver">
<section name="Enterprise"
allowDefinition="MachineToApplication"
allowLocation="false"
type="EPiServer.Enterprise.EnterpriseConfigurationHandler,EPiServer.Enterprise" />
</sectionGroup>
</configSections>
<episerver>
<Enterprise>
</Enterprise>
</episerver>
You have now completed installation of the first Web site.
Install Multiple Enterprise Web Sites
Follow the instructions below to set up multiple Web sites.
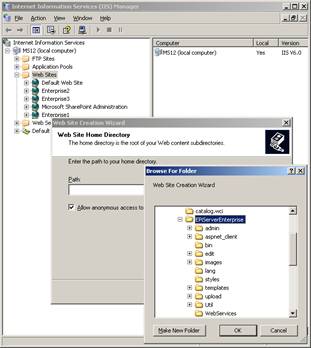
- Create a new Web site in Internet Information Services Manager (IIS Manager).
- Configure the home directory to point to the same home directory as your first Enterprise Web site.
- Open the start page on the new Web site and you will see the Install basic content page.
- Import the content and system language that you want to start with for your new site and click Complete installation.
- Go to System Settings in Admin mode and set the Address to your Web site to the address for the new Web site. Save System Settings to make sure that EPsHostUrl gets saved to web.config.
Configuration
Start Page Setup
If you want to use a different page template for the start page of a new enterprise Web site, you must create a new template file in the root directory and create a new start page type from Admin mode. Finally you need to edit the configuration of the Web site in IIS to make sure that the new page template is the first default page in the list.
The reason for having a file with a different name is because the files are shared between all installations.
Technical Details
web.config
The unique site configuration information for each site will be stored in a section in web.config under Enterprise. For example, the site running under IIS instance 1 could have a section like the following:
<episerver>
<Enterprise>
<appSettings instance="1">
<add key="EPnStartPage" value="3" />
<add key="EPsHostUrl" value="http://ms11.ep.se" />
<add key="EPsLocalSite" value="desktop" />
</appSettings>
</Enterprise>
</episerver>
This means that all configuration information for this Web site will be read from the common appSettings section, but EPnStartPage, EPsHostUrl and EPsLocalSite will be read from the section above.
Load Balancing
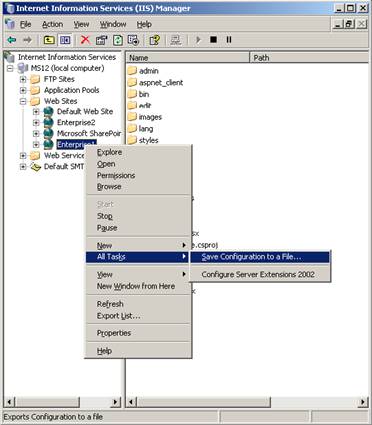
If you are running in a load-balanced scenario, you need to make sure that the load-balanced sites receive the same instance ID (the instance attribute as shown above) as the master Web site. If you are running Windows Server 2003, the easiest way to accomplish this is to use the Save Configuration to a File menu option in IIS Manager from the master site, and then create the slave site with the function New > Web Site (from file).
If you are running Windows 2000, you may need to use MetaEdit or a similar tool. MetaEdit can be downloaded from www.microsoft.com.
Local Cache Update
A feature that the Enterprise Edition has introduced is intelligent local cache updates. From a .NET viewpoint, all your enterprise Web sites are completely separate applications, running in their own appDomains. Since all sites share the same database and therefore may be affected by page updates on other sites, the system needs to be able to update page information between all the enterprise Web sites.
Prior to EPiServer CMS 4.40, you needed to configure remote web sites in EPiServer to let these Web sites update cache information between sites. This process is still needed if you need to communicate with Web sites running on another server, but for local updates, the new local cache update feature takes care of this without requiring any further configuration.
This update process is handled by EPiServer CMS Scheduler Service. The main purpose of this service is to handle jobs that are scheduled to run at a specific time without manual intervention. Now it is also used to notify sites of cache updates.
Each site will register with the scheduler service when the site starts. As part of this registration, the site will identify the database it uses by giving the scheduler service a hash value based on the database connection string. If two sites use the same database connection string, they will have the same hash value and will therefore be notified about updates to pages in that database.
If this cache update does not seem to work, the cause is most likely that the EPiServer CMS Scheduler Service is not started.
Additional Information
Security
A possible misconception regarding authentication in Enterprise solutions is that logging out on one site while being logged in on other sites would log you out from those as well. This is not the case. When logging out from an Enterprise site to, for example, leave the computer, make sure to log out from any other sites as well.