A critical vulnerability was discovered in React Server Components (Next.js). Our systems remain protected but we advise to update packages to newest version. Learn More.
Gadgets - Developers Tutorial
|
Product version: |
EPiServer CMS 6 / 6 R2 |
|---|---|
|
Document last saved: |
The dashboard is one of the new features of EPiServer 6 which is also a plug-in area open to partners. Usages include presenting high-level information or provide quick access to common tasks. This document is a tutorial to creating gadgets on the dashboard.
While this document highlights aspects related to gadget development with code examples keep these external resources handy for in depth information:
- The OnlineCenter Developer documentation.
- QuickChat project, Zipped C# project: Quick and dirty output from this tutorial
- Dynamic DataStore SDK: Documentation and examples on the data store
- Up-to-date info on ASP.NET MVC
Important Note Regarding MVC Version
The information in this technote applies to both EPiServer CMS 6.0 and EPiServer CMS 6 R2 but with one important difference:
- EPiServer CMS 6.0 requires MVC 1.0
- EPiServer CMS 6 R2 requires MVC 2.0
Contents
Gadget Development, step 1: Showing Information
Gadget Development, step 2: Server Interaction
Gadget Development, step 3: Client side development
Gadget development, step 4: Styles and CSS
Checklist: Playing nice on the dashboard
OnlineCenter Overview
EPiServer OnlineCenter, which is a new UI framework for EPiServer products, is introduced in EPiServer CMS 6. The main purpose of EPiServer OnlineCenter is to allow easier navigation and integration of different products – EPiServer products or 3rd party products. EPiServer OnlineCenter is made up of two main components:
Global Navigation
The global navigation helps users navigate different integrated products such as EPiServer CMS, EPiServer Community, and EPiServer Mail but also third party products as ImageVault or similar integrated modules which would like to expose their interfaces to the logged on user.
The global navigation can be customized (it’s a new plugin-area) and it’s possible to insert the menu into both (custom) web forms and MVC views.
The menu is designed to be oriented on products and modules, so that each top menu item represents a product while the sub level menu contains the actual views/functions/parts of the product.
Dashboard
The main purposes of the dashboard are to aggregate site information and expose important functions to the user. For example showing a list of recently changed pages so that the editor quickly can get back to work where they left off.
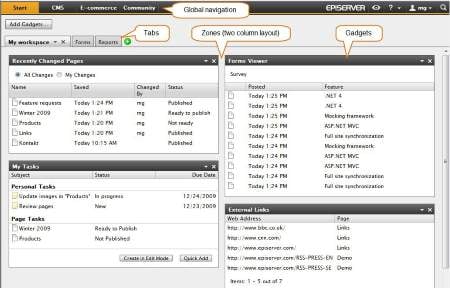
The dashboard is made up of tabs, zones and gadgets. Gadgets can easily be created (ASP.NET MVC) and plugged into the dashboard so that the user can use them (add to dashboard). A gadget is a self contained item and is responsible for its own rendering and behavior. A gadget can either contain functionality that can be used within the gadget interface or simple link away to other products integrated in the framework (for example; a direct link to CMS / Pages where you can use the classic editing mode features).
Setup
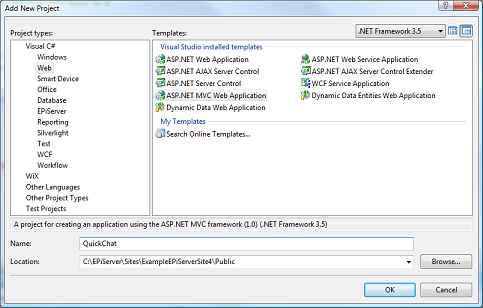
Start by installing an EPiServer CMS 6 web site using the standard installer. Using the default options you will end up with a web site in c:\EPiServer\Sites\[MySiteName]. In the example below this site was installed in c:\EPiServer\Sites\ExampleEPiServerSite4. While it’s not required for normal operation this tutorial assumes you have installed ASP.NET MVC.
Develop gadgets in separate project
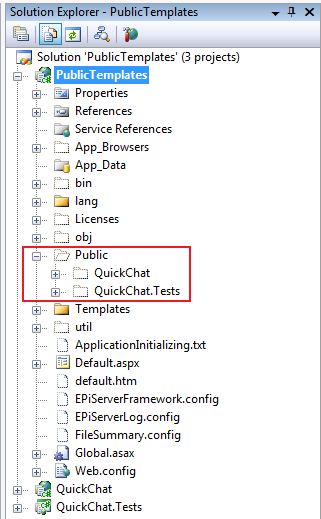
The module is created as a separate project below the “public” folder of the EPiServer site. As an alternative to creating a separate project you can add you gadget to the existing PublicTemplatest project, please see the Develop gadgets in public templates project section for more information.

Add a unit test project if you like. This tutorial will not cover unit testing.
As you can see in the screen shot when enabling “Show all files” the quick chat module is placed below the development site.
Modifications to default
Some modifications are recommended to the default MVC application.
1. Remove default controllers and views
Remove the default controllers, views and scripts (HomeController.cs, /Views/Home, etc.) according to the image below. You can always use another project to play with ASP.NET MVC. Please note that if you have added a unit test project you also have to remove all the related test functions from the QuickChat.Test project.

2. Clean up web.config
The web configuration is inherited from the public templates site but if you leave some settings in the module’s web.config you won’t kill intellisense. Copy the root web.config file (not the one in the Views folder) from the QuickChat example zip to your project.
3. Change output path
Open the QuickChat project's properties and change the default build output path of the quick chat project to “..\..\bin\”
4. Add references
Add references to EPiServer.Shell and EPiServer.Data. You will need these later on. You can find a copy of these in the public template’s bin folder.

5. Register module in web.config
Open the public templates’ web.config file and find the episerver.shell configuration section. Add the quick chat module to the /configuration/episerver.shell/modules/ path. This is an excerpt of the added configuration:
<episerver.shell>
    <publicModules rootPath="~/modules/" autoDiscovery="Minimal">
        <!-- QuickChat is assumed to be located in ~/modules/QuickChat -->
        <add name="QuickChat">
            <assemblies>
                <add assembly="QuickChat"/>
            </assemblies>
        </add>
    </publicModules>
Develop gadgets in public templates project
While creating gadgets in a separate project as described in the Create gadgets in separate project section often is a good approach it’s also possible create gadgets in the PublicTemplates.csproj project by doing some modifications to configuration and the csproj file.
1. Configuration
The Public Templates needs to be registered in the configuration/episerver.shell/publicModules configuration section. The resourcePath attribute tells the system to look for views (which are described later in this document) in the folder /Views/[ControllerName]/[ActionName].ascx instead of the default location below the modules folder. Also update the add assembly section to any new name chosen for the public templates application.
<episerver.shell>
     <publicModules rootPath="~/modules/" autoDiscovery="Minimal">
          <add name="Public" resourcePath="~/">
               <assemblies>
                    <add assembly="EPiServer.Templates.Public" />
               </assemblies>
          </add>
2. References
Add references to “System.Web.Mvc”, “EPiServer.Shell” and “EPiServer.Data”.
3. Create Folders
The ASP.NET MVC framework suggests you organize the code in below three folders: “Controllers”, “Models” and “Views”. Add these folders to your project.
4. Visual Studio Integration
ASP.NET MVC includes some wizards to help out in the task of creating controllers and views. These are not enabled in the PublicTemplates.csproj installed with EPiServer CMS but they can be with some manual tweaking of the file. Right-click on the project and “Unload”, then “Edit …” it. Add {603c0e0b-db56-11dc-be95-000d561079b0}; to the list of existing project type guids. Now save, right click “Reload Project”.
<Project>
     <PropertyGroup>
          <ProjectTypeGuids>{603c0e0b-db56-11dc-be95-000d561079b0};{349c5851-65df-11da-9384-00065b846f21};{fae04ec0-301f-11d3-bf4b-00c04f79efbc}</ProjectTypeGuids>
Starting out with gadgets
It’s time to create a gadget. Head to the QuickChat project, right click on the “Controllers” directory and “Add Controller”.

Add the gadget attribute to the controller template created for you. To reduce Time-to-dashboard we change the return statement to return html content directly (we’ll change this soon).
using System.Web.Mvc;
using EPiServer.Shell.Gadgets;

namespace QuickChat.Controllers
{
     [Gadget]
     public class QuickChatController : Controller
     {
          public ActionResult Index()
          {
               return Content("<strong>Some</strong>thing!");
          }
     }
}
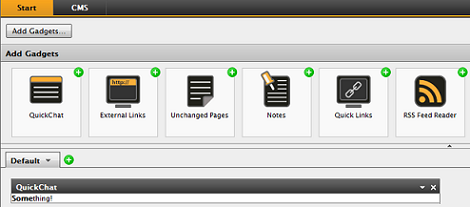
Now compile and switch over to the dashboard. Click on the (+) symbol of QuickChat in “Add Gadgets…” to add this new gadget. Now that we’ve got “Something” out on the dashboard we can move on to more serious business.

A tiny bit of background
Dashboard gadgets are developed using the MVC model. From the point of view of processing a server request this model can be described like this:
Incoming Request » Controller Action » View » Outgoing Response
The “Controller Action” and “View” represents code that is developed to provide functionality. The arrows (») represent pluggable points provided by the ASP.NET MVC framework.
In a typical ASP.NET MVC application the flow spans over a complete page request. However, in the case of our dashboard gadgets this is slightly different:
Incoming Request » Dashboard Controller Action » Dashboard View
     foreach (gadget on userDashboard)
     {
          Partial Request » Controller Action » View
     } » Outgoing Response
Dashboard gadgets uses the same principles as a typical MVC application but only renders a portion of the dashboard.
Gadget Development, step 1: Showing Information
With something now presented on the dashboard and a little background behind us we can let the coding begin.
Models
Add a class Message to the Models directory of the quick chat project.
using System;
namespace QuickChat.Models
{
     public class Message
     {
          public string Text { get; set; }
          public string From { get; set; }
          public DateTime Sent { get; set; }
     }
}
Controller
Going back to the QuickChatController and use EPiServer.Data to retrieve messages from the database (take a look at the EPiServer Framework Reference SDK for in-depth information about the Dynamic Data Store):
[Gadget]
public class QuickChatController : Controller
{
     // since the controller is created for each request
     // we can assign a store as a variable
     static QuickChatController()
     {
          DynamicDataStoreFactory.Instance.CreateStore(typeof(Message));
     }

     DynamicDataStore store = DynamicDataStoreFactory.Instance.GetStore(typeof(Message));

     public ActionResult Index()
     {
          // select all messages for the last 5 minutes
          var fiveMinutesAgo = DateTime.Now.AddMinutes(-5);
          var messages = from m in store.Items<Message>()
               where m.Sent > fiveMinutesAgo
               select m;

     // pass the messages to the view
     return View(messages.ToList());
}}
The code will select all recent messages and pass them to the “Index” view for display.
Views
Create an MVC partial view in the quick chat project.

The wizard can be conjured by right-clicking in the controller action and choosing “Add view…” (requires ASP.NET MVC to be installed).
When the view is located in Views/QuickChat/Index.ascx in the quick chat project it will be automatically selected to show the messages.
<%@ Control Language="C#" Inherits="System.Web.Mvc.ViewUserControl<IList<QuickChat.Models.Message>>" %>
<%@ Import Namespace="QuickChat.Models" %>
<div class="epi-defaultPadding">
     <ul>
     <% foreach (Message m in Model) { %>
          <li><%= m.From %>: <%= m.Text %></li>
     <% } %>
     </ul>
     Number of messages: <%= Model.Count %>
</div>
The view shows messages passed to it by the controller which is just about enough when adhering to the MVC pattern.
Gadget Development, step 2: Server Interaction
So far we have created a gadget that shows messages in the database but there is no way to put the messages in. That is precisely what is going to be fixed.
Posting messages to the controller
The most convenient option for posting information from the dashboard is using AJAX. This release includes an extension method that helps out doing this:
<%@ Import Namespace="EPiServer.Shell.Web.Mvc.Html" %>
<div class="epi-defaultPadding">...</div>
<hr />
<% Html.BeginGadgetForm("Save"); %>
     <input name="text" />
     <%= Html.AcceptButton() %>
<% Html.EndForm(); %>
The new improvement of the view renders a form with a text input field and a submit button. Since we used a “gadget form” the form will be serialized and posted using jQuery.ajax. The results of the “Save” action will replace any existing content in the gadget.
Taking care of posted messages in the controller
The controller accepts the posted message and stores it in the store. The view that is returned will take the place of the existing view in the gadget area. The mapping of the posted message string to input parameters is a feature of ASP.NET MVC. Refer to the blogosphere for documentation on form posting scenarios.
public ActionResult Save(string text)
{
         // store the posted message
         Message message = new Message();
         message.Text = text;
         message.From = User.Identity.Name;
         message.Sent = DateTime.Now;
         store.Save(message);
         var messages = GetRecentMessages();

         return View("Index", messages);
}

     IList<Message> GetRecentMessages()
     {
         return (from m in store.Items<Message>()
                 where m.Sent > DateTime.Now.AddMinutes(-1)
                 orderby m.Sent
                 select m).ToList();
     }
Gadget Development, step 3: Client side development
While server development is great it’s what you do on the client that makes your projects shine.
You may have noticed that the chat gadget at this point still isn’t very interactive. While you get updates when refreshing the page, or posting messages it’s just sits there in between.
Defining resources
First of all is getting out on the dashboard with all the other gadgets. The recommended way of doing this is using an attribute on the controller, as below:
[Gadget]
[EPiServer.Shell.Web.ScriptResource("Content/QuickChat.js")]
public class QuickChatController : Controller
{
}
While the script is executed each time the dashboard loads the way to associate with a gadget instance are client script init methods:
[Gadget(ClientScriptInitMethod = "quickchat.init")]
[EPiServer.Shell.Web.ScriptResource("Scripts/QuickChat.js")]
public class QuickChatController : Controller
Client scripts
The script resource attribute assumes a JavaScript method “quickchat.init” is present on the client. Let’s take a look on this method in the quickchat.js file:
(function($) {
    // using this pattern helps keeping your privates private
    quickchat = {};
    quickchat.init = function(e, gadget) {
        setInterval(function() {
            // reload on an interval unless typing
            var typedText = $("input[type='text']", gadget.element).attr("value");
            if (!typedText) {
                gadget.loadView("Index");
            }
        }, 5000);
    };
})(epiJQuery);
The init method is invoked by the dashboard and starts updating the gadget every five seconds. While this represents an easy way to update the gadget regularly it’s not particularly suited for a chat since it will steal focus from the text box.
Gadget development, step 4 - Styles and CSS
The best way to get your own style sheets out on the dashboard is defining them for your gadget as in this snippet:
[Gadget(ClientScriptInitMethod = "quickchat.init")]
[EPiServer.Shell.Web.CssResource("Content/QuickChat.css")]
public class QuickChatController : Controller
By using the attribute on the gadget controller and creating a css file in the Styles folder of your gadget proejct you can define styles specific to your gadget. There are also shared styles you can use to get a consistent look and feel. This is described in a later section of this document.
Tutorial Download
Download the Quick Chat Gadget code sample in zip format.
Further Information
Styling
The CSS styles used on the Dashboard resets many of the default styling of elements added by the browser and in some cases adds an own default style. This styling may however not be enough (it’s rather none styled) so to the rescue comes some additional convenient classes. Documentation about styling and the can be found in the OnlineCenter Developer document.
Checklist: Playing nice on the dashboard
Making a gadget means sharing a common workspace with others. Take a moment to review this list before publishing your gadget to a wider audience:
- “Namespace” your CSS classes
- Namespace and encapsulate your JavaScript methods to avoid polluting global namespace
- Don’t override other gadget’s styles
- Don’t assume other gadgets will stay the same
- Never assume there is only one gadget of your kind (affects element id:s)
- Prefer documented CSS classes for a consistent look and feel over time
- Avoid long-running operation (such as reports or RSS operations) from your default action


