The DataCash payment provider is one of several payment solutions available for Episerver Commerce.
Installing the DataCash payment provider
- Copy EPiServer.Business.Commerce.Payment.DataCash.dll to the bin folder of both Commerce front-end and back-end sites. Download the DataCash module project files.
- Open the EPiServer.Business.Commerce.Payment.DataCash project. Make sure you have saved the solution to install NuGet packages.
- Install EPiServer.Commerce.Core page by executing the following command via Package Manager Console:
Install-Package EPiServer.Commerce.Core
You may want to install the version that your websites are using to avoid any assembly conflict. You do not need to apply any database transform or removing Common Framework components.
- If you are using a live account, uncomment the following line in the DataCashPaymentGateway file to activate the real-time fraud checking:
Line 261: requestDoc.set("Request.Transaction.TxnDetails.The3rdMan.Realtime.real_time_sha1", HashCode(merchantReference)); - Rebuild the project.
Deploying the DataCash payment provider
- Copy Transaction.dll in folder DataCash\Lib to the bin folder of both Commerce front-end and back-end sites.
- Under Shared\Apps\Order\Payments\Plugins, create a new folder named DataCash.
- Copy ConfigurePayment.ascx to the new DataCash folder.
- Create a DataCash folder in Shared\Apps\Order\Payments\MetaData.
- Deploy EditTab.ascx to Shared\Apps\Order\Payments\MetaData\DataCash.
- Create a DataCash folder under Templates\Sample\Units\CartCheckout of the Commerce front-end site.
- Copy CountriesCodes.txt, DataCashLandingPage.aspx, PaymentMethod.ascx and the ClientResources folder to Templates\Sample\Units\CartCheckout\DataCash.
- Copy the lang folder to the root folder of the Commerce front-end site.
Note: In Episerver Commerce 7.5, the Apps folder is located in the Episerver Commerce Manager Shared Files Folder, typically: C:\EPiServer\<YourCommerceManagerSite>\eCommerceFramework\5.3\Shared
If you updated your Commerce Manager site to the latest version via NuGet, locate the Apps folder in the wwwroot folder. Refer to this Apps folder as your corresponding path for the Apps folder in this section.
E:\EPiServer\<YourCommerceManagerSite>\wwwroot\Apps
Configuring the DataCash payment provider
Prerequisite: You must have a DataCash account registered at DataCash website.
- In Commerce Manager, go to Administration > Order System > Payments > Your country.
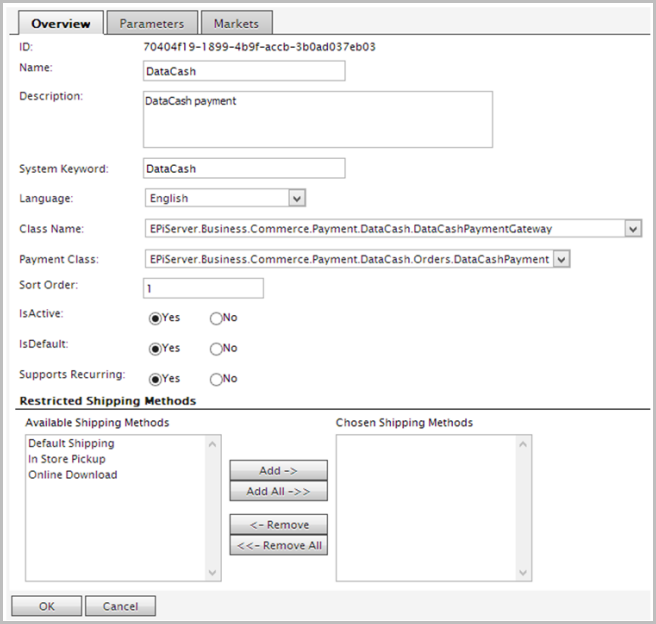
- Click New to create a new payment method. Enter information in the following fields and click OK:
- Name. DataCash
- Description. DataCash payment
- System Keyword. DataCash
- Language. English
- Class name. EPiServer.Business.Commerce.Payment.DataCash.DataCashPaymentGateway
- Payment Class. EPiServer.Business.Commerce.Payment.DataCash.Orders.DataCashPayment
- Sort Order. 1
- IsActive. Yes
- IsDefault. Yes (or No)
- Supports Recurring. Yes (or No)

Note: Add Restricted Shipping Methods only if you want to restrict any shipping method.
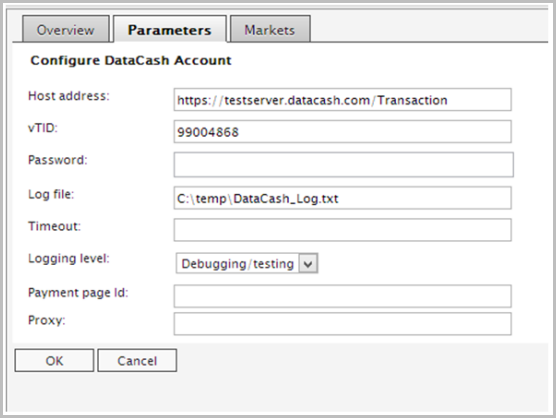
- Open the DataCash payment that you just created and go to the Parameters tab.
- Configure the parameters for DataCash payment:
- Host address. The URL of the DataCash server to send transactions (required).
- vTID. DataCash account number (required).
- Password. Password for vTID (required).
- Log file. The log file where the API writes the output log. The folder that contains the log file should be available and make sure that the IUSR and IIS_IUSRS have modify permission to this file. If you do not set the log file, no logging occurs.
- Time out. Number of seconds for transaction time out. If you do not set time out, 60 seconds is the default.
- Logging level. The level that should be logged.
- Payment page Id. The ID of the payment page (configured by DataCash) that you want to display.
- Proxy. The URL of a proxy to connect through. If you do not set a proxy, the default proxy of the server is used.

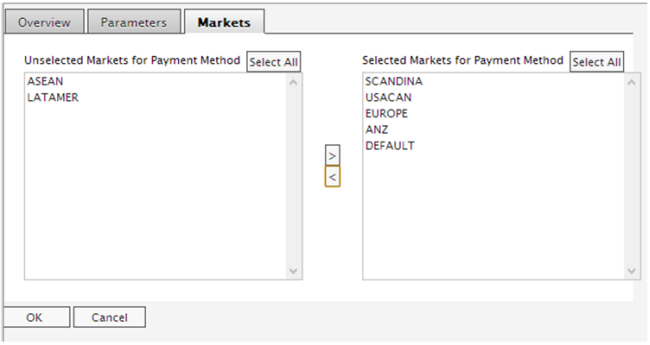
- Go to the Markets tab and add the expected markets for this payment.

- Click OK.
- Go to Administration > Order System > Meta Classes, choose Import MetaData menu button, to populate the MetaData import screen.
- Select the DataCash\DataCashPaymentMetaClass.xml file to import.
Note: For testing purposes, manually request DataCash to activate HPS and the 3rd Man services. (These services are not configured by default. Also, The 3rd Man Service is available only for a live account.)
Using the DataCash payment provider
When you have deployed and configured the DataCash payment provider, it appears as an option in the checkout procedure.
- Add a product to the cart and proceed to checkout.
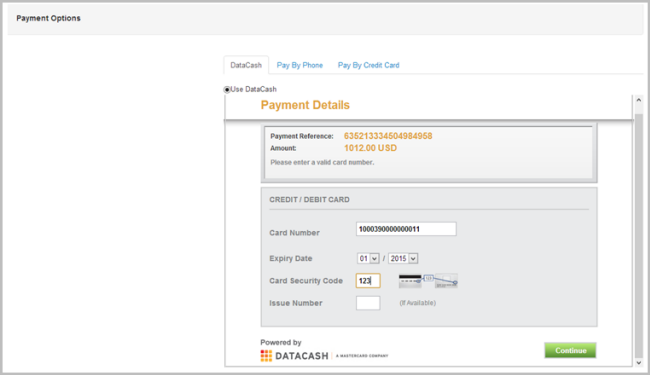
- Under Payment Options, select DataCash.
- Enter your payment card information.
- Click Continue to place the order. You are automatically redirected to the confirmation page.

Last updated: Apr 13, 2017
