This topic explains how to configure Solr search for Episerver Commerce. Solr is an enterprise-level search engine. The setup instructions result in a fully-functional search engine for use with the Episerver Commerce Framework (ECF).
Following the quick setup, additional instructions explain how to configure a more complex environment and create a more customized, efficient Solr configuration.
Notes: The Solr search provider for ECF is built to work with Solr 3.5.0, the version when the provider was released. While 3.5.0 is the officially supported version, the provider is designed to be compatible with future Solr versions. The Solr search provider is not supported with Episerver Customer-Centric Digital Experience Platform (DXP).
Solr setup
Step 1. Install Tomcat 7
- Download the Windows Service Installer for Apache Tomcat 7, and run the installer. The default options produce a working solution but, for best performance, select the Native option under the Tomcat node on the components screen.
- Within the Tomcat installation directory, edit the conf/server.xml file, and find the HTTP connector element (the port may be different, depending on your installation settings):
<Connector port="8080" protocol="HTTP/1.1" connectionTimeout="20000" redirectPort="8443" /> - Add the URIEncoding="UTF-8" attribute to this element to enable handling URIs with UTF-8 characters to the connector element.
- Restart the Tomcat service.
Step 2. Install the Solr Application
- Download the Solr installation files (version 3.5) from Apache Solr.
- From this package, copy apache*.war into [Tomcat installation path]/webapps path].
- Download the version of the EPiServer.Commerce.Solr35SearchProvider NuGet package that matches your Commerce site.
- Place the solr folder in the Tomcat installation directory.
Note: If an older version of Solr is already installed in the Tomcat instance, stop the Tomcat service and remove all Solr files from the Tomcat webapps directory before copying this version. (If other web applications were installed in the Tomcat instance, delete everything in the webapps folder except for the ROOT directory.)
- Browse to http://localhost:8080/solr to check that the Solr installation on Tomcat is correct.
Step 3. Configure the ECF Installation
Install the EPiServer.Commerce.Solr35SearchProvider NuGet package on the front end and back end sites.
- Open the configs/Mediachase.Search.config files in each web application, both front end and back end sites.
- Set the defaultProvider attribute of the SearchProviders element to Solr35SearchProvider.
- In the Solr35SearchProvider provider element, set the URL attribute to the Solr application in your Tomcat instance. For example: http://{server}:{port}/solr, unless you specifically configured a different application location.
The provider element should look like this:
<add name="Solr35SearchProvider"
     type="Mediachase.Search.Providers.Solr35.SolrSearchProvider, Mediachase.Search.Solr35SearchProvider"
     queryBuilderType="Mediachase.Search.Providers.Solr35.SolrSearchQueryBuilder, Mediachase.Search.Solr35SearchProvider"
     url="http://localhost:8080/solr"
     shareCores="true"
     facetLocalizedFieldValuesOnly="true"
     commitWithin="10000"
     maximumBatchSize="50" />
Changing to multi-core setup
If you use multiple applications for the ECF, use a multi-core setup to create separate configurations and search indexes for each application. If multiple instances of the ECF share the same Tomcat instance, they must use a multi-core setup, and you cannot reuse a single application name in more than one instance.
Complete the previous quick setup instructions before switching to a multi-core configuration.
To add a core for an application, edit the solr/solr.xml file in the Tomcat instance. In the cores element, add a core element named with the application name followed by .catalog, and a directory named with the application name. For example, if the application name is MyApplicationName, add line #4 from the following XML to your solr.xml file.
<solr persistent="false">
  <cores adminPath="/admin/cores">
    <core instanceDir="catalog" name="catalog"/>
    <core instanceDir="MyApplicationName" name="MyApplicationName.catalog"/>
  </cores>
</solr>
Each core needs a directory for configuration and index files. For the default shared core, this is the solr/catalog directory in the Tomcat instance, as configured by the instanceDir value in the default "catalog" core.
To create a directory for the newly added core, copy the catalog directory from solr directory into the Solr directory in the Tomcat instance, and rename it to the application name (the value of the instanceDir attribute in the new core element).
Update the ECF search configuration by editing Mediachase.Search.config for each web application, and setting shareCores="false" in the Solr35SearchProvider provider element.
When these steps are completed, restart the Tomcat instance so that the changes are loaded, and rebuild all indexes.
Customizing the Solr schema
The Solr configuration for each core includes a schema, describing the fields of the search documents and how they are stored and indexed. This configuration is contained in the Tomcat instance at solr/catalog/conf/schema.xml (for multi-core environments, replace catalog with the appropriate core directory). While the schema.xml provided in solr should work for most implementations, you can achieve more efficient indexing and searching performance by customizing the schema for your catalog configuration.
The catalog metafield edit screen of the commerce manager has five options for configuring the search properties of a metafield (all values may not be present for some metafield types):
- Allow Search. Enables searching directly on the field, and faceting on the field.
- Enable Sorting Search Results. Enables sorting results by the value of the field.
- Include Values in Search Results. Stores the unprocessed value of the field in the search document, and lets you retrieve the value directly from the ISearchResults.ISearchDocument interface, without requiring the original object to be loaded from the database.
- Tokenize. Directs the search engine to handle the value as searchable text, rather than a single constant string. A value like an alphanumeric product code should not be tokenized; a value like a long description should be tokenized.
- Include in the Default Search. Directs the search engine to copy the value into a default content value consisting of all the values marked as included, that is used for the default keywords search. Most basic keyword searches from public facing sites search on this content field.
A field does not have to have Allow Search checked to be included in the default search.
Note: If a field is not marked as tokenized, but is included in the default search, the field is not tokenized for faceting or on a direct search for that field; but the value copied into the default content value is tokenized.
When you configure the search properties and the Solr35SearchProvider as the default search provider, go to the Search Index screen in the Administration tab. This screen includes a stub of generated code to customize the Solr schema configuration:
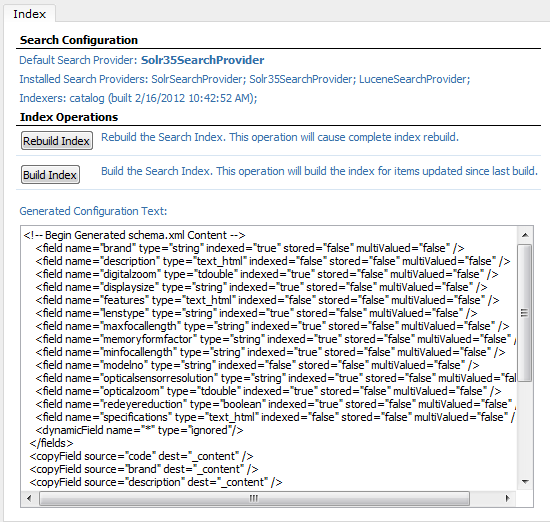
Edit the schema file in the Tomcat instance at solr/catalog/conf/schema.xml (replacing catalog with the appropriate directory for a multi-core configuration). Find the comments indicating the section of the configuration to replace with generated content. (Search for !!! to go to the appropriate place in the file.)
In the unmodified configuration, the section to replace has the following content:
<!-- !!! Replace content between this line and the next comment with "!!!" to use generated MetaData schema.xml configuration. -->
<dynamicField name="*" type="text" indexed="true" stored="true" multiValued="false"/>
</fields>
<copyField source="*" dest="_content"/>
<!-- !!! Replace content between this line and the previous comment with "!!!" to use generated MetaData schema.xml configuration. -->
Replace the content between these two comments with the XML copied out of the search index interface. To make use of the changes, restart the Tomcat instance, and rebuild the index.
Related topic
Last updated: Apr 08, 2021