
Farewell EPiFields, Hello Dynamic Content
An extensive website contains hundreds, sometimes thousands of pages. Certain pieces of information will be the same regardless of what page you are on. This could for instance be a label with the current users name, todays date, the current time or perhaps an image randomly selected from a preset cycle.
To avoid having to update identical types of information on all these pages EPiServer introduced EPiFields. In EPiServer CMS 5 EPiFields is gone and replaced with Dynamic Content. Why the change?
Dynamic Content:
- Uses hashes to make sure only EPiServer code can update the contents
- Fully adapts ASP.NET functionality
- Enables the developer to render the contents with any .NET derived type of control
- Is fully integrated into the EPiServer core and improves performance since the parsing engine is optimized for it
›› Take Charge of The Rendering, Or Let EPiServer Handle It
›› Render, State and Accessing the Properties of The Control
›› Adding The Dynamic Content Plug-In in Web.config
›› Using The Dynamic Content Plug-In
In This Article
I am going to create a dynamic content Plug-In, add it in web.config, make it persist some settings accessed in Edit Mode and display it on a page in the sample templates package.
Before we get going, make sure your development environment meets the following requirements (at least this is what I was using, I haven't checked if it's possible to do this example with "lesser" versions).
- Visual Studio 2008 (will be fully supported in R2 but if you are using the CTP, check Fredrik Tjärnbergs blog on how to get EPiServer support in VS2008)
- .NET Framework 3.5
- EPiServer CMS 5 R2 (CTP)
When you have your environment set up and ready to go, start by opening your EPiServer site in Visual Studio, right-click your project node and add a new class. In this example I've named it "MyDynamicContent", a bit Microsoft influenced perhaps, but it works.
Your class will initially look like this:
using System;
using System.Data;
using System.Configuration;
using System.Web;
using System.Web.Security;
using System.Web.UI;
using System.Web.UI.HtmlControls;
using System.Web.UI.WebControls;
using System.Web.UI.WebControls.WebParts;
namespace EPiServer
{
public class MyDynamicContent
{
}
}
Add the following two using statements:
using EPiServer.DynamicContent;
using EPiServer.Personalization;
Next step is to make the class implement the IDynamicContent interface. Add the statement to the class declaration (" : IDynamicContent"), click the interface and choose "Implement interface 'IDynamicContent'".
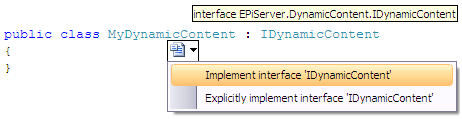
This will create a number of methods and properties in your class. A few methods to notice are RendersWithControl, State, Render and GetControl.
Take Charge of The Rendering, Or Let EPiServer Handle It
EPiServers Dynamic Content allows you to choose whether to take responsibility for the rendering of your component yourself or if you want EPiServer to simply display a string returned from the class' Render method.
To take the easy way out, just return false from RendersWithControl. This will make EPiServer call the render method of the class itself. In the Render method we return a string value that will be printed in the output on any page where we have placed the Dynamic Content Plug-In.
If you instead return true from the RendersWithControl method, you need to supply a control to handle the rendering. This control can for example be a standard .ascx control and contain any set of ASP.NET controls. This means that the possibilities are pretty much endless.
In this example we will return false from the RendersWithControl method and return a string from the Render method.
Render, State and Accessing the Properties of The Control
Modify the Render method to look as follows:
public string Render(EPiServer.PageBase hostPage)
{
    string Hello = string.Empty;
    if (EPiServerProfile.Current.IsAnonymous)
        Hello = "Hello anonymous user";
    else
        Hello = ("Hello " +
                    EPiServerProfile.Current.DisplayName);

    if (ShowTime)
    {
        return (Hello + ", the current time is " +
                    DateTime.Now.ToString("F"));
    }
    else
    {
        return (Hello + ", todays date is " +
                    DateTime.Now.ToString("D"));
    }
}
What we do is to create a string that, in case of a logged on user, greets the user with the display name and todays date, or the current time depending on what value the editor has choosen in Edit Mode for this property.
The state of the property is persisted in the State property. Modify this property to the following:
public string State
{
get
{
return ShowTime.ToString();
}
set
{
ShowTime = Boolean.Parse(value);
}
}
To access the values to be persisted we add a PropertyDataCollection to the Plug-In and insert a bool into this collection. Any properties added to the collection will be displayed under the Settings section in the Edit UI when editing your Dynamic Content. You can modify this behaviour if you want and show your own custom Settings UI.
EPiServer.Core.PropertyDataCollection _props =
    new EPiServer.Core.PropertyDataCollection();
public bool ShowTime;

public MyDynamicContentOld()
{
    _props.Add("ShowTime",
        new EPiServer.Core.PropertyBoolean(true));
}
In order to interact with this property we add a PropertyDataCollection accessor:
public EPiServer.Core.PropertyDataCollection Properties
{
get
{
return _props;
}
}
And that's it for the coding part.
Adding The Dynamic Content Plug-In in Web.config
In order for EPiServer to recognize your new Dynamic Content Plug-In you need to add it in the new <dynamicContent> section.
In my case the add statement will look like this:
<dynamicContent>
       <controls>
              <add description="Displays a property from any page"
         name="PagePropertyPlugin"
         type="EPiServer.DynamicContent.PlugIn.DynamicPageProperty,
          EPiServer"/>
    <add name="ShowTime"
         description="Shows time or date"
         type="EPiServerTest.MyDynamicContent,
          EPiServer.Templates.Public" />
       </controls>
</dynamicContent>
Using The Dynamic Content Plug-In
To demonstrate the Plug-In I've added it to the Standard Page "News" in my copy of the demo package. Why the News page? Because it was the first on the list and I'm lazy.
Click the News page in Edit Mode and select the Edit tab. You will notice an icon that looks very familiar to former EPiFields users.

Yes, we reused the icon from the EPiFields button for the Dynamic Content button. Familiarity is always nice.
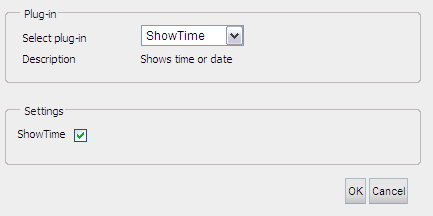
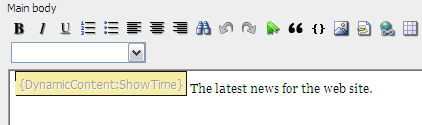
Place the marker in the MainBody editor and click the Dynamic Content button. In the dialog that pops up, select ShowTime from the DropDown. You will also notice a checkbox entitled "ShowTime" under Settings. This is the state that can be persisted and checking it makes the Dynamic Content Render method return the current time. Unchecking it gives us todays date.
Now click OK. You will see your Dynamic Content Plug-In displayed on the page in the MainBody editor and it should look something like this:
Viewing The Results
Going into View Mode for the page will display something like this:
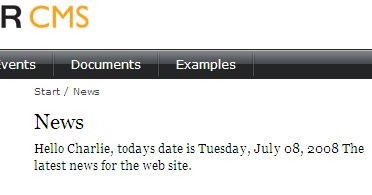
If the ShowTime checkbox is unchecked, the date will be displayed, if not, the current time.
This was just one easy example of what can be done with Dynamic Content. Remember that a Dynamic Content Plug-In that accepts user input or is updated with data in any way will display the same data on any page it's used on.