

Use Xform to store data when you have a form with a fixed design
Many of you have probably used xform before and also hate the fact that when the editor create a form inside EPiServer you can not set the layout and design as you like. But xform can be ok to use when store information/data when you have a form that have a specific design and layout or when the editor are not allowed to choose the fields to use.
Since almost every blogpost is about CMS 7 and MVC at the moment I thought this post might help someone still working with CMS 6 or doing ordinary good old EPiServer development 
Lately I have been working with a customer that needed a contact form looking something like this:
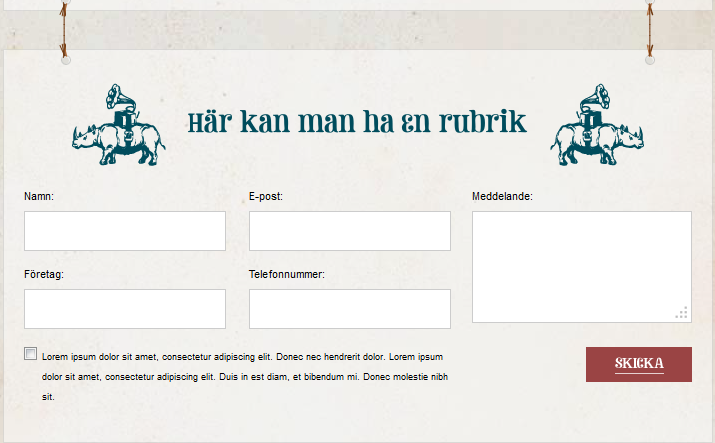
They hade some requirements for validation and my part in the project was to create the functionality and store the information. The html/css-part was already made by another developer therefore I could note create css and html to fit the ordinary tags that EPiServer Xform will create when you use it as an editor to produce forms.
But since EPiServer allow use to store information in Xform with the API we can create a form locking exactly like this and with the built-in functionality in EPiServer let the editor collect data. This is very simple.
- Create a property of type Xform on the specific PageType
- Create an empty form and set the property to use that form
The rest is done by code. First we need to create our form in html. With the help of web controls we can also use some validation. If you do not like to use validation you can delete the web controls handling validation.
1: <div class="form">
2: <div class="form-fields">
3: <div class="input">
4: <asp:Label runat="server" ID="lblName" AssociatedControlID="txtName">Namn:</asp:Label>
5: <asp:TextBox runat="server" ID="txtName" ValidationGroup="form"></asp:TextBox>
6: <asp:RequiredFieldValidator ID="RequiredFieldValidator1" runat="server" ControlToValidate="txtName" ErrorMessage="Vill vill gärna ha ditt namn!" ValidationGroup="form" Display="Dynamic"></asp:RequiredFieldValidator>
7: </div>
8: <div class="input">
9: <asp:Label runat="server" ID="lblMail" AssociatedControlID="txtMail">E-post:</asp:Label>
10: <asp:TextBox runat="server" ID="txtMail" ValidationGroup="form"></asp:TextBox>
11: <asp:RequiredFieldValidator runat="server" ControlToValidate="txtMail" ValidationGroup="form" ErrorMessage="Fyll i din epost så vi kan kontakta dig!" Display="Dynamic"></asp:RequiredFieldValidator>
12: <asp:RegularExpressionValidator runat="server" ValidationExpression=".*@.*\..*" ErrorMessage="Felaktig e-post" ControlToValidate="txtMail" Display="Dynamic" ValidationGroup="form"></asp:RegularExpressionValidator>
13: </div>
14: <div class="input">
15: <asp:Label runat="server" ID="lblCompany" AssociatedControlID="txtCompany">Företag:</asp:Label>
16: <asp:TextBox runat="server" ID="txtCompany" ValidationGroup="form"></asp:TextBox>
17: </div>
18: <div class="input">
19: <asp:Label runat="server" ID="lblPhone" AssociatedControlID="txtPhone">Telefonnummer:</asp:Label>
20: <asp:TextBox runat="server" ID="txtPhone" ValidationGroup="form"></asp:TextBox>
21:
22: <asp:RequiredFieldValidator runat="server" ControlToValidate="txtPhone" ValidationGroup="form" ErrorMessage="Du måste ange ett telefonnummer" Display="Dynamic"></asp:RequiredFieldValidator>
23: <asp:RegularExpressionValidator runat="server" ValidationExpression="\d*" ErrorMessage="Felaktigt telefonnummer" ControlToValidate="txtPhone" Display="Dynamic" ValidationGroup="form"></asp:RegularExpressionValidator>
24:
25: </div>
26: <div class="input input-message">
27: <asp:Label runat="server" ID="Label4" AssociatedControlID="txtMessage">Meddelande:</asp:Label>
28: <asp:TextBox runat="server" ID="txtMessage" TextMode="MultiLine" ValidationGroup="form"></asp:TextBox>
29: </div>
30: </div>
31: <div class="clearfix"></div>
32: <div class="check">
33:
34: <label>
35: <asp:CheckBox runat="server" ID="chkConfirm" ValidationGroup="form" />
36: <span>Lorem ipsum dolor sit amet, consectetur adipiscing elit. Donec nec hendrerit dolor. Lorem ipsum dolor sit amet, consectetur adipiscing elit. Duis in est diam, et bibendum mi. Donec molestie nibh sit.</span>
37:
38:
39: </label>
40: <asp:CustomValidator ID="CustomValidator1" runat="server" OnServerValidate="ValidateCheckbox" EnableClientScript="True" Display="Dynamic" ValidationGroup="form">Du måste godkänna att vi kontaktar dig.</asp:CustomValidator>
41: </div>
42: <div class="submit">
43: <asp:ImageButton runat="server" ID="btnSubmit" ImageUrl="~/images/foretag/form-skicka.png" PostBackUrl="#contact" ValidationGroup="form" />
44: </div>
45: </div>
The rest is code behind and it is really simple:
1: if (CurrentPage["Form"] != null && Page.IsValid)
2: {
3: string xformprop = CurrentPage["Form"] as string;
4: XForm form = XForm.CreateInstance(new Guid(xformprop));
5:
6: XFormData formData = form.CreateFormData();
7:
8: formData.PageGuid = CurrentPage.PageGuid;
9: formData.ChannelOptions = ChannelOptions.Database;
10:
11: //Set values to form
12:
13: formData.SetValue("Namn", txtName.Text);
14: formData.SetValue("E-post", txtMail.Text);
15: formData.SetValue("Företag", txtCompany.Text);
16: formData.SetValue("Telefonnummer", txtPhone.Text);
17: formData.SetValue("Meddelande", txtMessage.Text);
18: formData.SetValue("Godkänd", chkConfirm.Checked.ToString());
19:
20:
21: //Save form data to form
22: formData.Send();
23: }
Really nice and easy when you like to store information within a form. Of course you could have use DDS or something like that but since the xform functionality will give the editor control and the capability to export data from the form I think this is ok to use.
In EPiServer CMS 6 the data storage of Xforms and Xform postings is moved to DDS so you could extend your code with searching in forms for instance. You can read more about xforms and dynamic data store in this blogpost by Linus Ekström: http://world.episerver.com/Blogs/Linus-Ekstrom/Dates/2010/7/Using-the-dynamic-data-store-with-XForms/
Happy Easter!!
Interesting idea. Never thought about this!