Episerver Form MailChimp Integration
Episerver Forms are maturing with every update, which helps both developers and those in marketing. But while most people choose to use Mailchimp’s embedded forms to capture mailing lists, I wanted to allow EPiServer editors to integrate with a Mailchimp list. In this post, I am going to walk you through how I implemented Mailchimp into Episerver’s forms and allowed Episerver to post data via Mailchimp’s API.
Episerver provides an extensive API for forms and integration points, but the question remained: how easy is it to really tie into Episerver’s forms? In practice, it’s pretty easy — but once I dove in I found the documentation just isn’t mature enough, so I started decompiling assemblies to see what I could leverage.
(Note: this example is for Mailchimp, but this process really holds true for any integration that provides an API that can be used to fetch information.)
Methodology Preview
First, we will provide a service that will fetch information from Mailchimp.
Next, we will create a scheduled job to cache the list and its properties, so editors don't need to wait for the API calls to request information, making for a better editing experience.
From here, we will tie into EPiServer’s forms API and create an IExternalSystem to allow editors to choose a mailing list to submit data to.
Finally, we will create a PostSubmissionActor to post data to Mailchimp.
I have used this methodology for a couple of projects, and it seems to work well.
Create a Service and Scheduled Job
With all that said, let's first start by installing the Mailchimp NuGet package: “MailChimp.Net.V3”. This will provide the means to retrieve the lists and fields from Mailchimp.
- Install-Package MailChimp.net.V3
After installing the package, confirm you have the latest version of Episerver Forms. (As of publish date, this was version 4.22). Then install or update Episerver forms to your project
- Install-Package EPiServer.Forms
Once both of these packages are installed, create the Mailchimp service. This service will be used in the scheduled job, provide the datasource for the forms, and be the post-submission actor. You’ll see the service is pretty straight forward: it’s more of a class used to fetch information and one method to submit the data to Mailchimp.
(You will notice there is a using statement for Nito.AsyncEx, which is a helper class for calling async methods in a non async method. You can also use GetAwaiter(), but for this tutorial we have chosen Nito.)
Here is what the MailChimpService.cs file looks like:
using EPiServer.ServiceLocation;
using MailChimp.Net;
using MailChimp.Net.Interfaces;
using MailChimp.Net.Models;
using MailChimpSample.Business.Caching;
using Nito.AsyncEx;
using System;
using System.Collections.Generic;
using System.Configuration;
using System.Linq;

namespace MailChimpSample.Business.MailChimpAPI
{
    [ServiceConfiguration(ServiceType = typeof(MailChimpService), Lifecycle = ServiceInstanceScope.Transient)]
    public class MailChimpService
    {
        public readonly IMailChimpManager mailChimpManager;

        readonly ICacheService cacheService;

        public const int CacheTimeout = 720; // in minutes

        public MailChimpService(ICacheService cacheService)
        {
            this.cacheService = cacheService;
            this.mailChimpManager = new MailChimpManager(ConfigurationManager.AppSettings["MailChimpApiKey"]);
        }

        public List<List> GetLists() => this.cacheService.Get(MailChimpConstants.ListIds, CacheTimeout, () =>
        {
            return AsyncContext.Run(() =>
                this.mailChimpManager.Lists
                  .GetAllAsync())
                  .OrderBy(x => x.Name)
                  .ToList();
        });

        public Dictionary<string, string> GetListsAsDictionary()
        {
            return this.cacheService.Get(MailChimpConstants.ListDictionaryItems, CacheTimeout, () =>
             {
                 var list = new Dictionary<string, string>();
                 var items = this.GetLists();
                 foreach (var item in items)
                 {
                     if (!list.ContainsKey(item.Id))
                     {
                         list.Add(item.Id, item.Name);
                     }
                 }
                 return list;
             });
        }

        public List GetListByName(string name)
        {
            string cacheKey = string.Format(MailChimpConstants.ListId, name);
            return this.cacheService.Get(cacheKey, CacheTimeout, () =>
            {
                var result = this.GetLists().FirstOrDefault(x => x.Name.Equals(name, StringComparison.OrdinalIgnoreCase));
                return result;
            });
        }

        public List GetListById(string id)
        {
            string cacheKey = string.Format(MailChimpConstants.ListId, id);
            return this.cacheService.Get(cacheKey, CacheTimeout, () =>
            {
                return AsyncContext.Run(() =>
                    this.mailChimpManager.Lists.GetAsync(id.ToString()));
            });
        }

        public List<MergeField> GetFormFields(string listId) => this.cacheService.Get(string.Format(MailChimpConstants.ListMergeFields, listId), CacheTimeout, () =>
             {
                 var mergeFields = AsyncContext.Run(() =>
                     this.mailChimpManager.MergeFields
                         .GetAllAsync(listId.ToString()))
                         .ToList();
                 return mergeFields;
             });

        public Dictionary<string, string> GetFormFieldsAsDictionary(string listId)
        {
            var dictionary = new Dictionary<string, string>() { { "EMAIL", "Email" } };
            this.GetFormFields(listId)
                  .Select(x => new KeyValuePair<string, string>(x.Tag, x.Name))
                  .ToList()
                  .ForEach(x => dictionary.Add(x.Key, x.Value));

            return dictionary;
        }

        public Member Send(string listId, Dictionary<string, string> fields)
        {
            var externalFields = this.GetFormFields(listId);

            var member = new Member()
            {
                EmailAddress = fields["EMAIL"],
                StatusIfNew = Status.Subscribed
            };

            foreach (var externalField in externalFields)
            {
                if (fields.ContainsKey(externalField.Tag))
                    member.MergeFields.Add(externalField.Tag, fields[externalField.Tag]);
            }

            return AsyncContext.Run(() =>
                this.mailChimpManager.Members.AddOrUpdateAsync(listId.ToString(), member));
        }
    }
}
This file contains some extra methods that are not used, but are included in case you need to get a list by name or id. Additionally, you’ll see a caching mechanism — the source includes an abstract class to roll your own cache, but we use the ISynchronizedObjectInstanceCache along with an interface as well.
Create External Datasource
Now that we have defined our service, we need to create an ExternalDatasource for Episerver forms to populate the forms mappings dropdown list. This allows the editor to choose a mapping for submitting a form to a list, and also allows them to map form fields to the Mailchimp list field. We essentially are creating a one-to-one mapping from Episerver Form Field to Mailchimp Form Field.
Below is the IExternalDatasource that allows us to setup the datasources for the mappings.
using EPiServer.Forms.Core;
using EPiServer.Forms.Core.Internal.Autofill;
using EPiServer.Forms.Core.Internal.ExternalSystem;
using EPiServer.ServiceLocation;
using System.Collections.Generic;
using System.Linq;
using System.Web;

namespace MailChimpSample.Business.MailChimpAPI
{
    public class MailChimpDataSystem : IExternalSystem, IAutofillProvider
    {
        readonly MailChimpService mailChimpService;

        public MailChimpDataSystem()
        {
            this.mailChimpService = ServiceLocator.Current.GetInstance<MailChimpService>();
        }

        public virtual string Id =>
            "MailChimpDataSystem";

        public virtual IEnumerable<IDatasource> Datasources
        {
            get
            {
                var items = this.mailChimpService.GetListsAsDictionary();

                var datasources = items
                     .Select(x => new Datasource()
                     {
                         Name = x.Value,
                         Id = x.Key,
                         OwnerSystem = this,
                         Columns = this.mailChimpService.GetFormFieldsAsDictionary(x.Key)
                     });

                return datasources;
            }
        }

        public IEnumerable<string> GetSuggestedValues(IDatasource selectedDatasource, IEnumerable<RemoteFieldInfo> remoteFieldInfos, ElementBlockBase content, IFormContainerBlock formContainerBlock, HttpContextBase context)
        {
            if (selectedDatasource == null || remoteFieldInfos == null)
                Enumerable.Empty<string>();

            if (this.Datasources.Any(ds => ds.Id == selectedDatasource.Id)  // datasource belong to this system
                && remoteFieldInfos.Any(mi => mi.DatasourceId == selectedDatasource.Id))    // and remoteFieldInfos is for our system datasource
            {
                return Enumerable.Empty<string>();
            }

            return Enumerable.Empty<string>();
        }
    }
}
Let’s break this down a bit.
- Id field tells the system the ID of this datasource.
- datasources is the list of items that are keys for the datasource, which returns an Ienumerable of datasources. In the example above, it is going to return all lists in MailChimp.
- suggested values allows the system to change the datasources to match the autocomplete on — you’ll notice in our example this is the same as datasources
Now that we have the sources set up, we can then open Episerver Forms and start mapping. In this example, we are caching the items via a scheduled job. This is one method: we can use a traditional method as it will cache at first call, but that will take a couple seconds as the system populates the first time, so we suggest creating a scheduled job that primes the cache for the forms. This way there is no need to call out to Mailchimp on load, as it is already loaded.
Below is a sample of my scheduled job.
using EPiServer.PlugIn;
using EPiServer.Scheduler;
using EPiServer.ServiceLocation;
using MailChimpSample.Business.Caching;
using System;

namespace MailChimpSample.Business.MailChimpAPI
{
    [ScheduledPlugIn(DisplayName = "Mail Chimp Cache Manager", IntervalType = EPiServer.DataAbstraction.ScheduledIntervalType.Hours, Restartable = true, IntervalLength = 6)]
    public class MailChimpCacheScheduledJob : ScheduledJobBase
    {
        private bool _stopSignaled;

        readonly MailChimpService mailchimpService;

        readonly ICacheService cacheService;

        public MailChimpCacheScheduledJob()
        {
            IsStoppable = true;
            this.mailchimpService = ServiceLocator.Current.GetInstance<MailChimpService>();
            this.cacheService = ServiceLocator.Current.GetInstance<ICacheService>();
        }

        /// <summary>
        /// Called when a user clicks on Stop for a manually started job, or when ASP.NET shuts down.
        /// </summary>
        public override void Stop()
        {
            _stopSignaled = true;
        }

        /// <summary>
        /// Called when a scheduled job executes
        /// </summary>
        /// <returns>A status message to be stored in the database log and visible from admin mode</returns>
        public override string Execute()
        {
            //Call OnStatusChanged to periodically notify progress of job for manually started jobs
            OnStatusChanged(String.Format("Starting execution of {0}", this.GetType()));

            // Clear Lists
            this.cacheService.Remove(MailChimpConstants.ListIds);
            var lists = this.mailchimpService.GetLists();
            var cacheItemsUpdated = 0;
            foreach (var list in lists)
            {
                if (_stopSignaled)
                {
                    return "Stop of job was called";
                }

                this.cacheService.Remove(string.Format(MailChimpConstants.ListId, list.Id));
                this.cacheService.Get(string.Format(MailChimpConstants.ListId, list.Id), 720, () =>
                {
                    return list;
                });

                this.cacheService.Remove(string.Format(MailChimpConstants.ListMergeFields, list.Id));
                this.mailchimpService.GetFormFields(list.Id);

                cacheItemsUpdated++;
                this.OnStatusChanged($"Cache Items Updated: {cacheItemsUpdated}");
            }

            // Clear the dictionary
            this.cacheService.Remove(MailChimpConstants.ListDictionaryItems);
            this.mailchimpService.GetListsAsDictionary();

            //For long running jobs periodically check if stop is signaled and if so stop execution

            return $"Cache Items Updated: {cacheItemsUpdated}";
        }
    }
}
You can see that we are grabbing all the Mailchimp lists, then iterating those lists to grab all the associated fields.
The Editor Interface
Now that we have the Mailchimp service and DataSource created, and we’ve created a scheduled Job to prime the cache, let's explore how this implementation will look to the editor.
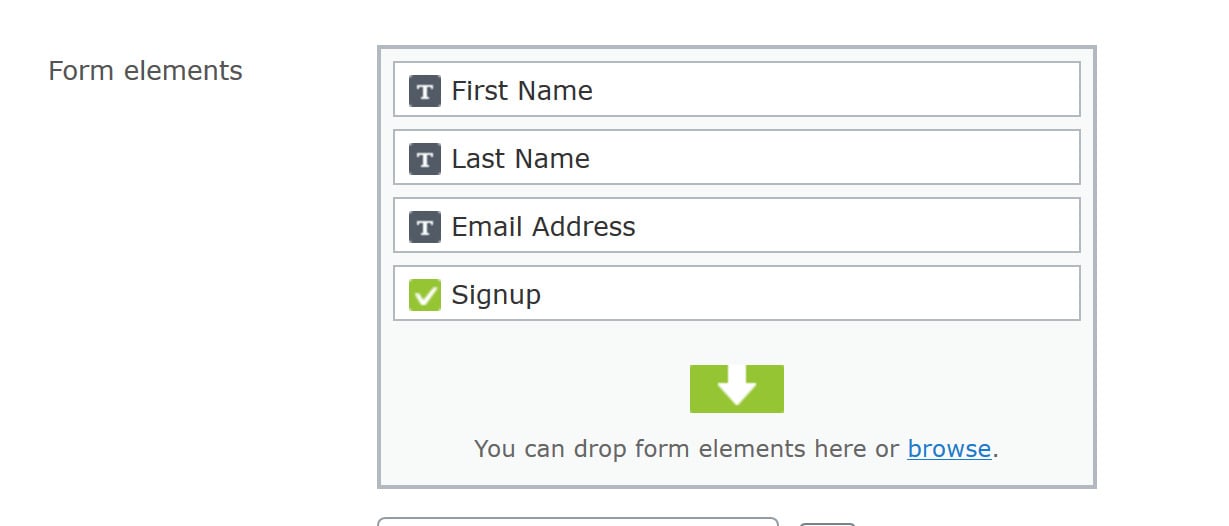
First, create a form in Episerver. As an example, I have added a simple form to the Alloy Demo, with three text properties (FirstName, LastName, EmailAddress) and a submit button.

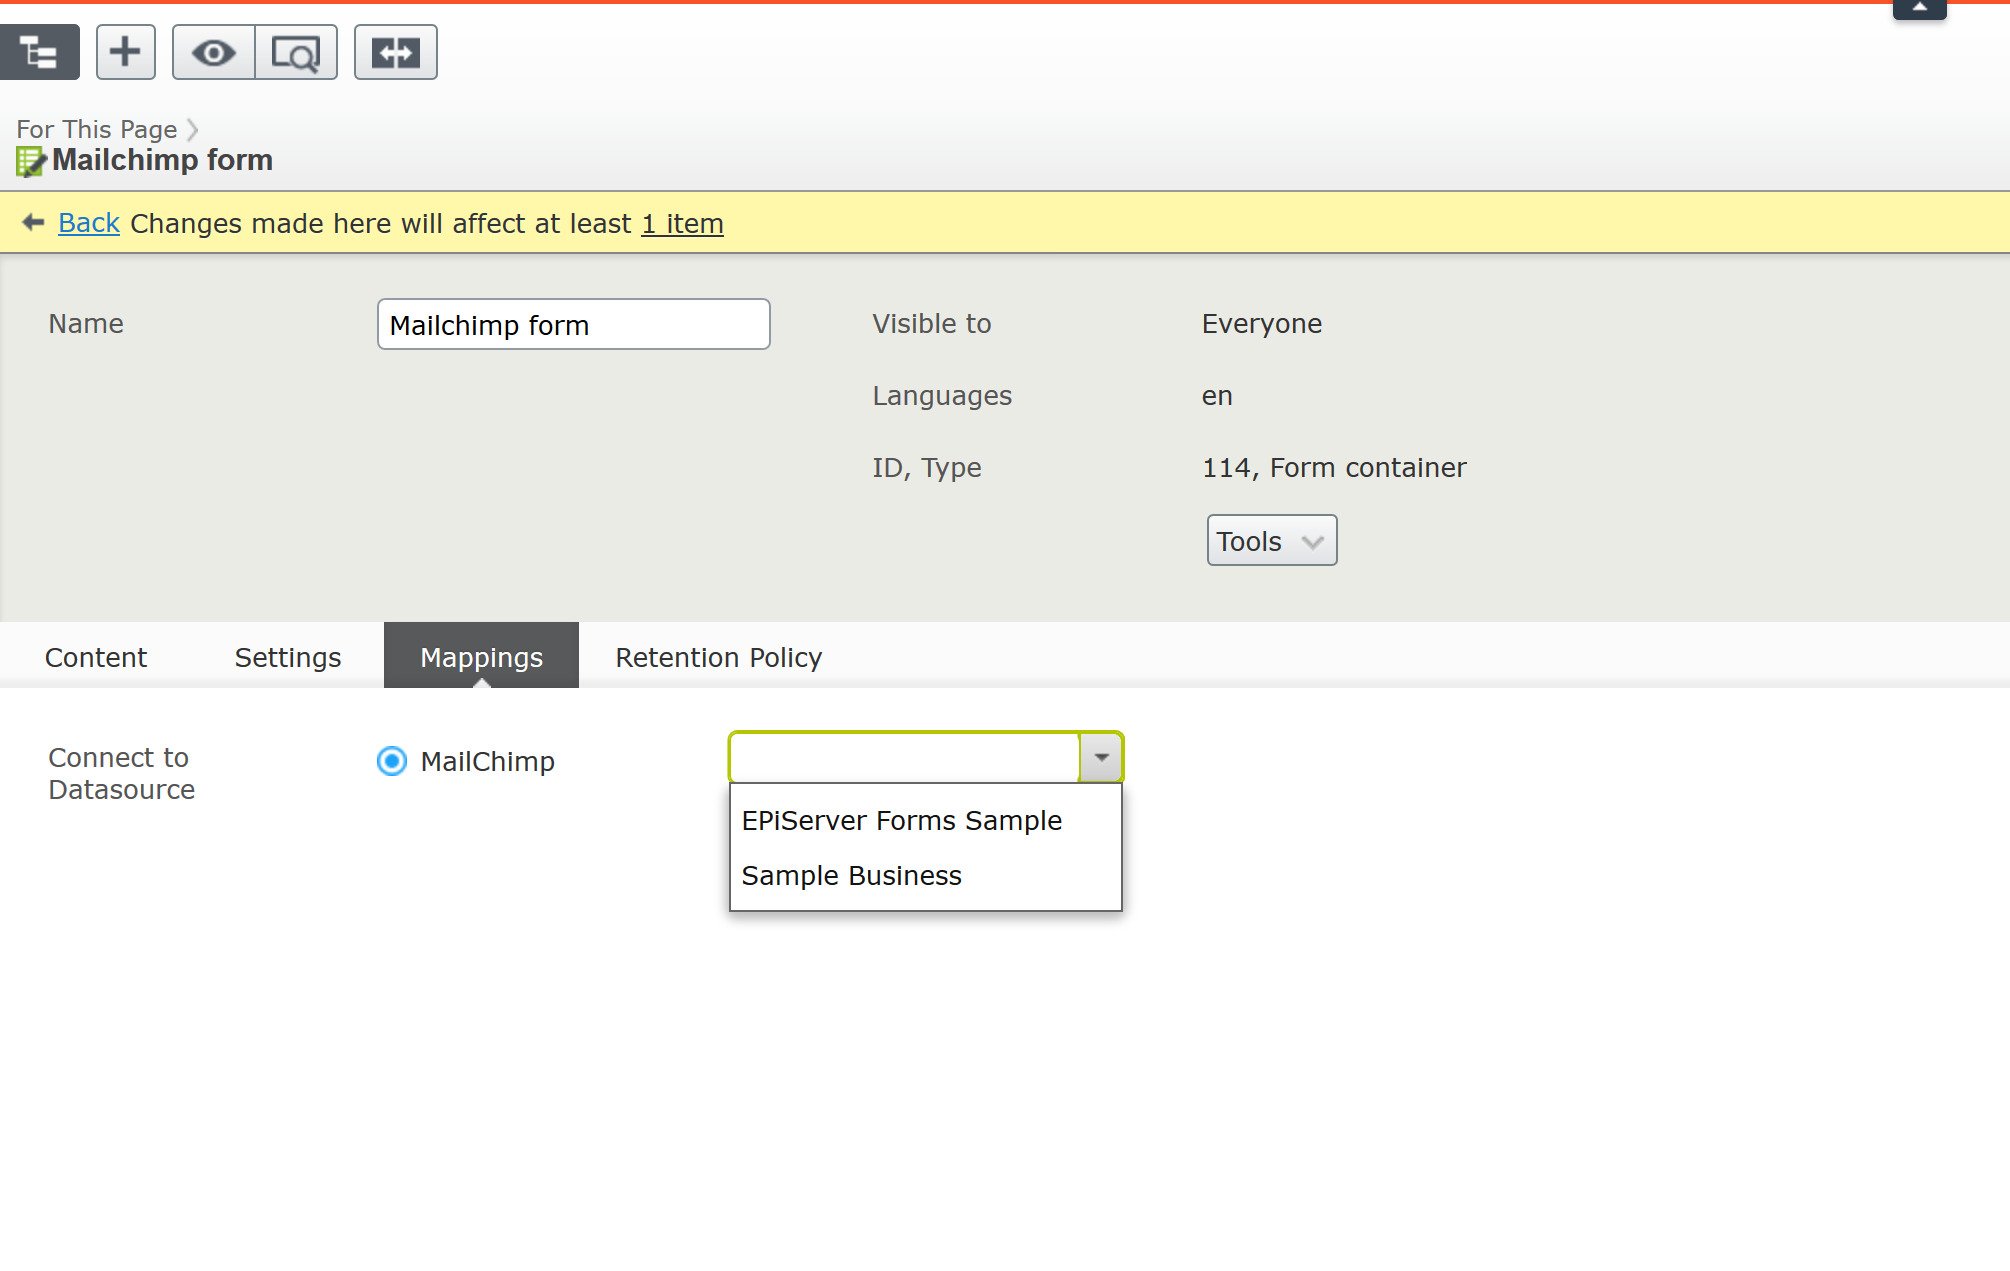
Then, we map this form to a Mailchimp list. You’ll notice there’s now a “Mappings” tab in the form container block, which displays as soon as you create a class that implements IExternalSystem.
This dropdown is filled from your IEnumerable<IDatasource> Datasources property from the MailChimpDataSystem.cs file we created above. You should see a screen that looks like the following, except with your Mailchimp Lists in the dropdown.

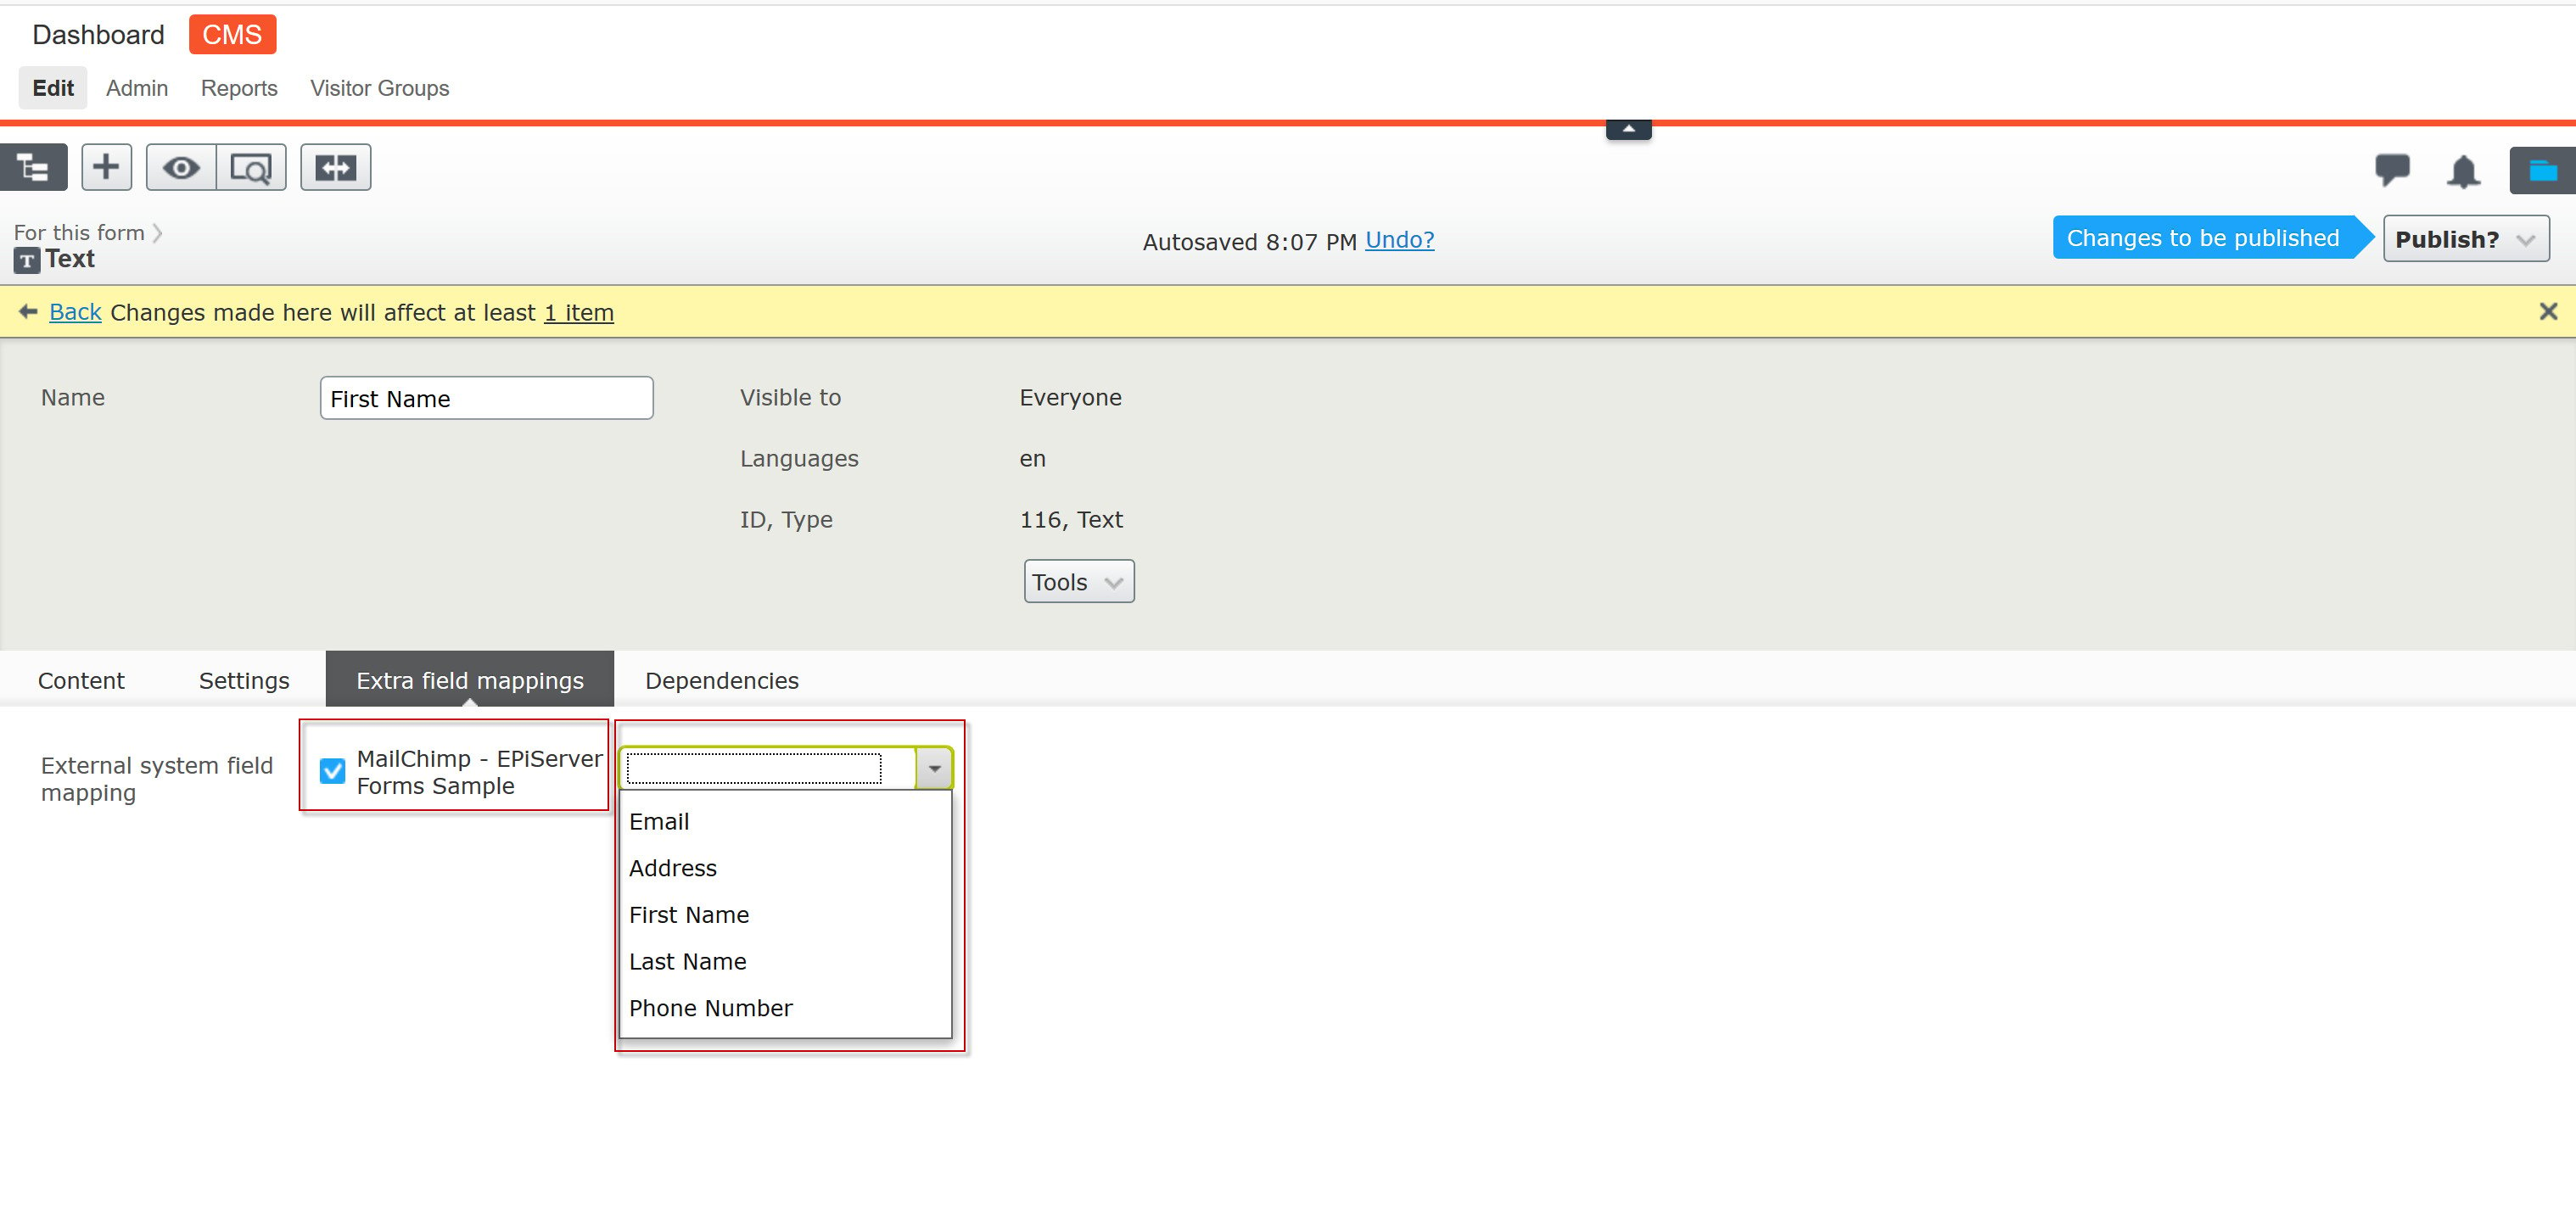
In this sample, we will select “Episerver Forms Sample,” which tells Episerver that we want to map that form to the Mailchimp list. Once you publish the form, you’ll need to tie those form elements to the fields in our Mailchimp list, which again are pulled from the datasources “Columns” Field on the selected datasource in the image above.

You can see that the list is expecting a set of fields — in this example, remember we used First Name, Last name, and Email. (NOTE: Email is required in Mailchimp, so keep that in mind when using Mailchimp integration in Episerver)
In this example, we will select First name, and then we will publish the form.
Including PostSubmissionActor
We now have a form that is mapped one-to-one with Mailchimp, but one last thing is missing: when a user submits the form, how will data be sent to Mailchimp?
This is where the PostSubmissionActor comes into play. To wrap all of this up, we need to create a form submission actor that will handle a few different things:
- First, we need to convert all the mappings and form fields to a dictionary.
- Then, we review the ActiveExternalFieldMappingTable and loop the list fields to see if the activeexternalfieldmappingtable contains the same property name as the Mailchimp list field. If the field doesn’t exist, it is ignored.
- Finally, once all of the mapped fields have been added to the dictionary, we send it off to the MailChimpService to send to Mailchimp.
using EPiServer.Forms.Core.PostSubmissionActor;
using EPiServer.ServiceLocation;
using System.Collections.Generic;

namespace MailChimpSample.Business.MailChimpAPI
{
    public class MailChimpPostActor : PostSubmissionActorBase
    {
        readonly MailChimpService mailChimpService;

        public MailChimpPostActor()
        {
            this.mailChimpService = ServiceLocator.Current.GetInstance<MailChimpService>();
        }

        public override object Run(object input)
        {
            string submissionResult = string.Empty;

            if (this.SubmissionData == null)
                return submissionResult;

            Dictionary<string, string> postedFormDataDictionary = new Dictionary<string, string>();
            foreach (KeyValuePair<string, object> pair in this.SubmissionData.Data)
                if (!pair.Key.ToLower().StartsWith("systemcolumn") && pair.Value != null)
                    postedFormDataDictionary.Add(pair.Key, pair.Value.ToString());

            var mappings = base.ActiveExternalFieldMappingTable;
            if (mappings != null)
            {
                Dictionary<string, string> formDataAttributes = new Dictionary<string, string>();
                string listId = string.Empty;
                foreach (var item in mappings)
                {
                    if (item.Value != null)
                    {
                        var fieldName = item.Key;
                        var remoteFieldName = item.Value.ColumnId;

                        if (postedFormDataDictionary.ContainsKey(fieldName))
                        {
                            formDataAttributes.Add(remoteFieldName, postedFormDataDictionary[fieldName]);
                            if (string.IsNullOrWhiteSpace(listId))
                                listId = item.Value.DatasourceId;
                        }
                    }
                }

                if (formDataAttributes.Count > 0)
                    this.mailChimpService.Send(listId, formDataAttributes);
            }

            return submissionResult;
        }
    }
}
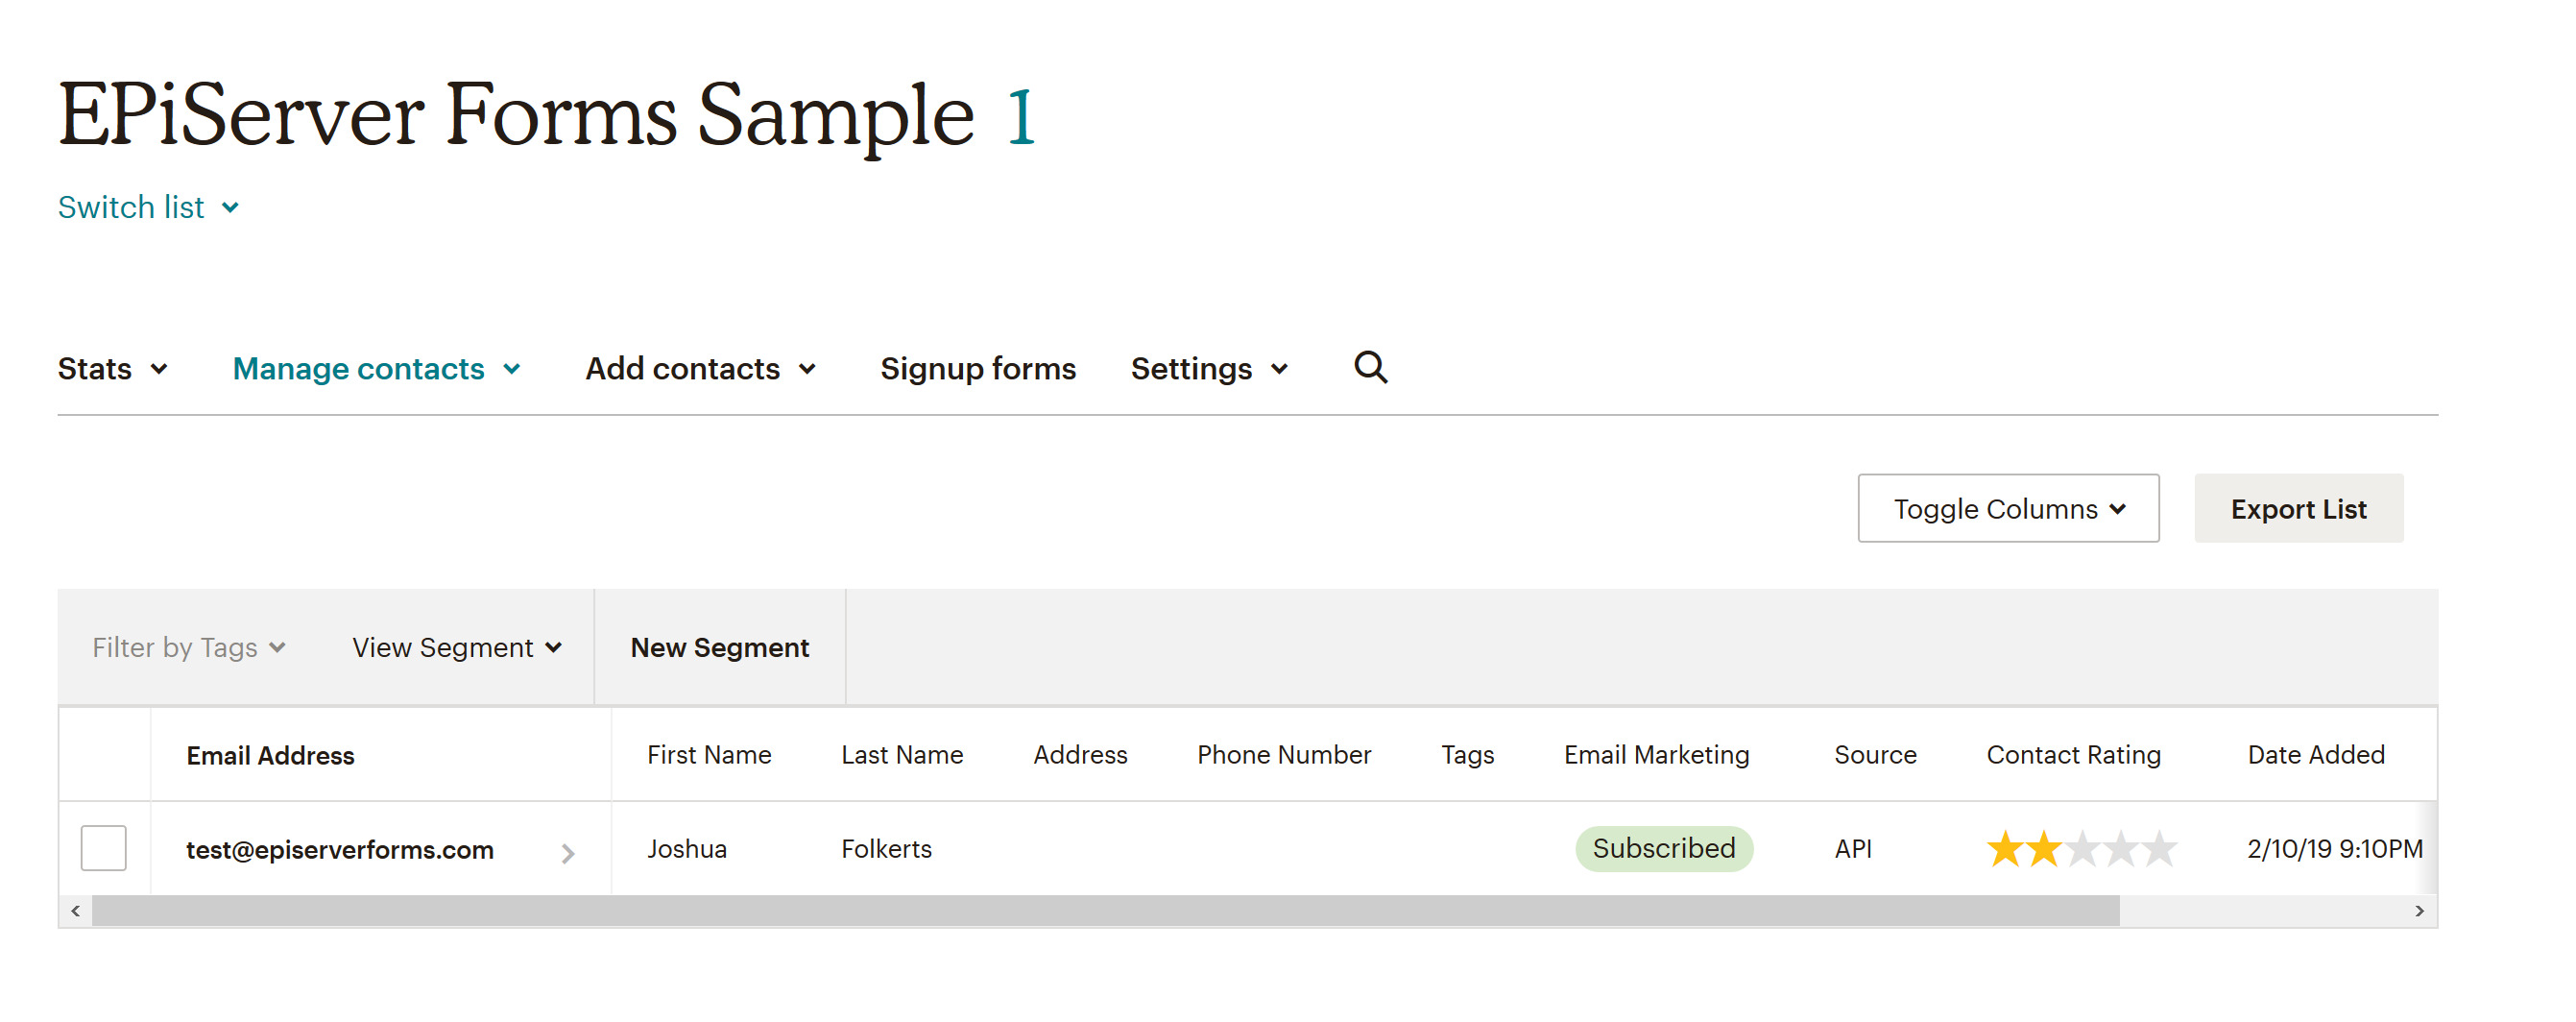
The final test is to fill out a form and hit submit. If that record exists in Mailchimp and is mapped correctly based on our submission, then we can consider this a success!

Recap
Let’s recap what we accomplished here.
- We created a mailchimp service that handles the communication to Mailchimp’s API
- We created a Datasource that talks to the Mailchimp service to retrieve lists and fields from Mailchimp
- We created a new scheduled job to prime the cache so there’s no need to wait for items to be returned
- We created a PostSubmissionActor to handle mappings from Episerver to Mailchimp fields and submitted those to Mailchimp
- We submitted the new form and tested the results in Mailchimp’s dashboard.
In this example, I used Mailchimp, but you can implement this with any third party service such as Silverpop, Exact Target, or other API-based service. I chose Mailchimp for this example as it was easier to create a new test account than the other systems.

Nice solution following the standard integration of selecting the fields for mapping, we built something very similar to DotMailer.
If you don't need the control of CMS editors mapping the fields, say for just a simple scenario you can also use the JSON webhook with a logic app as it has a MailChip connector. The logic app does all the connection to mailchip without any worry of version and you can just select what entity, fields you want in the app.
Nice write up - thanks for sharing! Its worth noting that there out the box connectors for things like Silverpop and Exact Target so certainly worth checking the Marketing automation section of the add-ons page before building your own :) https://world.episerver.com/add-ons