Mixed Mode Authentication
Recently I have been asked to show a working mode authtenication as a couple partners coulld not get it working. In this post I will go through the steps of setting up mixed mode with asp.net identity and WS-Federation with Azure AD.
Azure Application Setup
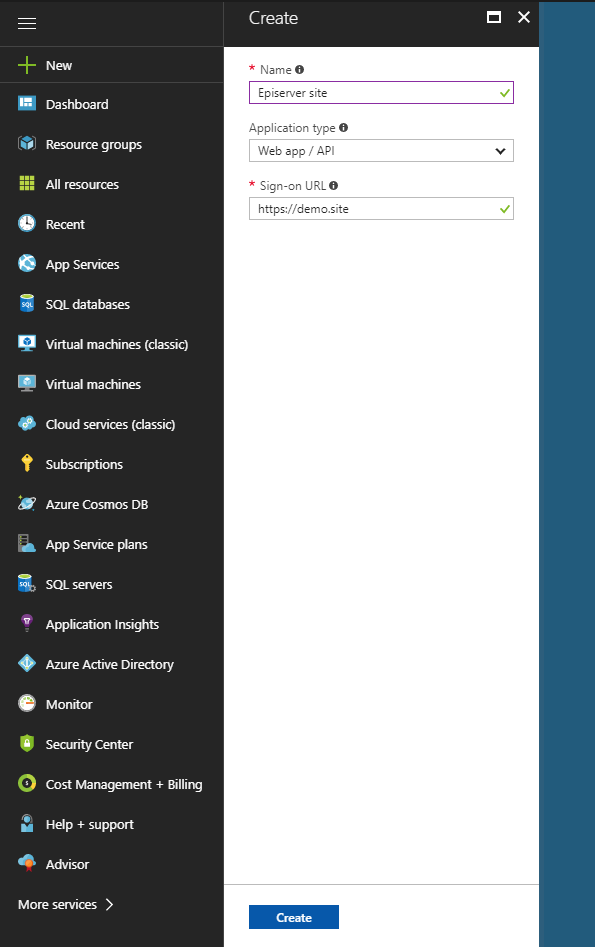
First we need to setup our application in the azure portal. Click on Azure Active Directory, and then App registrations. Now click on the new app registration button. Fill out the name, application type, and sign-on url like below.

After creating then new application click on the application name to edit the application. Click on the manifest button so we can add application roles. Locate the appRoles setting and insert the appRole definitions in the array.
This is an example of approles that declare WebAdmins and WebEditors. You can modify it according to your application roles. Note that you need to generate new Guid for each role declaration.
"appRoles": [
    {
      "allowedMemberTypes": [
        "User"
      ],
      "description": "Editor can edit the site.",
      "displayName": "WebEditors",
      "id": "XXXXXXXX-XXXX-XXXX-XXXX-XXXXXXXXXXXX",
      "isEnabled": true,
      "value": "WebEditors"
    },
    {
      "allowedMemberTypes": [
        "User"
      ],
      "description": "Admins can manage roles and perform all task actions.",
      "displayName": "WebAdmins",
      "id": "XXXXXXXX-XXXX-XXXX-XXXX-XXXXXXXXXXX",
      "isEnabled": true,
      "value": "WebAdmins"
    },
     {
      "allowedMemberTypes": [
        "User"
      ],
      "description": "Admin the site.",
      "displayName": "Admininstrators",
      "id": "XXXXXXXXXX-XXXX-XXXX-XXXX-XXXXXXXX",
      "isEnabled": true,
      "value": "Admininstrators"
    }
  ],
After updating the mainfest, we will need to update some settings of the application. Click on the settings button of the application. Next click on permissions and edit the required permissions. Read should be enough but you can set to write as well.

Next we need to assign membership to the application roles. In Azure Active Directory view, choose enterprise applications. Choose all applications and select the application that was just created. Select users and groups and click on the button add new user. You will then select a user and map to a role either Administrators or WebAdmins. Please note for standard Active Directory you will need to manually assign each user to a role. If you have premium AD you can map a group to a role.

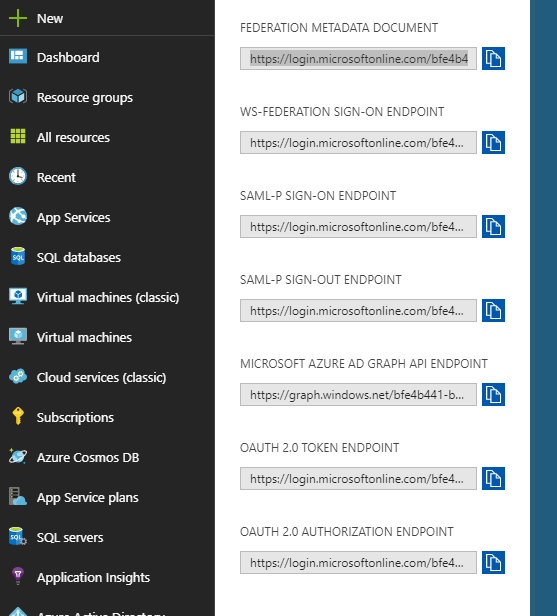
Next we need to get the endpoints to use to connect to our application. Click on App registrations in the Azure Ad view. Next click the enpoints button. Copy the the Federation MetaData Document.

Now go back to app registrations and choose the application you have setup. Choose settings and the select properties. Copy the App Id Uri. Now we have the application setup and the connection values that will be needed in the setup of our WS-Fed.
Application Setup
-
Disable Role and Membership Providers
Disable the built-in Role and Membership providers in web.config because they do not support federated security:
<authentication mode="None" /> <membership> <providers> <clear/> </providers> </membership> <roleManager enabled="false"> <providers> <clear/> </providers> </roleManager> -
Configure Episerver to support federation
Enable claims on virtual roles by setting the addClaims property. Also add the provider for security entities, which is used by the set access rights dialog and impersonating users. The SynchronizingRolesSecurityEntityProvider configured in the following example is using the SynchronizingUserService that is used in step 4. Also if you are using the Administrators group you want to remove or comment out the virtual role because it tried to use domain/username for authtenication.
<episerver.framework> <securityEntity> <providers> <add name="SynchronizingProvider" type ="EPiServer.Security.SynchronizingRolesSecurityEntityProvider, EPiServer"/> </providers> </securityEntity> <virtualRoles addClaims="true"> <!--<add name="Administrators" type="EPiServer.Security.WindowsAdministratorsRole, EPiServer.Framework" />--> </virtualRoles> -
Install NuGet packages
Open Package Manager in Visual Studio and install the following packages:
Install-Package Microsoft.Owin.Security.Cookies Install-Package Microsoft.Owin.Security.WsFederation Install-Package Microsoft.Owin.Host.SystemWeb Update-Package Microsoft.IdentityModel.Protocol.Extensions -Safe -
Configure Identity and WSFederation
We configure the cms identity service and the ws-fed authtneication middleware. We make the Ws-Fed the default so it will challenge us to login if we go /episerver for instance. For normal site login the users will use the login and logout buttons of the web application. We also set /logout to trigger a logout of the owin middleware. Finally make sure there is no external cookie registered in the pipeline as it seems to mess up the ws-fed authenication and go into endless redirect loop. Also note you might need to explictly set TokenValidationParameters for the NameClaimType or RoleClaimType if they are not using the default ones setup for Ws-Fed. You can put a preak point in the SecurityTokenValidated callback to see what claims are being passed from Azure AD if you are not able to login correctly and update accordingly.
public class Startup
    {
        // For more information on configuring authentication,
        // please visit http://world.episerver.com/documentation/Items/Developers-Guide/Episerver-CMS/9/Security/episerver-aspnetidentity/

        private readonly IConnectionStringHandler _connectionStringHandler;

        public Startup() : this(ServiceLocator.Current.GetInstance<IConnectionStringHandler>())
        {
            // Parameterless constructor required by OWIN.
        }

        public Startup(IConnectionStringHandler connectionStringHandler)
        {
            _connectionStringHandler = connectionStringHandler;
        }

        public void Configuration(IAppBuilder app)
        {
            app.AddCmsAspNetIdentity<SiteUser>(new ApplicationOptions
            {
                ConnectionStringName = _connectionStringHandler.Commerce.Name
            });

            // Enable the application to use a cookie to store information for the signed in user
            // and to use a cookie to temporarily store information about a user logging in with a third party login provider.
            // Configure the sign in cookie.
            app.UseCookieAuthentication(new CookieAuthenticationOptions
            {
                AuthenticationType = DefaultAuthenticationTypes.ApplicationCookie,
                LoginPath = new PathString("/Login"),
                Provider = new CookieAuthenticationProvider
                {
                    // Enables the application to validate the security stamp when the user logs in.
                    // This is a security feature which is used when you change a password or add an external login to your account.
                    OnValidateIdentity = SecurityStampValidator.OnValidateIdentity<ApplicationUserManager<SiteUser>, SiteUser>(
                        validateInterval: TimeSpan.FromMinutes(30),
                        regenerateIdentity: (manager, user) => manager.GenerateUserIdentityAsync(user)),
                    OnApplyRedirect = (context => context.Response.Redirect(context.RedirectUri)),
                    OnResponseSignOut = (context => context.Response.Redirect(UrlResolver.Current.GetUrl(ContentReference.StartPage)))
                }
            });

            app.SetDefaultSignInAsAuthenticationType(WsFederationAuthenticationDefaults.AuthenticationType);
            app.UseCookieAuthentication(new CookieAuthenticationOptions
            {
                AuthenticationType = WsFederationAuthenticationDefaults.AuthenticationType
            });
            //Enable federated authentication
            app.UseWsFederationAuthentication(new WsFederationAuthenticationOptions()
            {
                //Trusted URL to federation server meta data
                MetadataAddress = "Metadata document enpoint",
                //Value of Wtreal must *exactly* match what is configured in the federation server
                Wtrealm = "App Id Uri",

                TokenValidationParameters = new TokenValidationParameters
                {

                    NameClaimType = "http://schemas.xmlsoap.org/ws/2005/05/identity/claims/emailaddress",
                },
                Notifications = new WsFederationAuthenticationNotifications()
                {
                    RedirectToIdentityProvider = (ctx) =>
                    {
                        //To avoid a redirect loop to the federation server send 403 when user is authenticated but does not have access
                        if (ctx.OwinContext.Response.StatusCode == 401 && ctx.OwinContext.Authentication.User.Identity.IsAuthenticated)
                        {
                            ctx.OwinContext.Response.StatusCode = 403;
                            ctx.HandleResponse();
                        }
                        return Task.FromResult(0);
                    },
                    SecurityTokenValidated = (ctx) =>
                    {
                        //Ignore scheme/host name in redirect Uri to make sure a redirect to HTTPS does not redirect back to HTTP
                        var redirectUri = new Uri(ctx.AuthenticationTicket.Properties.RedirectUri, UriKind.RelativeOrAbsolute);
                        if (redirectUri.IsAbsoluteUri)
                        {
                            ctx.AuthenticationTicket.Properties.RedirectUri = redirectUri.PathAndQuery;
                        }

                        //if (ctx.AuthenticationTicket.Identity.Name)
                        //Sync user and the roles to EPiServer in the background
                        ServiceLocator.Current.GetInstance<ISynchronizingUserService>().SynchronizeAsync(ctx.AuthenticationTicket.Identity);
                        return Task.FromResult(0);
                    }
                }
            });


                        app.UseStageMarker(PipelineStage.Authenticate);
            app.Map("/Logout", map =>
            {
                map.Run(ctx =>
                {
                    ctx.Authentication.SignOut();
                    return Task.FromResult(0);
                });
            });
        }
}
Please refer to federated-security documentation for tips on troubleshooting issues.

Thanks for sharing, Only developers who were looking for this can understand the importance of this post. ;)