Add-Ons development environment
This post is about how to setup an environment for developing add-ons for EPiServer 7. By development environment here I mean a possibility for an add-on developer to make some changes in code, build the project and see those changes on a development site without manual operations like copying files and so on. I recommend your to read the Add-Ons section of Developer Guide in the EPiServer 7 Framework SDK, where you can find all information about the Add-On system. However you don’t need to know everything about the Add-On system in order to follow simple and detailed steps described here.
Public or protected.
First of all you need to decide whether your add-on will be public or protected. The difference between public and protected add-ons is in location where they are placed on a site. Public add-ons by default resides in “modules” folder under the site root, for example C:\EPiServer\Sites\ExampleEPiServerSite\modules\. Protected add-ons can be found in “Modules” subfolder under the site VPP folder, for example C:\EPiServer\VPP\ExampleEPiServerSite\Modules\.
Public add-ons doesn’t have any access restrictions and this type of add-on should be preferred if you are planning to have a user interface or some kind of content that should be available for the site visitors.
Protected add-on type should be preferred if you are going to create an add-on that will be used mostly by site editors or administrators.
Add-ons binaries for both protected and public add-ons are stored by default in “modulesbin” folder under the site root: C:\EPiServer\Sites\ExampleEPiServerSite\modulesbin\
In this guide we are going to create an add-on with a simple shared block, so it will be a public add-on.
Creating an add-on project
All steps described below assumes that you have EPiServer 7 installed with the Alloy sample site. By default the site location is C:\EPiServer\Sites\ExampleEPiServerSite. Also you need to download nuget.exe command line tool and put it in a location listed in your PATH.
So here are the steps:
- Open Alloy project with Visual Studio. The project file is located under the site root folder: C:\EPiServer\Sites\ExampleEPiServerSite.
- Right click on solution tree and select Add > New project.
- Select ASP.NET Empty Web Application or any other project type that fits best for your add-on.
- If you are going to create a public Add-On select C:\EPiServer\Sites\ExampleEPiServerSite\modules folder for the new project location.
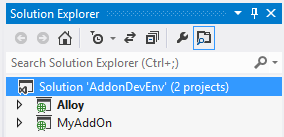
If you are going to create a protected Add-On select C:\EPiServer\VPP\ExampleEPiServerSite\Modules folder for the new project location. - Type MyAddOn in the project name field and click Ok. Now your solution should contain two projects - the site project and the add-on project:
- Open AssebmlyInfo.cs file from the add-on project and enter some non-empty values for the AssemblyCompany and AssemblyDescription attributes. This step is required in order to provide NuGet with package mandatory attributes.
- Open command line and go to the folder with the new project: C:\EPiServer\Sites\ExampleEPiServerSite\modules\MyAddOn and run command: nuget.exe spec. The NuGet manifest file will be created.

- Include MyAddOn.nuspec manifest file in the new project, so it will be easily accessible from the Solution explorer.
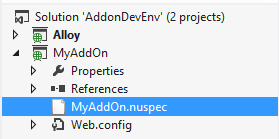
- Open manifest file and edit tags value, set it to EPiServerPublicModulePackage for public package or EPiServerModulePackage for protected package.
<?xml version="1.0"?>
<package >
  <metadata>
    <id>$id$</id>
    <version>$version$</version>
    <title>$title$</title>
    <authors>$author$</authors>
    <owners>$author$</owners>
    <requireLicenseAcceptance>false</requireLicenseAcceptance>
    <description>$description$</description>
    <releaseNotes>Summary of changes made in this release of the package.</releaseNotes>
    <copyright>Copyright 2012</copyright>
    <tags>EPiServerPublicModulePackage</tags>
  </metadata>
</package> - Then we need to add several automatic operations that will be executed after the project build: copy add-on binaries to the “modulesbin” folder, restart the site and create an add-on package file.
Unload MyAddOn project and open the project file in editor.
Find the AfterBuild target, uncomment it and replace with the following targets:<Target Name="AfterBuild" DependsOnTargets="CopyOutputToModulesBin; RestartSite; CreateAddOnPackage; ">
</Target>
<PropertyGroup>
<DevelopmentSitePath>c:\EPiServer\Sites\ExampleEPiServerSite</DevelopmentSitePath>
</PropertyGroup>
<Target Name="CopyOutputToModulesBin">
<!-- Copy project output to the site modulesbin folder -->
<ItemGroup>
<AddOnFilesToCopy Include="$(OutputPath)*.*" />
</ItemGroup>
<Copy SourceFiles="@(AddOnFilesToCopy)" DestinationFolder="$(DevelopmentSitePath)\modulesbin\" />
</Target>
<Target Name="RestartSite">
<!-- Triggers restart of the site -->
<WriteLinesToFile File="$(DevelopmentSitePath)\bin\restart.txt" Lines="Temp file for triggering restart of the web application" Overwrite="true" />
<Delete Files="$(DevelopmentSitePath)\bin\restart.txt" />
</Target>
<Target Name="CreateAddOnPackage" Condition=" '$(Configuration)' == 'Release' ">
<!-- Creates an Add-On package and deploys it to the site package repository -->
<PropertyGroup>
<PackageOutputDir>c:\EPiServer\VPP\ExampleEPiServerSite\ModulesRepository</PackageOutputDir>
</PropertyGroup>
<Exec Command="nuget pack $(MSBuildProjectFile) -OutputDirectory $(PackageOutputDir)" />
</Target>
The CopyOutputToModulesBin target copies project output binaries to the site “modulesbin” folder.
The RestartSite target – triggers site restart by writing and deleting a temp file to the sites bin folder. The site restart is required to reload add-on assemblies to the site application domain, since placing an assembly to the “modulesbin” folder doesn’t restart the site automatically as it happens when you place an assembly in the sites “bin” folder.
The CreateAddOnPackage target – creates a package and places it to the site local package repository. This target is not required on every build, so we have a condition to run it only in Release configuration. When you are ready to publish your add-on – just build it in Release configuration. But if you want your add-on to be visible in the list of installed add-ons on the site, the package file needs to be placed in the site local package repository. - Reload the project in Visual Studio and build it in Release configuration. If everything was configured correctly you should find a new package MyAddOn.1.0.0.0.nupkg in the C:\EPiServer\VPP\ExampleEPiServerSite\ModulesRepository folder and a new assembly MyAddOn.dll in the C:\EPiServer\Sites\ExampleEPiServerSite\modulesbin\
- In order to be able to see MyAddOn in the Add-Ons management UI we should add an add-on reference to C:\EPiServer\VPP\ExampleEPiServerSite\Modules\Packages.config
<?xml version="1.0" encoding="utf-8"?>
<packages>
  <package id="CMS" version="1.0.135" />
  <package id="EPiServer.Packaging" version="1.0.776" />
  <package id="EPiServer.Packaging.UI" version="1.0.776" />
  <package id="Shell" version="1.0.140" />
  <package id="MyAddOn" version="1.0.0.0" />
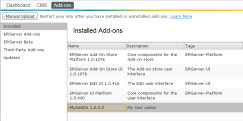
</packages> - Open the site in the web browser, log-in and navigate to the Add-Ons management interface. You should find a new add-on in the list of installed add-ons:
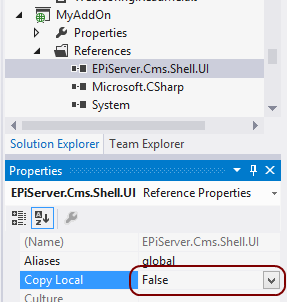
Note regarding library references: if you are going to add a reference to one of the EPiServer libraries or a library that is a part of some other add-on to your project, please make sure you set "Copy Local" to False, so the referenced library will not be copied to the add-on project output folder:
Injection shared block
Ok, so now we have everything in place. It’s time to add some functionality to our add-on, just to prove that our environment works fine. The steps described below assumes that MyAddOn is a public add-on, since the shared block template should be visible for the site visitors.
Lets start with adding some references to MyAddOn project. We going to need EPiServer, EPiServer.BaseLibrary and EPiServer.Data assemblies. You can reference them from the site bin folder.
Now we need to create a new shared block type. Add a new class to MyAddOn project, name it InjectionBlockType. Add a property with type string and name InjectionValue:
using System.ComponentModel.DataAnnotations;
using EPiServer.Core;
using EPiServer.DataAnnotations;
using EPiServer.Web;
namespace MyAddOn
{
[ContentType(
DisplayName = "Injection block",
Description = "A block containing a property that doesn't have HTML encoding.")]
public class InjectionBlockType : BlockData
{
[BackingType(typeof(PropertyLongString))]
[UIHint(UIHint.Textarea)]
public virtual string InjectionValue { get; set; }
}
}
Then we need a template to render our block. Add a new Web User Control to MyAddOn project. Name it InjectionBlock. The markup of the template is very simple and should look like this:
<%@ Control Language="C#" AutoEventWireup="true" CodeBehind="InjectionBlock.ascx.cs" Inherits="MyAddOn.InjectionBlock, MyAddOn" %>
<% =CurrentBlock.InjectionValue %>
Please, pay attention to the Inherits attribute value – we need to put add-on assembly name after the type name, so that template could be located.
Open controls code behind and make it inherit from BlockControlBase<InjectionBlockType> :
using EPiServer.Web;
namespace MyAddOn
{
public partial class InjectionBlock : BlockControlBase<InjectionBlockType>
{
}
}
What we are basically doing here is just rendering a value entered by editor without encoding. Sounds dangerous? It is so, but it gives a lot of possibilities as well. You can use this block to embed whatever you like on a page: YouTube video, Twitter button, Google AdSense etc.
Finally build the project and go to the site edit mode. In the block list press “Create a new block” button. Enter some name and select “Injection block” type. Now you should see a blank block editor – it’s ok, just toggle forms editing :
You should see the editor for the InejctionValue property:
Enter the following value:
<style>h1 {color: red; }</style>
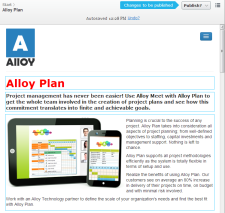
Publish the block. Open Start/Alloy Plan page in the page tree and try to drop a new block to the content area on the bottom of the page. All headers should change color to red:
Cool, huh? Well, maybe not. However we got a working development environment for creating real add-ons!


Great work!
Thanks for the great post
Great tutorial! I'm just starting out building EPiServer 7 Add-ons, and this tutorial was a great help.
Helped a lot!
Great work Sergii, totally clear and worked the first time - thanks!