
Adding menu item to page tree context menu
Update: For EPiServer version 10.1 and above see this link
Recently I have migrated/upgraded an EPiServer 6 R2 composer based website to EPiServer 7.xx. In EPiServer 6 R2 website, the EPiServer right click context menu (page tree right click menu) was highly customized. This functionality, however, is totally removed in EPiServer 7.xx. EPiServer 7, however, does provide you a similar context menu to copy/cut/paste the content. My job was to customize this context menu and add menu items to it.
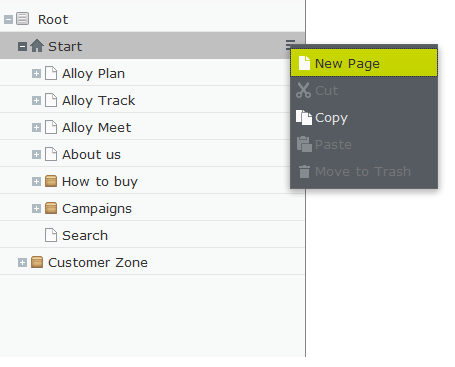
A quick Google search resulted in a great blog post published by Shamrez Iqbal to change the tooltip of the page tree and this acted as a starting point for my investigation. For the sake of completeness, I am going to mention all the steps required to customize the context menu, however all the credit goes to Shamrez Iqbal for such a great blog. To get started, install Alloy Tech (webforms) website using visual studio extension, and enable the uncompressed (non-minified) version of javascript files in edit mode.
Enable client side debugging for JavaScript Files
The first thing that needs to be done is to tell EPiServer to use the uncompressed version of JavaScript files in edit mode so you can easily debug the js files. This is well explained in “Uncompressed JavaScript for EPiServer 7.6+” article here, however, in summary, you have to install the “EPiServer.CMS.UI.Sources” from nuget

and simply add the
<clientResources debug="true" />
to the EPiServerFramework.config file underneath the episerver.framework element.
Once this is installed, you should see EPiServer.Cms.Shell.UI.zip under modules\_protected\CMS directory
Override the Context Menu creation process
So to customize the context menu, we have to a) identify where this menu is created and b) find out a way to override/customize the process so we can inject our own menu item. The page tree menu is created in \epi-cms\component\ContentNavigationTree.js and this can be customized by using an InitializableModule to override PageRepositoryDescriptor. (see this blog for detail description) Full code is below.
 public class OurDescriptor : PageRepositoryDescriptor
    {
        public override string CustomNavigationWidget
        {
            get
            {
                return "alloy/component/ContentNavigationTree";
            }
        }
    }

    [InitializableModule]
    [ModuleDependency(typeof(EPiServer.Web.InitializationModule))]
    public class DescriptorInitialization : EPiServer.ServiceLocation.IConfigurableModule
    {

        public void ConfigureContainer(EPiServer.ServiceLocation.ServiceConfigurationContext context)
        {
            context.Container.Configure(ConfigureContainer);
        }

        public void Initialize(EPiServer.Framework.Initialization.InitializationEngine context)
        {

        }

        public void Preload(string[] parameters)
        {

        }

        public void Uninitialize(EPiServer.Framework.Initialization.InitializationEngine context)
        {

        }

        private static void ConfigureContainer(StructureMap.ConfigurationExpression container)
        {
            container.IfTypeMatches(type => type.Equals(typeof(PageRepositoryDescriptor))).InterceptWith(i => new OurDescriptor());
        }
    }
Second step is to copy the original EPiServer JS uncompressed files provided by EPiServer and modify it to customize the menu. To do this, open the EPiServer.Cms.Shell.UI.zip under modules\_protected\CMS directory and
- Copy all the JS code from ContentNavigationTree.uncompressed.js. Create a file ContentNavigationTree.js under ClientResources\Scripts\Component directory and paste the copied content.
- change "epi-cms/component/ContentNavigationTree" to alloy/component/ContentNavigationTree
- Change "epi-cms/component/ContentContextMenuCommandProvider" to "alloy/component/ContentContextMenuCommandProvider"
- Change "./command/_GlobalToolbarCommandProvider", to "epi-cms/component/command/_GlobalToolbarCommandProvider",
- Change "../command/CopyContent", to "epi-cms/command/CopyContent"
- Change "../command/CutContent", to "epi-cms/command/CutContent"
- Change "../command/DeleteContent", to "epi-cms/command/DeleteContent"
- Change "../command/PasteContent", to "epi-cms/command/PasteContent"
- Copy all the JS code from ContentContextMenuCommandProvider.js, create a file ContentContextMenuCommandProvider.js under ClientResources\Scripts\Component directory and paste the copied content. The full code is below (notice the newly added RefreshTreeCommand)
define("alloy/component/ContentContextMenuCommandProvider", [
// dojo
    "dojo/_base/declare",
    "dojo/_base/array",
// epi
    "epi/shell/command/_CommandProviderMixin",

    "epi-cms/command/CopyContent",
	"alloy/component/RefreshTreeCommand",
    "epi-cms/command/CutContent",
    "epi-cms/command/PasteContent",
    "epi-cms/command/TranslateContent",
    "epi-cms/command/DeleteContent",

    "epi-cms/widget/CreateCommandsMixin",

    "epi/shell/selection"
],

function (
// dojo
    declare,
    array,
// epi
    _CommandProviderMixin,
    CopyCommand,
	RefreshTreeCommand,
    CutCommand,
    PasteCommand,
    TranslateCommand,
    DeleteCommand,

    CreateCommandsMixin,

    Selection
) {

    return declare([_CommandProviderMixin, CreateCommandsMixin], {
        // summary:
        //      Command provider for content context menus
        // tags:
        //      internal xproduct

        // treeModel: [Object]
        //      Model use for the commands
        treeModel: null,

        clipboardManager: null,

        _settings: null,
        _newContentCommand: null,
        _translateContentCommand: null,

        constructor: function (params) {
            declare.safeMixin(this, params);
        },

        postscript: function () {
            this.inherited(arguments);

            //Create the commands
            this._settings = {
                category: "context",
                model: this.treeModel,
                clipboard: this.clipboardManager,
                selection: new Selection()
            };

            this._translateContentCommand = new TranslateCommand({ category: "context"});

            var createCommands = this.getCreateCommands(),
                commands = [];

            for (var key in createCommands) {
                commands.push(createCommands[key].command);
            }

            commands.push(
                this._translateContentCommand,
				new RefreshTreeCommand(this._settings),
                new CutCommand(this._settings),
                new CopyCommand(this._settings),
                new PasteCommand(this._settings),
                new DeleteCommand(this._settings)
            );

            this.set("commands", commands);
        },

        updateCommandModel: function (model) {
            // summary:
            //      Updates the model for the commands.
            // tags:
            //      public

            array.forEach(this.get("commands"), function(command){
                if (command.isInstanceOf(this.createCommandClass) || command.popup){
                    command.set("model", model);
                }
            }, this);

            this._translateContentCommand.set("model", model);
            this._settings.selection.set("data", [{ type: "epi.cms.contentdata", data: model}]);
        }

    });

});
Now under the component directory add the file RefreshTreeCommand.js and add the following code. The below code is copied from "copy command" and modified. As an example, I am just getting the clicked page id, calling the asmx webservice and reloading the whole page.
define("alloy/component/RefreshTreeCommand", [
"dojo/_base/declare",
"dojo/_base/array",
"epi",
"epi/shell/command/_Command",
"epi/shell/command/_ClipboardCommandMixin",
"epi/shell/command/_SelectionCommandMixin"
], function (declare, array, epi, _Command, _ClipboardCommandMixin, _SelectionCommandMixin) {
return declare([_Command, _ClipboardCommandMixin, _SelectionCommandMixin], {
// summary:
// A command that starts the create new content process when executed.
//
// tags:
// public
// label: [readonly] String
// The action text of the command to be used in visual elements.
label: "Refresh",
// iconClass: [readonly] String
// The icon class of the command to be used in visual elements.
iconClass: "epi-iconRevert",
_execute: function () {
// summary:
// Copies the currently selected items to the clipboard and sets the clipboard copy flag.
// tags:
// protected
//this.clipboard.set("copy", true);
//this.clipboard.set("data", this.selection.data.concat());
//alert('Thanks for calling me');
//debugger;
// Standard jQuery to call an action method of our ASP.NET MVC controller
var pageId = { "id": this.selection.data[0].data.contentLink };
dojo.rawXhrPost({
url: "/HelperService.asmx/Update",
//handleAs: "json",
headers: { "Content-Type": "application/json" },
timeout: 10000,
postData: dojo.toJson(pageId),
load: function (data) {
var result = dojo.fromJson(data);
if (result.d.Data != '') {
window.location.reload();
}
},
error: function (error) {
}
});
},
_onModelChange: function () {
// summary:
// Updates canExecute after the model has been updated.
// tags:
// protected
var model = this.model,
selection = this.selection.data,
canExecute = false;
if (model && selection.length) {
canExecute = array.every(selection, function (item) {
return model.canCopy(item.data);
});
}
this.set("canExecute", canExecute);
}
});
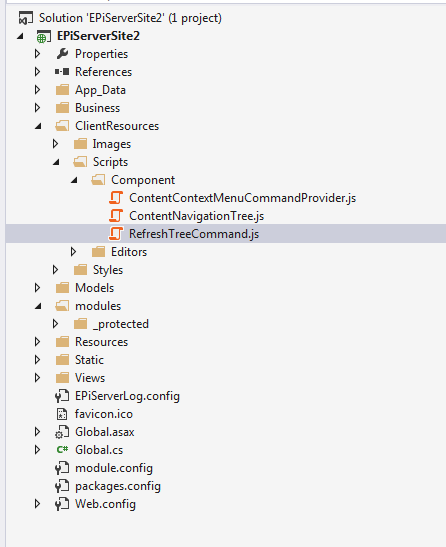
});The visual studio structure should be
Now compile and run the project. You should see a new menu something like
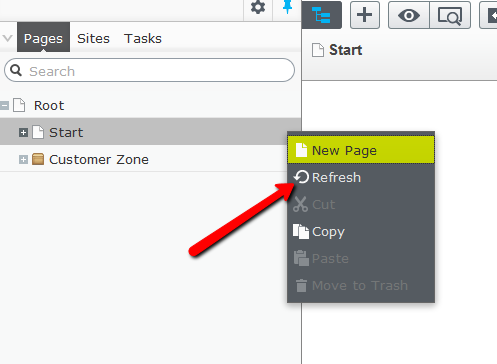
Clicking on this menu will call a asmx webservice passing page id as parameter. On server end, you can clear the EPiServer cache or do something else useful.
Nice post, thanks for your sharing.
Nice! You inspired me to make a small add-on that demonstrates another, arguably simpler, way of adding an item to the context menu. https://github.com/episerver/AddOn.ReloadChildren/
Hey Ben & Tahir,
Thx for inspiration for my new blog (and thx Ben for the solution that I could re-use to most extent).
http://www.mogul.com/en/about-mogul/blog/open-unselected-page-in-a-new-tab-from-episerver-tree