


From AI Agents to AI Workflow with Opal
Introduction
In the first article in this series, we talked about AI agents in Optimizely Opal and walked through the process of creating a specialised agent. In this article we will take the next step and build a workflow agent.
As in the first article, we will go through a step–by–step process of creating a workflow agent using a practical example of creating a workflow that performs automated initial review of content draft for brand and tone of voice alignment.
Standalone agent vs workflow agent
Before we dive into building a workflow agent, let’s first look at how it differs from a Standalone Agent. “Standalone agent” is not an official term used in Optimizely documentation, but in this article, we will use it to refer to either an existing agent from the Optimizely Agent Directory or a specialised agent you build yourself.
A standalone agent already uses context (prompt template, variables, attached files, instructions and the conversation it is in). It can already take actions on its own using tools. What it cannot do is start on its own, coordinate other agents, or run the same workflow on a schedule or every time an event happens. That is what a workflow agent adds: it uses triggers, steps sequence, conditions and loops to combine multiple standalone agents into a multi–step process.
Can you just create a specialised agent with a prompt that will make it do the same multi-step process? In theory – yes, but in practice such a complex agent will be very difficult (if not impossible) and expensive (in terms of Opal credits and time spent) to test, debug and maintain. You can refer to the first article – it explains this in more detail.
An important consideration to keep in mind: workflow agents typically operate with greater autonomy and less human involvement. A standalone agent is usually invoked by a person, who then reviews its output. A workflow agent, by contrast, often starts automatically and runs unattended, with human review taking place only after the workflow is complete. For this reason, workflow agents (and any standalone agents they use as part of the workflow) need stricter guardrails defining what they can do, what outputs they must produce, and how they should handle errors and edge cases.
Building Blocks of a Workflow Agent
A workflow agent consists of 3 building blocks: a trigger that decides when it starts, a series of agents that each perform one step, and the logic that determines how those steps are sequenced.

Trigger
Trigger is what starts the workflow agent. It can be one of the following:
-
Chat – agent is called from a chat, just like a standalone agent.
-
Scheduler – agent is executed on a schedule (every hour, every day at 9AM, etc.).
-
Webhook – Opal listens for an incoming webhook and starts the workflow when an external. system sends an event.
-
Email – agent is called when email is sent to the email address that you set as the Trigger Recipient. You can configure additional conditions for sender and subject to avoid accidental email or spam to result in workflow execution
Logic
Workflow agent logic is defined using conditions and loops.
Conditions allow the workflow to follow different paths based on defined criteria. This is your typical “if-then-else” condition that can have multiple “then” parts. Below is an example of having different processing steps for blog article, email or social post.
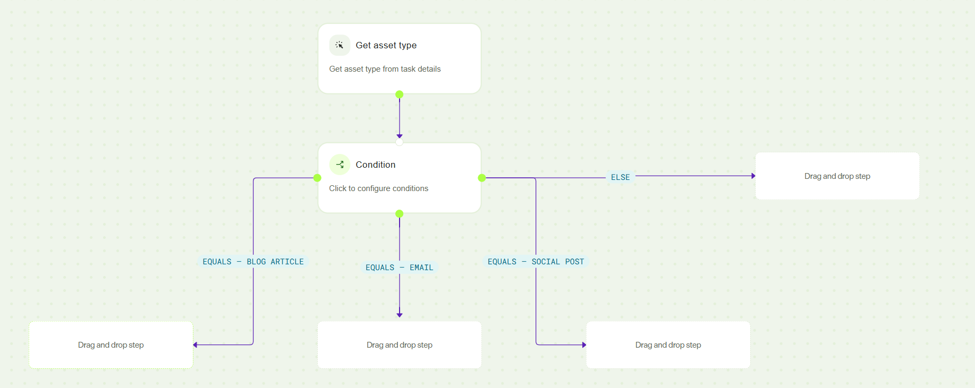
Consider the following best practices when using conditions in workflow:
-
Use clear criteria and structured data – base conditions on specific, predictable values. Prefer numeric or pre-defined values such as High, Medium or Low over free-form text.
-
Keep conditions simple – split complex logic into smaller decisions.
-
Avoid overlapping or duplicate rules – make it clear which path takes priority.
-
Cover every outcome – include both matching and fallback paths.
-
Test edge cases – check missing, unexpected and boundary values.
-
Add a safe fallback – route uncertain cases for human review or end the workflow safely.
Loop is handy when you need to perform same step (or set of steps) over multiple items. Below is an example of using loop to do AEO/GEO analysis and provide summary and improvement recommendations for all child pages of a specified page.

Some best practices when using loops:
-
Keep the loop focused – include only the steps required for each item inside the loop, all other steps should be outside of the loop.
-
Handle individual failures – define what should happen when one or more items in the loop cannot be processed.
-
Test with different list sizes – plan/check for empty lists, single-item lists and larger collections.
-
Limit the number of iterations – large lists can increase workflow execution time and credits consumption.
-
Avoid excessive nesting – Optimizely supports up to three nested loops, but simpler workflows are easier to maintain so avoid nested loops unless it’s really necessary.
Agents
Each step in the workflow is executed by an agent – it can be out-of-the-box agent from Optimizely Agent Directory or a specialised agent you or someone else from your team created.
Creating Workflow Agent
Let’s now create a workflow agent that performs an automated initial review of a content draft for brand and tone-of-voice alignment.
In this example we will use combination of Optimizely CMP + Opal. There is a reason this is a very powerful combination – CMP provides the structure, governance and visibility to the process, while Opal adds the creativity, reasoning and judgement needed to accelerate complex tasks that cannot be done by conventional tools, such as creating content briefs and drafts, reviewing and proofreading content.
Here is the scenario we will build. A content team is working on content production. Every content production task follows a set of steps, and one of these steps is Brand review. Today, a copywriter picks up this step, opens the content, opens the brand guidelines, and checks one against the other. It is necessary work, but most of it is mechanical.
With the workflow we will build, when a task reaches the Brand review step, Opal picks it up automatically. It reads the content, fetches the latest brand and tone of voice guidelines, reviews the content against them, and leaves a comment on the task listing any issues it found and suggesting improvements. The task is then assigned to the copywriter, who now starts from a prepared initial review instead of a blank page.
Looks simple but even such a simple workflow can save lots of time for a team that has to produce lots of content and is short on resources. Or imagine a situation where a new version of brand guidelines is released and someone needs to re-check 20 most recent articles against updated guidelines. How long would that take if done manually from scratch? As a copywriter, is this a kind of task you’d be excited to work on? As a team manager, is this where you’d want to spend your copywriters’ time?
Planning the Workflow
Before jumping into building the agent, it’s first important to understand and plan what exactly you want to the workflow to do, how do you want it to do it.
A simple way to do this is to write down workflow steps or (if you’re a visual person) draw it as a sequence diagram. Then look at the workflow and ask yourself these questions:
-
Is it only covering the happy path, what could go unexpectedly and how should we handle it.
-
Do you have human review steps at the right place? It’s tempting to have a workflow where AI does just everything and human only reviews the final result but in a complex multi-step workflow you will likely need few human review checkpoints.
-
If workflow has a loop in it – is there a risk of it becoming an endless loop or having too many iterations, do you want to put a limit on number of iterations to avoid it from consuming too many credits?
Here are the high-level steps in our example workflow:
-
Content creation task reaches the AI Assisted Brand review step.
-
Opal gets the task details and extracts the content to be reviewed.
-
Opal fetches the latest brand and tone of voice guidelines.
-
For each content item in the task, Opal identifies the content type, reviews it against the relevant guidelines, and leaves a comment on the task with identified issues and suggested improvements.
-
Opal moves the task to the next step, Final Brand Review and Approval.
Next, we look at these initial steps and ask the questions:
-
What should happen if we cannot get the task details on step 2?
-
What if task status is Completed instead of instead of In Progress – do we still do the review or skip it?
-
What if we get an error fetching latest brand guidelines?
-
On step 4, what content type should be reviewed and what content type should be skipped?
-
Do we want to have a limit of content types to review within 1 task?
Now we adjust our workflow with these considerations in mind:
-
Content creation task reaches the AI Assisted Brand review step.
-
Get task details. If there is an error when getting task details – notify support/ops team via email. If task status is Completed – skip processing and exit.
-
Get the latest brand and tone of voice guidelines. If there is an error getting them – skip processing, leave comment about this in the task and notify support/ops team via email
-
Get content items with content type “article” or “social media post” from the task – these are the only ones we want to cover with the review. If there are no matching content items – skip processing, leave comment about this in the task. If there are more than 5 matching content items found – leave comment that only first 5 will be processed, the rest will be skipped
-
Loop over found content items: Review content item against brand guidelines, leave comment in the task with findings and recommendations. Stop after reviewing 5 content items.
-
Move the task to the next step – Final Brand Review and Approval.
Configuring the Workflow
CMP Configuration
CMP will control the overall content production steps. We will not get into the details of CMP configuration in this article but if you’re starting with CMP, you can read about how to configure task workflows.
Workflow
Here is how our CMP Task Workflow looks like

Note that AI Brand Review has the icon that indicates that it is an external step – this is required to trigger Opal workflow agent from this step.
When converting this step to external step you will be required to select external system:
We will later use this in Opal agent configuration to distinguish webhook for external step in “Content Production with AI-Assisted Brand Review” CMP workflow vs external step in another CMP workflow.

Configuring webhook to trigger Opal workflow agent
We already have workflow with external step – now we need to create webhook in CMP to notify Opal when our external step “AI Brand Review” is started.
This process is describe in details here: https://support.optimizely.com/hc/en-us/articles/43289384478989-How-to-trigger-workflow-agents-with-Content-Marketing-Platform-webhooks
We will only select 1 event for our webhook: external_sub_step_started
Note that when creating webhook you will need to provide callback URL and secret – you get those when you create trigger in Opal – once you get them copy them to webhook settings.
Opal Configuration
Here is how our workflow will look like when we’re done
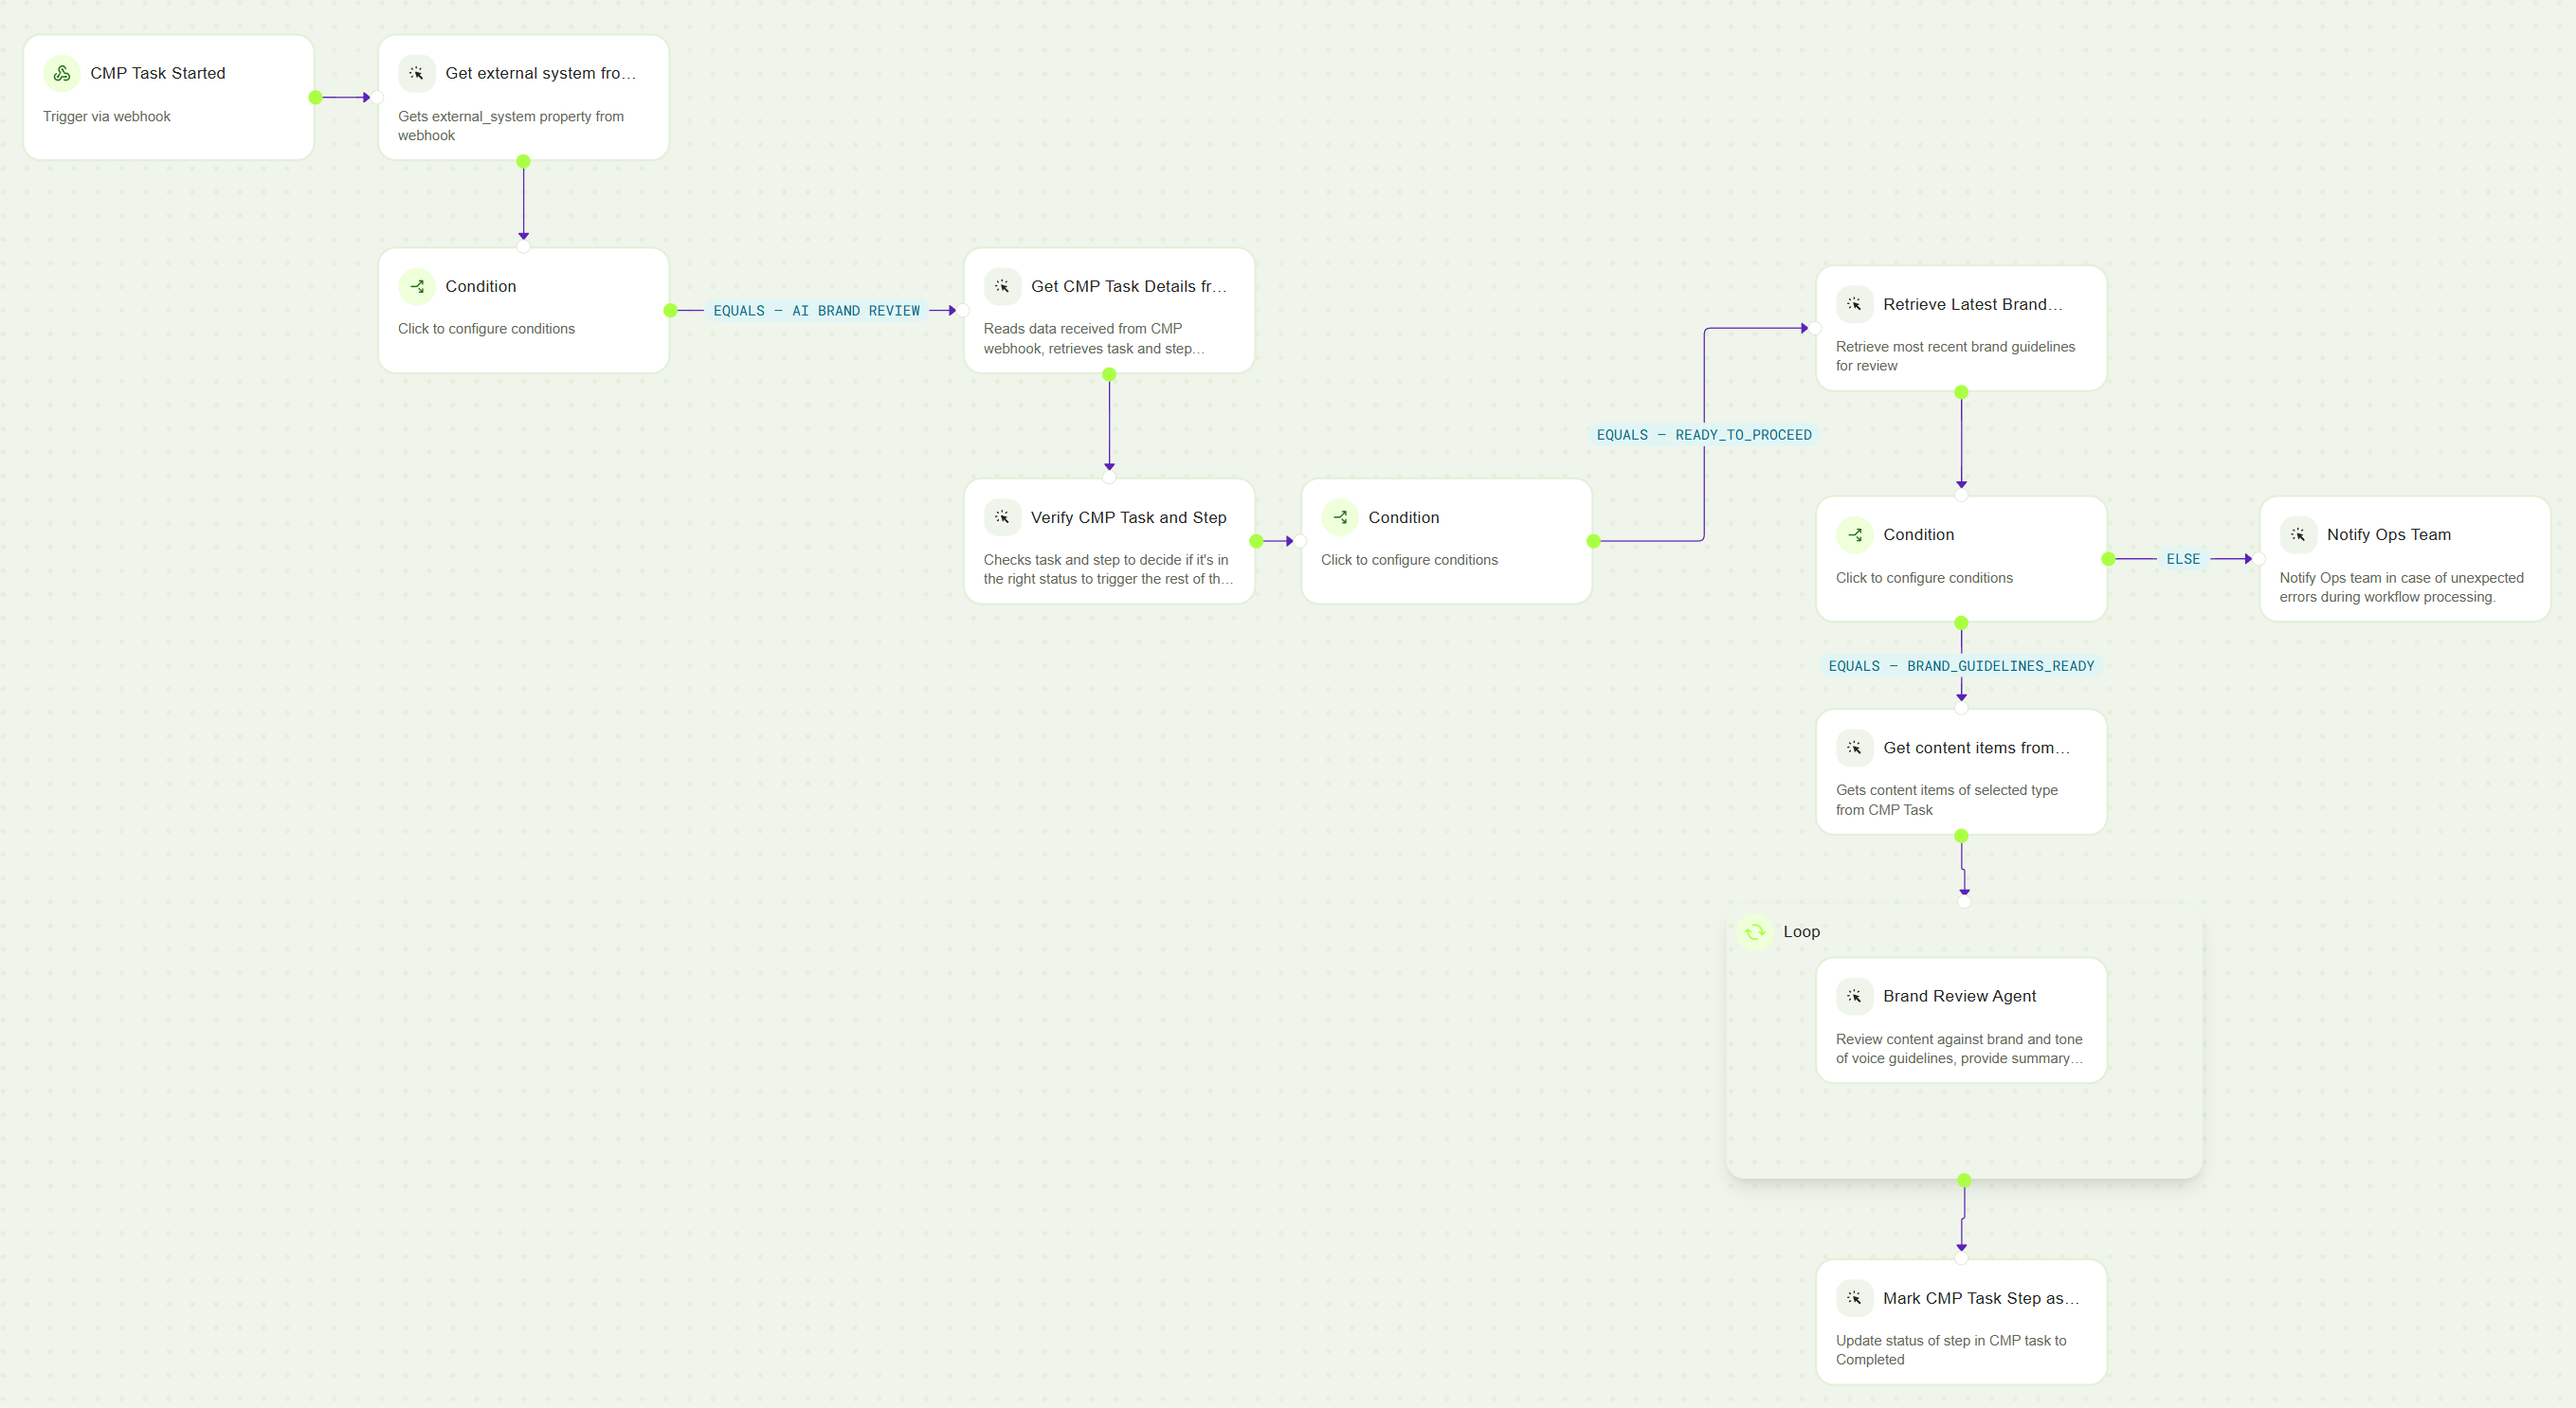
Let’s see how we create it step by step.
Connect Opal to CMP instance
For Opal agents to be able to use existing CMP tools to get task details, it must be given access to this CMP instance by connecting to it.
Note that this connection can only be added by Opal Administrator in your organisation: https://support.optimizely.com/hc/en-us/articles/36359944449805-Get-started-with-Optimizely-Opal-for-administrators#h_01JTGSVJJ6VYDVXSYEK8MZTQWX
As a user, you can check what Optimizely products and instances Opal is connected to by creating a workflow agent, adding a trigger step, clicking on the trigger step and see what products and instances are available in Product Instance drop-down.

Add Trigger
Once you add a trigger by dragging it from the components section to working area, make sure to select the right product instance and configure auth header as described in the documentation:

Copy webhook URL and secret and put them in webhook configuration on CMP side.
Add check for external system passed in webhook

This is similar to External Step Routing Agent described here: https://support.optimizely.com/hc/en-us/articles/43289384478989-How-to-trigger-workflow-agents-with-Content-Marketing-Platform-webhooks
But instead of agent with external step name specified in prompt, we use an agent that gets value of external step + a condition that checks it. You can re-use this combination in other workflows initiated by a webhook trigger without having to create separate step routing agent with different external system name in prompt.
We need to add this check because CMP will call the webhook any time an external sub step of a task is started. It could be an external step of a task in a completely different workflow unrelated to content production.
Add agents to get task and step details and check if it’s ready for processing
Next, we need agents that will get task details and check if task is at the right step in the workflow (AI Brand Review).

All this could be done with 1 specialised agent, but as we covered before, smaller agents are easier to create and maintain.
We already covered details on creating specialised agents in the previous article, so here we’ll focus on what each of these agents will do rather than how they are built.
Get CMP Task Details from Webhook agent does exactly what the name suggests
-
Gets CMP task ID from webhook
-
Uses get_cmp_resource tool to get task details
-
Returns task details
You can re-use agent in any other workflow that is initiated by a webhook from CMP Task.
Verify CMP Task and Step agent gets task details from the previous agent, check the status of the task (should be In Progress), and the current step of the task (should be AI Brand Review). If task has the right status and is at the right step – it will return READY_TO_PROCEED.

We then have a condition step that moves workflow to next step (Brand Guardrails retrieval) or stops processing if the CMP task has wrong status or is not at “AI Brand Review” step.
We also added a condition to notify Ops team in case Opal fails to get task details from CMP. This is an optional condition and we’re using it as example of how you can make the workflow more robust.
Add agent to get latest brand and tone of voice guidelines

This agent gets the latest version of brand and tone of voice guidelines. Depending on how and where you store these guidelines, it can use tools like browse_web or read_file or a custom tool (if you keep brand guidelines in a system that must be access in a specific way).
This agent should also return the status of guidelines retrieval. In this example we return BRAND_GUIDELINES_READY if all went well.
Here we also have a contingency step to notify Ops team if brand retrieval was not successful.
Add agent to get content items from the task

Now that we have the brand guidelines, we need to get content items from the task. This agent goes over list of content items created in the task and filters one with the appropriate type (article, social post, etc). It can get list of content items in task from “Get CMP task details” agent or use tool get_cmp_resource to get this information. We can also instruct this agent to:
-
leave comment in the task if there are no content items found in the task and there is nothing to review;
-
only choose first 5 content items from the task if it has too many (to avoid workflow taking forever and consuming too many credits) and leave comment about this in the task.
Use loop to call Brand Review Agent for each content item

Since a task can have multiple content items in it, we use loop to iterate over these content items and call Brand Review Agent for each of them.
Brand Review Agent already has access to brand guidelines (passed from “Retrieve Latest Brand Guidelines” agent), uses tool cmp_retrieve_asset_from_library to get asset contents, and uses tool add_comment_on_task_substep to leave comment with review details.
Mark step in task as Completed
To make CMP workflow progress to the next step, we have an agent that uses tool update_task_substep to complete the current step (AI Brand Review).
Testing and Troubleshooting the Workflow
Just as specialised agents, workflow agents in Opal keep execution log that show details of each step in the workflow, including input, output and processing status.

To see details of an execution – click on the flow icon

And from there you can click on each step in the workflow to see its input, output and execution memory.
I recommend that you do this testing early in the process and repeat every time you add a new step to the workflow, especially if you are creating a workflow for the first time. Otherwise, it will be difficult to find where it went wrong when you need to troubleshoot across 5-10 steps.
As a starting point – make sure CMP trigger actually works:
-
Create CMP task based on the workflow that includes external step that will trigger the webhook
-
Make sure you saved you workflow agent and it’s in Active status
-
Move task to the step that triggers the Opal workflow and make sure step is in In Progress state
-
Go to Opal agent > View logs – you should see agent execution in the log
Lessons learned
A few principles I would carry into building any workflow like this:
Start small. One trigger, one review, one comment. A first version that also fixes the content, reassigns the task, and updates three external systems in the process is harder to test and debug. Get one path working end to end before you add the next.
Use a clear trigger. It should be clear what starts the workflow. If you find yourself adding too many conditions right after the trigger, the trigger is probably too broad.
Keep each agent focused. The same rule as in the first article applies: an agent should do one thing well. This matters even more inside a workflow than in chat, because agents in a workflow run unattended in a single pass - there is nobody there to answer a clarifying question, so the prompt has to carry everything the agent needs.
Keep a human approval step. No matter how good the results may look, leave the final step assigned to a person. The workflow's job is to make that person faster, not to replace their decision.
Do not automate irreversible actions early. Leaving a comment is easy to ignore if it is wrong. Un-publishing content or rejecting a task is not as easy. Keep the workflow on the safe side of that line until you trust it.
Measure the result. The point of this workflow is less manual effort and better review coverage. Check whether that is actually happening by looking at the measurements available in agent execution log, CMP reports on tasks throughput and most importantly, by talking to people who use the workflow.
Wrapping up
In the first article, we built a specialised agent that focuses on one task. In this one, we connected several agents to create to a real content process: a trigger from CMP, context gathered at run time, a loop over content items, an action written back into the task, and a human making the final call.
Standalone agents are already valuable, but workflows are where the efficiency gains can multiply. When applied to the right process and designed well, workflows can run consistently whenever they are needed, without relying on someone to initiate each step. As this example shows, that does not mean removing the human from the process. The goal is to reduce the time spent on repetitive, time-consuming tasks so people can focus on review, judgement and final decisions. AI simply expands the range of work that can be treated as routine and automated.
Comments