
Create a Signage type block
In this tutorial I will create a signage type of block. The idea is to have a block where the user can make an interactive decision that will progress the user to different content without re-loading the page.
Below are the end result from a new Foundation site using the signage block.

A few limitations.
- Doesn't currently work with personalization. Meaning, the content that is displayed along the path does not consider personalization. (The main block does.)
- Currently doesn't work with forms. This is because of a javascript error.
- Limited to only one signage block per page.
Now lets get started.
Overview
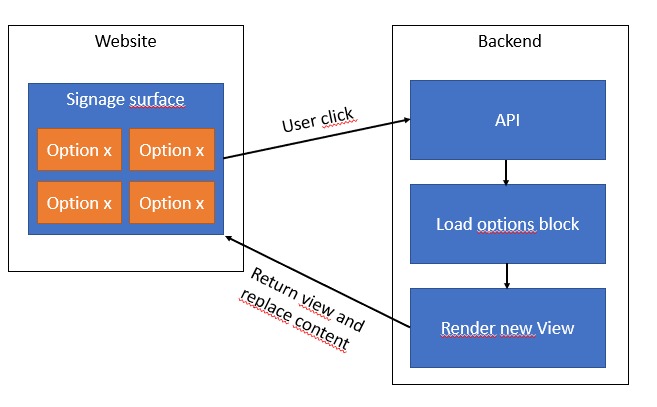
The process will be, user clicks on a signage surface this in turn triggers a call to the backend that renders a new view that is then presented to the user. In this new view, a new signage can be present that allows for further interactions and so on. Meaning, we will not be bound to just one decision but can actually continue to build more and more depth (if we so wish.)
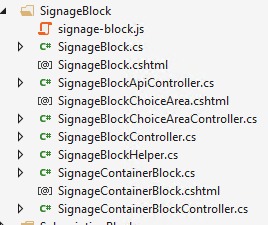
Here is an overview of the files that will I will create in this tutorial.
Step 1 - Blocks, controllers and views
Blocks
First we create the 2 blocks that are needed. The first one is a container block will be used to display all options. The second one is an options block which will be created by an editor when an option is needed. To make it more flexible (thank you David Knipe for this idea) we will use a content area that represents the clickable surface, then we have a second content area that will represent the new view to render. The idea is simple, the container block loads all options and all options decide themselves how they will render within the container area. Then once clicked, a different rendering will be used to display the new view to the user.
In the example below I will use controllers to make it simple to further enhance this, however it is possible to do it without controllers and instead use a IViewTemplateModelRegistrator.
SignageContainerBlock.cs
[ContentType(DisplayName = "Signage container block",GUID = "af597729-f5c5-407e-85a9-a36652f4e419",Description = "",GroupName = GroupNames.Content)][ImageUrl("~/assets/icons/cms/blocks/CMS-icon-block-23.png")]public class SignageContainerBlock : FoundationBlockData{ [Display(Name = "Is this the first signage block on the page?", GroupName = SystemTabNames.Content, Order = 10)] public virtual bool IsRootProgressBlockContainer { get; set; }
[CultureSpecific] [Display(Name = "Progress choices", GroupName = SystemTabNames.Content, Order = 20)] [AllowedTypes(typeof(Blocks.SignageBlock.SignageBlock))] public virtual ContentArea ChoiceArea { get; set; }}
SignageBlock.cs
[ContentType(DisplayName = "Signage Block",GUID = "ce7f2aa7-8356-4511-a1f2-0d78355cfde9",Description = "",GroupName = GroupNames.Content)][ImageUrl("~/assets/icons/cms/blocks/CMS-icon-block-23.png")]public class SignageBlock : FoundationBlockData{ [CultureSpecific] [Display(Name = "Clickable area", GroupName = SystemTabNames.Content, Order = 10)] public virtual ContentArea ClickableArea { get; set; }
[Display(Name = "Clickable area CSS class", GroupName = SystemTabNames.Content, Order = 20)] public virtual string ClickableAreaCssClass { get; set; }
[CultureSpecific] [Display(Name = "Main content area", GroupName = SystemTabNames.Content, Order = 30)] public virtual ContentArea MainContentArea { get; set; }
[Display(Name = "Main content area CSS class", GroupName = SystemTabNames.Content, Order = 40)] public virtual string MainContentAreaCssClass { get; set; }}
This is pretty straight forward. I create a container block with 2 properties, the first one will let me know if we have written a HTML-container on the page already (this allows us to create multiple nested containers) and the second is a content area with options.
The second block is equally as straight forward, first the clickable area which can be anything followed by the main area which we render if someone click on the clickable area. The css properties are just if we want to style it differently.
Controllers
The controllers doesn't contain any particular information except for the TemplateDescriptor. I added them in this example to make it easy to add custom logic to the page.
There are a total of three controllers, two controllers for the signage block (one to render the choice and one to render the new view) and one controller for the container block.
SignageContainerBlockController.cs
[TemplateDescriptor(Default = true)]public class SignageContainerBlockController : BlockController<SignageContainerBlock>{ public override ActionResult Index(SignageContainerBlock currentBlock) { // Do some custom stuff here
var viewModel = new BlockViewModel<SignageContainerBlock>(currentBlock); return PartialView("~/Features/Blocks/SignageBlock/SignageContainerBlock.cshtml", viewModel); }}
SignageBlockController.cs
[TemplateDescriptor(Default = true)]public class SignageBlockController : BlockController<SignageBlock>{ public override ActionResult Index(SignageBlock currentBlock) { // Do some custom stuff here
var viewModel = new BlockViewModel<SignageBlock>(currentBlock); return PartialView("~/Features/Blocks/SignageBlock/SignageBlock.cshtml", viewModel); }}
SignageBlockChoiceAreaController.cs
[TemplateDescriptor(Tags = new [] { "SignageContent" }, TemplateTypeCategory = TemplateTypeCategories.MvcPartialController, Inherited = true, AvailableWithoutTag = false)]public class SignageBlockChoiceAreaController : PartialContentController<SignageBlock>{ public override ActionResult Index(SignageBlock currentBlock) { // Do some custom stuff here
var viewModel = new BlockViewModel<SignageBlock>(currentBlock); return PartialView("~/Features/Blocks/SignageBlock/SignageBlockChoiceArea.cshtml", viewModel); }}
The only interesting thing in the controllers is the TemplateDescriptor in the SignageBlockChoiceAreaController. In here we define a Tag that we will be referencing in the container view in order to render the choice area and not the new view.
Views
We will also create three views, one for each controller.
SignageContainerBlock.cshtml
@model IBlockViewModel<Foundation.Features.Blocks.SignageBlock.SignageContainerBlock>
@helper PrintItems(){ if (Model.CurrentBlock.ChoiceArea != null) { @Html.PropertyFor(m => Model.CurrentBlock.ChoiceArea, new { Tag = "SignageContent" }) }}
@if (Model.CurrentBlock.IsRootProgressBlockContainer){ <div id="signage-block" style="background-color: @Model.CurrentBlock.BackgroundColor; opacity:@Model.CurrentBlock.BlockOpacity;" class="@(Model.CurrentBlock.Padding + " " + Model.CurrentBlock.Margin)"> @PrintItems() </div>}else{ @PrintItems() }
SignageBlock.cshtml
@model IBlockViewModel<Foundation.Features.Blocks.SignageBlock.SignageBlock>
<div style="background-color: @Model.CurrentBlock.BackgroundColor; opacity:@Model.CurrentBlock.BlockOpacity;" class="@(Model.CurrentBlock.Padding + " " + Model.CurrentBlock.Margin + " " + Model.CurrentBlock.MainContentAreaCssClass)"> @Html.PropertyFor(m => m.CurrentBlock.MainContentArea)</div>
SignageBlockChoiceArea.cshtml
@model IBlockViewModel<Foundation.Features.Blocks.SignageBlock.SignageBlock>
@{var id = ((IContent)Model.CurrentBlock).ContentLink.ID;}<div style="background-color: @Model.CurrentBlock.BackgroundColor; opacity: @Model.CurrentBlock.BlockOpacity; cursor: pointer;" data-id="@id" class="signage-block-link @(Model.CurrentBlock.Padding + " " + Model.CurrentBlock.Margin + " " + Model.CurrentBlock.ClickableAreaCssClass)"> @Html.PropertyFor(m => Model.CurrentBlock.ClickableArea)</div>
We basically just print out the content areas and not much more. The container block check if we have the property IsRootProgressBlockContainer set, if not then we first print out the container followed by the choices otherwise we only print out the choices.
The SignageBlockChoiceArea gets the ID-number of the block and assigns it to a data-id property. That way we can load the correct choice block in the API.
Step 2 - API and helpers
Now that we have all blocks, controllers and views in place it is time to look at the API that is used to render the "new view" and return it to the user. This process is pretty straight forward.
SignageBlockApiController.cs
public class SignageBlockApiController : Controller{ [HttpGet] [Route("block/progress")] public ActionResult GetBlockProgression(int id) { var contentLoader = ServiceLocator.Current.GetInstance<IContentLoader>(); var componentContentReference = new ContentReference(id); contentLoader.TryGet(componentContentReference, out SignageBlock signageBlock);
if (signageBlock == null) return Content("");
var viewModel = new BlockViewModel<SignageBlock>(signageBlock); var viewResult = ControllerContext.RenderPartialToString("~/Features/Blocks/SignageBlock/SignageBlock.cshtml", viewModel); return Content(viewResult, "text/html"); }}
First we load the block (or return empty if the block can't be found) then we call the helper method to render the contents into a string and finally we return it as HTML to the user.
SignageBlockHelper.cs
public static class SignageBlockHelper{ public static string RenderPartialToString(this ControllerContext context, string partialViewName, object model) { return RenderPartialToStringMethod(context, partialViewName, model); }
public static string RenderPartialToStringMethod(ControllerContext context, string partialViewName, object model) { ViewDataDictionary viewData = new ViewDataDictionary(model); TempDataDictionary tempData = new TempDataDictionary(); return RenderPartialToStringMethod(context, partialViewName, viewData, tempData); }
public static string RenderPartialToStringMethod(ControllerContext context, string partialViewName, ViewDataDictionary viewData, TempDataDictionary tempData) { ViewEngineResult result = ViewEngines.Engines.FindPartialView(context, partialViewName);
if (result.View == null) return String.Empty;
StringBuilder sb = new StringBuilder(); using (StringWriter sw = new StringWriter(sb)) { using (HtmlTextWriter output = new HtmlTextWriter(sw)) { ViewContext viewContext = new ViewContext(context, result.View, viewData, tempData, output); result.View.Render(viewContext, output); } }
return sb.ToString(); }}
There is no black magic happening. We simply take a controller context along with the view and model which we then render using one of the ViewEngines registered.
Step 3 - Javascript
Now all that is needed is some javascript and we are done. The code below is using Webpack as I am using Foundation to build this. You can of course take out and just use the jQuery parts as you see fit. (I will highlight the changes needed to run this for Foundation.)
signage-block.js
import * as axios from "axios";
export default class SignageBlock { init() { let oldBlockHtml = ''; $('#signage-block').on('click', '.signage-block-link', (e) => { oldBlockHtml = $('#signage-block').html(); let id = $(e.currentTarget).data('id');
$('#signage-block').html('<img src="/Assets/imgs/spinner.gif" style="width: 100px; height: 100px;" />'); axios.get('/block/progress?id=' + id) .then((result) => { $('#signage-block').html(result.data); }).catch((error) => { $('#signage-block').html(oldBlockHtml); notification.error(error); }); }); }}
First we create a Webpack class which contains an init method. (This is an optional and only included because I write this for Foundation.) Inside the Init method we have a jQuery event handler that binds the 'click' on all objects that has the class 'signage-block-link' which can be found in the SignageBlockChoiceArea.cshtml file. Once such a class is detected, we bind a click event to it. This fetches the ID-number and makes a call to the API. The spinner is of course optional and just there to show that something is happening. Once the data has been loaded we display it. In case we fail to load, we put the old data back into the container.
Register in Webpack (For Foundation)
In order to get it to work in Foundation you will need to register it in Webpack.
Open Assets > js > common > foundations.cms.js
Add a new import (make sure the path is correct)
import SignageBlock from "Features/Blocks/SignageBlock/signage-block";
Then call the init method at the bottom where all the init calls are happening.
let signageBlock = new SignageBlock();signageBlock.init();
Wrapup
This is it. This is all that is needed to create your own signage block. You can then put in tracker inside the API to follow what users are doing with the block.
API failure
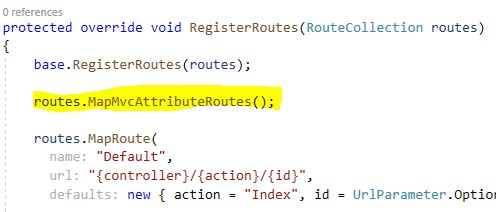
In case you encounter a problem with the API and that you can not make any calls, then it is most likely because you haven't registered the use of MVC route based routing in the Global.asax class.
Open Global.asax or the class where you register your routes and then add the following routes.MapMvcAttributeRoutes();
Comments