Adding icons/thumbnails to content tree items in Episerver CMS
Updates [2021/01/04]: Geta has updated the module to allow you to configure the tree icons. See below link
https://github.com/Geta/Epi.FontThumbnail#tree-icon-feature
You might not need this customization anymore.
.
.
In continuous efforts to make the content editor’s life easy, we will learn to add icons/thumbnails, to the items in our content tree. So that we can easily identify the type of an item.
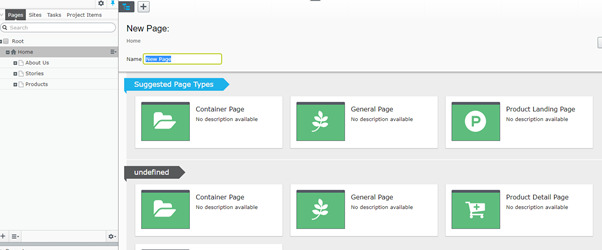
In EpiServer, we have an attribute to add preview images to our custom types (Page/Block types). But that will only show while adding new item (as shown in below image). So, this is the default scenario. When we are using the Episerver’s ImageUrl attribute.

You can see the icons on the content types (on right side), but those are missing on the items in tree (in left panel).
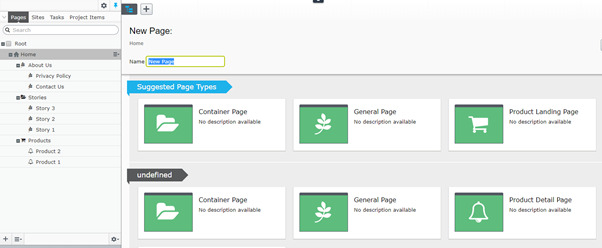
So, I would recommend Geta module for thumbnails (Geta.Epi.FontThumbnail). That is very handy and easy to use. And, this (below image) is when using the Geta module.

The same situation we face here, icons are missing on content tree items.
Here, I will add some code along with Geta module to add icons to our items in tree.
Here we go.
Let’s start by adding an Initialization Module, named let's say TreeIconsInitialization inherited from IInitializableModule and dependencies as show below.
[InitializableModule]
[ModuleDependency(typeof(InitializableModule))]
[ModuleDependency(typeof(FontThumbnailInitialization))]
public class TreeIconsInitialization : IInitializableModule
{
}
Add the following code inside the Initialize function
public void Initialize(InitializationEngine context)
{
    if (context == null)
        return;

    var assemblies = AppDomain.CurrentDomain.GetAssemblies().ToList();
    assemblies = assemblies.Where(x => x.GetName().Name.StartsWith("AlloyDemo")).ToList();

    var types = assemblies.SelectMany(x => x.GetTypes()).ToList();
    var typesWithIcon = types
        .Where(type => type.IsDefined(typeof(ThumbnailIcon), false))
        .ToList();

    var iconClasses = typesWithIcon
        .Select(type => new
        {
            Type = type,
            IconClass = this.ParseIconClass(type)
        })
        .ToDictionary(key => key.Type, value => value.IconClass);

    foreach (var uiDescriptor in context
        .Locate
        .Advanced
        .GetInstance<UIDescriptorRegistry>().UIDescriptors)
    {
        if (iconClasses.ContainsKey(uiDescriptor.ForType))
        {
            uiDescriptor.IconClass += iconClasses[uiDescriptor.ForType];
        }
    }
}
In above code, we are scanning the project assemblies to retrieve the types that are defined with the ThumbnailIcon attribute. Here, function ParseIconClass() is responsible for parsing the icon class (font awesome icon class).
Here is the code for parsing the icon class:
private string ParseIconClass(Type type)
{
    if (type == null)
        return null;

    var attribute = Attribute.GetCustomAttribute(type, typeof(ThumbnailIcon)) as ThumbnailIcon;

    string path = attribute?.Path;

    if (string.IsNullOrWhiteSpace(path))
        return null;

    Uri.TryCreate($"http://localhost{path}", UriKind.RelativeOrAbsolute, out Uri uri);
    var query = System.Web.HttpUtility.ParseQueryString(uri.Query);
    string characterCodeString = query["Character"];

    if (!int.TryParse(characterCodeString, out var characterCode))
        return null;

    FontAwesome fa = (FontAwesome)characterCode;
    string name = System.Enum.GetName(typeof(FontAwesome), fa);
    string kebab = FromPascalCaseToKebabCase(name);
    string iconClass = $"fa fa-{kebab}";

    return iconClass;
}
In this function, we are getting the path value of the ThumbnailIcon attribute, as this path contains the icon code in querystring param “Character”. Then converting that code into the font awesome icon class.
The method FromPascalCaseToKebabCase() is for converting the icon name into actual font-awesome icon class.
private static string FromPascalCaseToKebabCase(string input)
{
    if (string.IsNullOrWhiteSpace(input))
        return null;

    StringBuilder retVal = new StringBuilder(32);

    retVal.Append(char.ToLowerInvariant(input[0]));
    for (int i = 1; i < input.Length; i++)
    {
        if (char.IsLower(input[i]))
        {
            retVal.Append(input[i]);
        }
        else
        {
            retVal.Append("-");
            retVal.Append(char.ToLower(input[i], CultureInfo.InvariantCulture));
        }
    }

    return retVal.ToString();
}
After all these, of course we will need to add reference to font awesome css file. To do so, add (if, not already added) module.config and following code.
<?xml version="1.0" encoding="utf-8"?>
<module>
  <clientResources>
    <add name="epi-cms.widgets.base" path="/Static/css/font-awesome.min.css" resourceType="Style" />
  </clientResources>
</module>
And, here we have our icons/thumnails to content tree items


RnD credit goes to our EMVP Drew Null.
If anyone need a hand on any issue or understanding any code line, do let me know.
Happy Coding, thanks and regards,
Praful Jangid

I like to use all the ones built in to Episerver that you can find at http://ux.episerver.com/ then you can easily add a UIDescrptor such as explained https://ericceric.com/2017/06/07/use-episervers-content-icons-as-site-tree-icons/ keeps it nice and easy and within the Episerver framework.
Hi Scott, first of all, thanks for your feedback. I would say that it's just a matter of doing things differently and point of interest. As a developer, we can have different choices to solve a problem but, we choose the one based on different circumstances. And I liked this one as it is easy to manage. I just have to add a single attribute on any content type, and it will manage itself for tree items as well as preview images. :)
Nice blog post thanks Praful. I agree with Scott, use the Episerver Icons where possible, but sometimes you might need some custom Icons too.
Thanks Darren. That's the main reason, that we have very limited collection of icons in Epi.
Very impressive blog. Keep it up.. .)
Thanks Avinash.