Commerce showcase: mobile application for online store
Last month we introduced the Service API, which is a service layer available for system integrators to update and retrieve information from EPiServer. Building an integration between EPiServer and external systems is now easier than ever.
Today, we released the sample code for a mobile application, for every EPiServer Commerce system. With this mobile application, people now can explore your store, find their favorite stuff, looking for the nearest store, and make an order! The application is built and tested on Android device, but it can be built for iOS device too. The interesting part is, this mobile application is developed based on HTML, CSS and JavaScript, so it is quite familiar to us, web developer. By using the Service API, we now can retrieve, update catalog by a single AJAX call.
In this post, we will go detail on how to get the data from Service API, how to render catalog data by using template engine, how to make an order on button click, and how to add the Google map to the application.
Platform
By using Cordovafor building, this mobile application can be deployed on Android and iOS. It is built upon HTML, CSS and JavaScript, packaged as a native application. With Cordova plugin, this Web app can access to native device features such as Geolocation, camera, etc… By using the Google Map plugin, we can add Google Map to the app, so people can find the nearest store, using their current location.
Libraries
- Cordova for building native-app-like
- jQueryMobile for building HTML5 responsive web app.
- Backbone router and view.
- RequireJS for AMD, to improve the speed and code quality.
- doT.js template engine.
- jQuery
Project structure
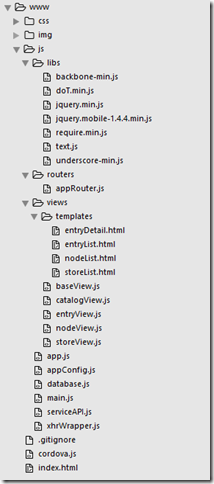
Our code base is in the www folder, everything else is Cordova’s stuff. Unless if we want to customize the Android configuration, we can check the platforms/android folder.

Checkout the README.md file for installation guide, Cordova Command Line Interface on how to add and build other platforms. All of Service API calls is located in js/serviceAPI.js file.
Config the router
The Backbone router is implemented in js/routers/appRouter.js, below is the snippet of router configuration:
routes: {
    "entry/:entryCode/stores": "findNearestStore",
    "node/*href": "loadNode",
    "entry/*href": "loadEntry",
    "": "home"
},
When the application starts, the "home" action will be called. And based on the route configuration, this URL will open the "findNearestStore" view for "foo" entry: "index.html#entry/foo/stores". For more information regarding Backbone router: what is backbone router.
Render the home page

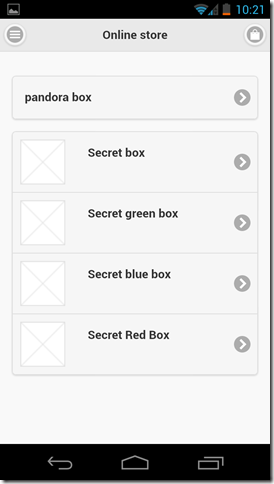
The home page will be rendered when the application starts. We will display nodes and entries under the selected catalog in the home page. But before getting catalog data, we must obtain the access token.
Get the access token
To use any of the Service API RESTful methods, we need to obtain an "OAuth 2 Bearer Token" to send with the request. This token fits for Server to Server integration. But in case of this mobile application, a shared key authentication would be better. That would be the next feature of Service API. In this application, we still use the Bearer token for authenticate.
getAccessToken: function (username, password) {
    return $.ajax({
        type: "POST",
        url: "https://partnerforum2014.azurewebsites.net/token",
        dataType: "json",
        data: {
            grant_type: "password",
            username: username,
            password: password
        }
    });
}
Example response:
{"token_type":"bearer","access_token":"AAAA%2FAAA%3DAAAAAAAA"}We need to keep this access_token, for every later request. By default, the access token lasts for 60 minutes. After 60 minutes, we need to request the new one.
Get catalog data
Now we have the access token, next thing is getting the catalog data.
getCatalog: function (catalogName, accessToken) {
    return $.ajax({
        type: "GET",
        url: "https://partnerforum2014.azurewebsites.net/episerverapi/commerce/catalogs/" + catalogName,
        dataType: "json",
        headers: {
            "Authorization": "Bearer " + accessToken
        }
    });
}
The returned catalog is in JSON format, which contains "Nodes" and "Entries" properties. We will use those properties for rendering the node and entry list. We prefer using a template engine for rendering. Below is the template for displaying node list:
<ul data-role="listview" name="nodeList" data-split-theme="a" data-inset="true">
    {{~it :value:index}}
    <li>
        <a href="#node/{{=value.Href}}" data-node-href="{{=value.Href}}" name="nodeDetailLink">
            <h2>{{! value.Title}}</h2>
        </a>
    </li>
    {{~}}
</ul>
Then using doT.Js template to render an unordered list for all node under our catalog:
doT.template(nodeListTemplateString)(catalog.Nodes)The doT.template function returns a HTML string. We can add that HTML string to a Div tag and jQueryMobile will render the list. Every node will be rendered as a list item, which contains an Anchor tag. The Href of the anchor tag is, for example: "index.html#node/{nodeHref}". Remember the router configuration? This Url will be routed to the loadNode action, with the node’s href. We use this node’s href to ask the Service API to return the node data.
getNode: function (nodeHref, accessToken) {
    return $.ajax({
        type: "GET",
        url: nodeHref, // for example: "https://partnerforum2014.azurewebsites.net/episerverapi/commerce/nodes/pandora-box-1"
        dataType: "json",
        headers: {
            "Authorization": "Bearer " + accessToken
        }
    });
}
Check out the views/nodeView.js for how to rendering the Node page.
Make an order when clicking on Order button

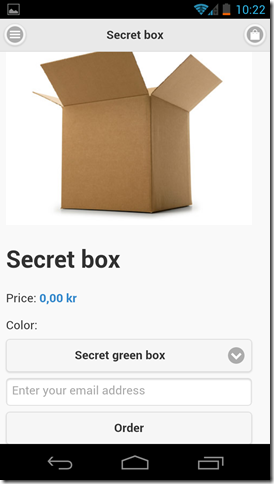
In the entry detail template, we added a button tag:
<button id="makeOrder" data-entry-code="{{=it.Code}}">Order</button>The event binding in Backbone view simply as:
events: {
    'click button#makeOrder': 'makeOrder',
    'change select[name="select-variant"]': 'variantChange'
},
When the "makeOrder" button is clicked, the makeOrder function of the entryView.js view will be invoked. Which will post a request to the server to create an order. In this sample, we simply ask for the buyer’s email address when placing an order. Please note that this "make order" controller is not a part of the Service API. It was added, and customized for this mobile application only.
makeOrder: function (variationCode, email) {
    return $.ajax({
        type: "POST",
        url: "https://partnerforum2014.azurewebsites.net/episerverapi/commerce/orders/order/",
        dataType: "json",
        data: {
            variationCode: variationCode,
            email: email
        },
        headers: {
            "Authorization": "Bearer " + accessToken
        }
    });
}
Find nearest store

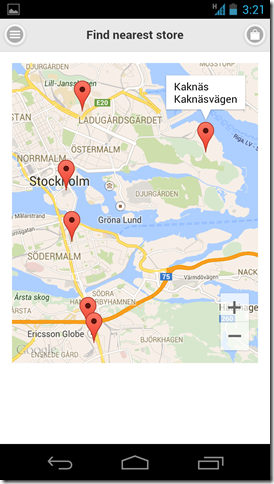
In order to add a map to our application, we use the Google Map plugin for Cordova. The advantage of this plugin, comparing to the Google Map JavaScript API v3 is the performance. Since this plugin uses the native Google Map Mobile SDKs, its performance is much better than the JavaScript library.
Before adding a map to the application, we need to query all stores locations from the server first. The server will return an array of store, and its location (latitude and longitude). Based on those locations, we add a marker to the map for each store. Please note that this feature is not a part of the Service API.
Create the map
this.map = plugin.google.maps.Map.getMap(mapContainer);
this.map.setMapTypeId(plugin.google.maps.MapTypeId.ROADMAP);
this.map.setZoom(8);
this.map.setMyLocationEnabled(true);
this.map.on(plugin.google.maps.event.MAP_READY, $.proxy(function () {
    this.renderStores(this.model);
}, this));
mapContainer is a Div tag, a place holder, where we want to put the map to. When the map is created, we will call the renderStores to add markers for each store.
$.each(stores, $.proxy(function (index, value) {
    this.map.addMarker({
        'position': { lat: value.Latitude, lng: value.Longitude },
        'title': value.Name,
        'snippet': value.Address
    });
}, this));
We also want to move the map camera to the current location, by using map.getMyLocation:
this.map.getMyLocation($.proxy(function (location) {
    this.map.setCenter(location.latLng);
    this.map.animateCamera({
        'target': location.latLng,
        'zoom': 12
    });
}, this));
Try this app on Android device
We have builds in "dist" folder where you can grab an .apk file and try it on your Android phone or tablet. Since the file was not added to Google Play Store, it is considered as unknown source application, then we need to check a checkbox in order to install it: http://developer.android.com/distribute/tools/open-distribution.html
Related information
- Refer to EPiServer Service API for information on how to use the Service API.
- Sample client code for the EPiServer Service API on GitHub.
- Sample mobile application code for the online store on GitHub.

Your personal ShopApp and your Ecwid store stay fully synced in the cloud. Images, prices, availability and any changes that you make online will automatically sync with your mobile app.
Which of these codes should I learn first? Basically, I understood HTML, should I start with PHP next of JQuery? ShowboxApp Gadgetswright Tutuapp Savetubes
I know the css as wll as HTML .I done some some frontend work with these. Now i want to go for backend coding . so Which should i start first for backend devoping ?
Blokada TvTap Bobbymovie