
Planning Your Bynder DAM and Optimizely SaaS CMS Integration the Right Way: Avoiding Asset Sprawl and Unnecessary Synchronization
Note: This is Part 2 of our Bynder integration series. If you missed the Part 1, check out "Implementing the Bynder DAM Connector with Optimizely SaaS CMS: Lessons Learned".
In my previous article, I explored how the Bynder DAM Connector integrates with Optimizely SaaS CMS and how synchronized assets become available through Optimizely Graph and the CMS authoring experience.
This article focuses specifically on the Out-of-the-Box (OOTB) Bynder Connector available through Optimizely Connect Platform (OCP). The goal is to understand how much control can be achieved using standard Optimizely and Bynder capabilities before introducing custom integrations, middleware, or synchronization processes.
While the technical setup of the OOTB connector is relatively straightforward, I discovered that the most important decisions actually happen before the first synchronization is ever executed.
Many implementation teams focus on establishing the connection between Bynder and Optimizely. However, a more important architectural question is:
What assets should Optimizely be allowed to see in the first place?
For organizations that use Bynder as a centralized Digital Asset Management platform, the answer has significant implications for governance, editor experience, operational overhead, and long-term scalability.
This article focuses on the planning and governance considerations that should be addressed before enabling the Bynder connector.
Understanding the Default Connector Behavior
The Out-of-the-Box (OOTB) Bynder connector synchronizes assets that are visible to the authenticated Bynder account.
In simple terms, the connector does not determine which assets should be synchronized. Bynder determines that by evaluating the permissions of the account used during the authorization process.
As a result, the overall scope of synchronization is directly influenced by:
- The permission profile assigned to the integration account
- Asset visibility settings within Bynder
- Metadata visibility rules
- The account used during connector authorization
The connector can only synchronize assets that the authenticated account can access.
This seemingly simple behavior becomes extremely important when working with large DAM implementations.
Why Asset Scope Matters
In many organizations, Bynder contains assets for multiple business functions and audiences.
Examples include:
- Website assets
- Campaign assets
- Product photography
- Internal communications
- Regional marketing materials
- Archived content
- Partner-specific assets
- Brand assets
Not all of these assets are intended for websites powered by Optimizely.
Without careful planning, the connector can synchronize substantially more assets than editors actually need.
At first glance this may not appear to be a major concern. However, every synchronized asset becomes another content item managed by the Optimizely ecosystem.
As synchronization volume grows:
- More items are stored in Optimizely Graph
- More content records are created
- More synchronization events are processed
- Asset selection becomes harder for editors
- Governance becomes increasingly complex
Most importantly, organizations should understand how content volume contributes to overall platform usage and operational overhead.
For this reason, a successful DAM strategy is not about synchronizing everything that exists inside Bynder.
It is about synchronizing only what is required.
Start With Governance, Not Technology
One of the biggest lessons learned during implementation was that DAM integrations are primarily a governance challenge rather than a technical challenge.
The connector itself can be configured very quickly.
Determining which assets should be synchronized requires considerably more thought.
Before connecting Bynder to Optimizely, I recommend answering questions such as:
- Which assets are intended for public websites?
- Which business teams own those assets?
- Which environments require those assets?
- Who approves synchronization scope changes?
- How will future asset growth be managed?
Answering these questions early can prevent a significant amount of cleanup work later.
The Common Mistake: Connecting With an Administrator Account
The easiest way to enable the connector is often to authenticate using an administrator account.
The workflow usually looks something like this:
- Open the Bynder connector.
- Click Connect.
- Log in using administrative credentials.
- Approve access.
- Start synchronizing.
The problem is that administrator accounts often see virtually everything.
That means the connector can potentially see:
- Website assets
- Internal assets
- Historical assets
- Regional assets
- Unused assets
- Archived assets
In other words, the connector effectively inherits access to the entire DAM repository.
This removes any meaningful synchronization boundaries.
Why Creating a New User Is Not Enough
A common assumption is:
"I'll simply create a new user for Optimizely and restrict its permissions."
Unfortunately, this is where many implementations run into trouble.
Bynder permissions are primarily controlled through Permission Profiles.
The effective model looks like this:
Permission Profile → User → Asset Visibility
This means that simply creating a new user does not automatically reduce visibility.
If the new integration user remains associated with a highly privileged profile, that user may still inherit broad access to assets.
In practice, creating a new user and placing it within an administrator-level permission profile often results in another highly privileged user.
The desired filtering behavior never materializes.
This is why a dedicated Permission Profile becomes essential.
The Recommended Approach
Instead of creating a user within an existing administrative profile, create:
- A dedicated synchronization user
- A dedicated synchronization permission profile
- Dedicated metadata visibility rules
Together, these become the foundation of your synchronization strategy.
The goal is to create an account that acts as a read-only integration consumer and nothing more.
1. Creating a Dedicated Synchronization Profile
The dedicated synchronization profile should be configured with only the permissions required for integration purposes.
Recommended permissions include:
Asset Bank
- View assets
- Search assets
- View asset details
- View metaproperties
General / Integration
- API Access
- Manage Webhooks
Permissions that generally do not need to be enabled include:
- Upload assets
- Edit assets
- Delete assets
- Manage taxonomy
- Administrative functions
2. Create a Dedicated Synchronization Account
Once the synchronization profile has been configured, create a dedicated service account and assign it exclusively to that profile.
This account will be used during the Bynder authorization process and will ultimately determine which assets the Optimizely connector can access.
Avoid assigning the account to an existing administrative profile or a profile used by content creators. The goal is to create a narrowly scoped integration account whose sole responsibility is synchronizing approved assets into Optimizely.
By separating the integration account from day-to-day user accounts, you gain:
- Predictable synchronization behavior
- Easier troubleshooting
- Clear ownership of integration permissions
- Reduced risk of unintentionally exposing additional assets to Optimizely
3. Using Metadata as a Synchronization Boundary
Many teams think about metadata exclusively in terms of search and categorization.
During this implementation, I found it equally useful to think of metadata as a governance mechanism.
Metadata can help answer questions such as:
- Should this asset be visible to websites?
- Which business unit owns this asset?
- Which region can use this asset?
- Which environments should receive this asset?
By implementing metadata-driven visibility, organizations can define synchronization boundaries before assets enter Optimizely.
This keeps governance as close as possible to the source system.
4. Configuring Metadata Visibility
One effective approach is to use a required metadata property that identifies whether an asset is intended for website consumption.
For example: VisibleTo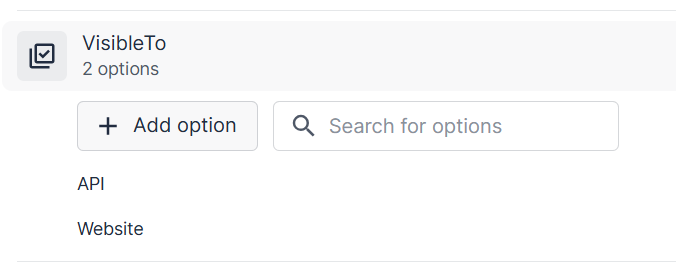
To configure this:
- Navigate to Settings → Taxonomy → Metaproperties Management
- Select the metadata property
- Open the Visibility configuration
- Select the synchronization profile
- Grant/deny visibility only to approved metadata values.
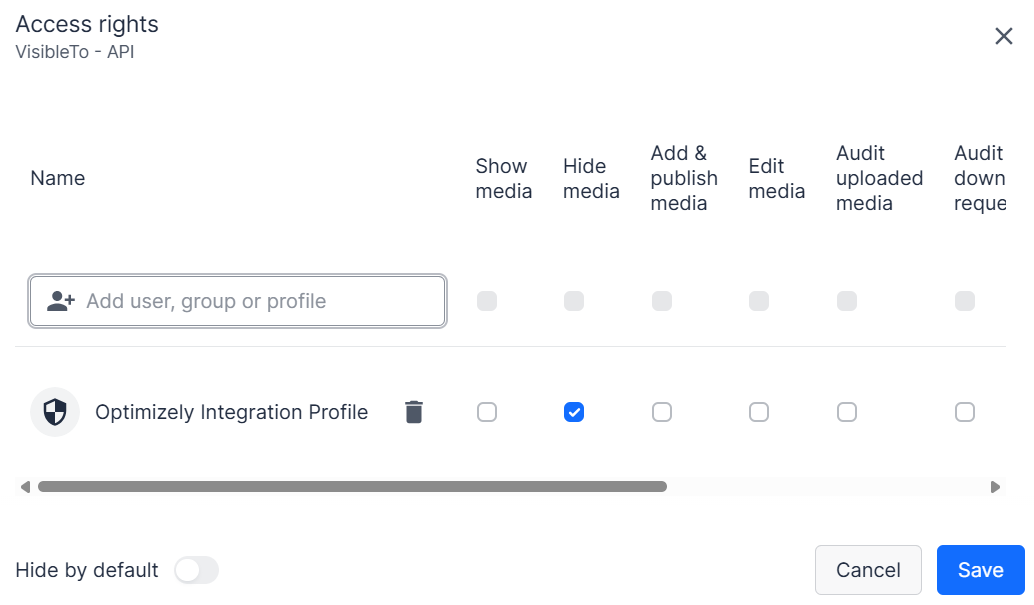
When configured correctly, the synchronization account becomes effectively blind to assets outside the approved scope.
5. Validate Before Connecting
One of the most valuable steps in the entire process happens before Optimizely is connected.
After creating the synchronization account and permission profile:
- Open an Incognito or InPrivate browser session.
- Login using the synchronization account.
- Search for assets.
- Browse collections.
- Verify metadata visibility.
- Validate that only the intended assets are available.
Ask yourself:
If I connect Optimizely using this account right now, am I comfortable synchronizing every asset visible on this screen?
If the answer is no, continue refining the profile before proceeding.
This simple validation step can save considerable troubleshooting effort later.
The Authorization Flow Trap
Another lesson learned during implementation is that the authorization process deserves more attention than most teams initially give it.
The connector authorization flow uses the account that participates in the OAuth approval process.
If an existing browser session already contains administrative Bynder credentials, those credentials may inadvertently be used during authorization.
To avoid this:
- Open a fresh InPrivate or Incognito browser window.
- Login to Optimizely SaaS CMS.
- Start the Bynder App installation and connection process.
- Most Important:
- Installation process must open the Bynder login page.
- Login using the dedicated synchronization account.
- Complete the authorization flow.
Using a clean browser session helps ensure the connector is authorized with the intended account rather than accidentally inheriting access from an existing administrative session.
Understanding the Synchronization Flow
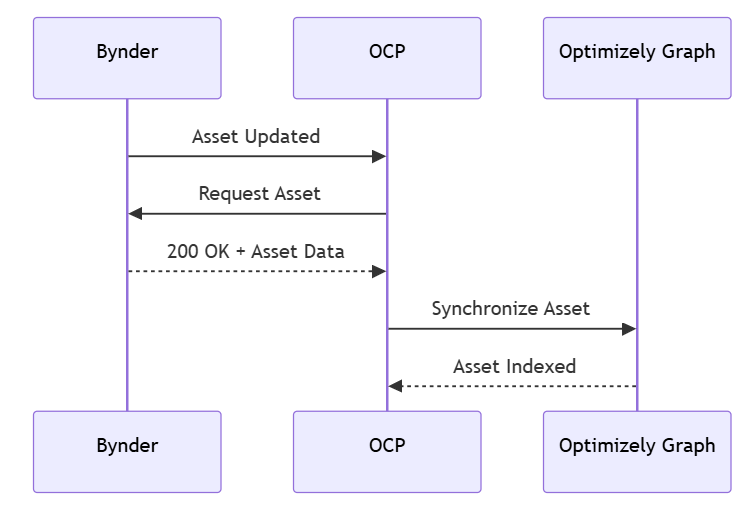
Scenario A : Asset is visible to the synchronization account
- Asset uploaded/updated into Bynder.
- Bynder triggers the OCP connector webhook.
- Bynder receives a request from the connector.
- The synchronization account is authorized to view the asset.
- Bynder returns the asset payload.
- OCP processes the response.
- The asset is synchronized into Optimizely Graph.
- The asset may become available within CMS depending on configuration.
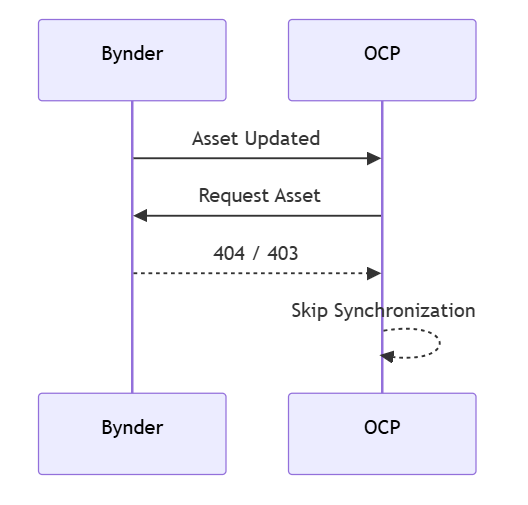
Scenario B : Asset is not visible to the synchronization account
- Asset uploaded/updated into Bynder.
- Bynder triggers the OCP connector webhook.
- Bynder receives a request from the connector.
- Bynder evaluates permissions.
- Access is denied because the synchronization account cannot see the asset.
- No asset payload is returned.
- OCP connector skips synchronization.
This means filtering occurs naturally through the permission model rather than through custom synchronization logic.
Key Lessons Learned
One of the biggest realizations are that successful DAM integrations are defined long before the first asset is synchronized.
A few recommendations I would strongly encourage:
- Define synchronization boundaries before configuring the connector.
- Create a dedicated integration profile instead of reusing administrative profiles.
- Use metadata strategically rather than treating it purely as a categorization tool.
- Validate permissions using a private browser session before connecting Optimizely.
- Think carefully about which assets truly belong inside the website ecosystem.
- Start with a smaller, controlled asset scope and expand incrementally if needed.
Most importantly:
Just because an asset exists in Bynder does not mean it needs to exist in Optimizely.
Conclusion
The Bynder connector makes it very easy to bring DAM assets into Optimizely SaaS CMS.
However, the long-term success of the integration depends less on connector configuration and more on governance decisions made beforehand.
By investing time in permission profiles, metadata design, synchronization boundaries, and dedicated integration accounts, organizations can significantly reduce operational overhead and create a much cleaner experience for both editors and developers.
📚 Bynder + Optimizely SaaS CMS Integration Series
- ✅ Part 1: Implementing the Connector — Lessons Learned
What metadata syncs, how URLs behave, and how to query/render assets in a Next.js frontend. - 👉 Part 2: Planning & Filtering — Avoiding Asset Sprawl and Unnecessary Sync (You are here)
How we achieved metadata-based sync filtering with zero custom code. - ⏭️ Part 3: Exploring Asset Lifecycle Management & Three-Gate Governance
Explore a webhook-driven, three-gate model to handle asset updates, environments, and usage verification.
Comments