A critical vulnerability was discovered in React Server Components (Next.js). Our systems remain protected but we advise to update packages to newest version. Learn More.
AI OnAI Off
A critical vulnerability was discovered in React Server Components (Next.js). Our systems remain protected but we advise to update packages to newest version. Learn More.
Note: This topic has no later version.
WebDAV is an extension of HTTP that allows for extended file handling. Moving from the read-only internet that first emerged into a read-and-write enabled web creates new needs. WebDAV meets those needs and provides a base for developers to extend the functionality of a site and its ease of use for an editor or administrator. In EPiServer CMS it is used to give easy access to files (such as Word documents, images, etc).
For more information about WebDAV, please visit WebDAV.org.
Using WebDAV has the following advantages:
WebDAV opens up possibilities for developers to create their own add-ins with extended file handling capabilities, for example the following:
Edit web.config and make sure it contains the sections outlined below (note that WebFolder is simply a suggested default, you may change this to another name).
<configSections>
 <sectionGroup name="episerverModules">
   <section name="webDav"
        allowDefinition="MachineToApplication"
        allowLocation="false"
        type="EPiServer.WebDav.Config, EPiServer.WebDav" />
  </sectionGroup>
</configSections><episerverModules>
<webDav name="WebFolder">
<provider
name="Global files"
type="EPiServer.WebDav.Provider.VirtualDirectoryProvider,
EPiServer.WebDav"
virtualPath="~/Global/" />
</webDav>
</episerverModules><system.webServer>
<modules>
<add name="UrlRewriteModule"
type="EPiServer.Web.UrlRewriteModule, EPiServer"
preCondition="managedHandler" />
<add name="WebDav"
type="EPiServer.WebDav.Module, EPiServer.WebDav"
preCondition="managedHandler" />
</modules>
</system.webServer><system.webServer>
<handlers>
<!--Should have remove statement to avoid duplicate OPTIONSVerbHandler name -->
<remove name="OPTIONSVerbHandler"/>
<add name="OPTIONSVerbHandler"
path="*"
verb="OPTIONS"
type=""
modules="ProtocolSupportModule"
scriptProcessor=""
resourceType="Unspecified"
requireAccess="None"
allowPathInfo="false"
preCondition=""
responseBufferLimit="4194304" />
<add name="PROPFINDVerbHandler"
path="*"
verb="PROPFIND"
type="EPiServer.WebDav.Handler, EPiServer.WebDav"
resourceType="Unspecified"
requireAccess="None"
allowPathInfo="true"
preCondition=""
responseBufferLimit="4194304" />
</handlers>
</system.webServer><location path="WebFolder">
<system.webServer>
<handlers>
<add
name="wildcard"
path="*"
verb="*"
type="EPiServer.WebDav.Handler, EPiServer.WebDav" />
</handlers>
</system.webServer>
<system.web>
<globalization
requestEncoding="utf-8"
responseEncoding="utf-8" />
<authorization>
<deny users="?" />
</authorization>
</system.web>
</location><system.webServer>
<modules>
<add name="WebDav"
type="EPiServer.WebDav.Module, EPiServer.WebDav"
preCondition="managedHandler" />
<add name="BasicAuthentication"
type="EPiServer.Security.BasicAuthentication, EPiServer"
preCondition="managedHandler" />
</modules>
</system.webServer><system.webServer>
<modules>
<remove name="WebDAVModule" />
</modules>
</system.webServer>If you are experiencing problems connecting to an EPiServer CMS WebDAV folder from a Windows computer, make sure you have updated the WebFolder software to the latest version. The WebFolder update can be downloaded at Microsoft.com.
If the site is configured to use Windows Authentication the previous steps should not be needed.
To disable locking support for the client, follow these steps:
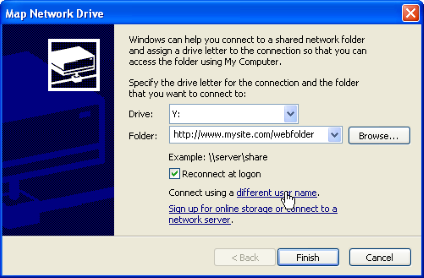
Perform the following steps to map a drive to a WebDAV share:
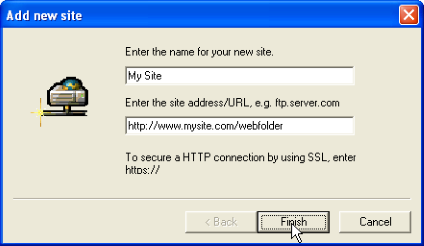
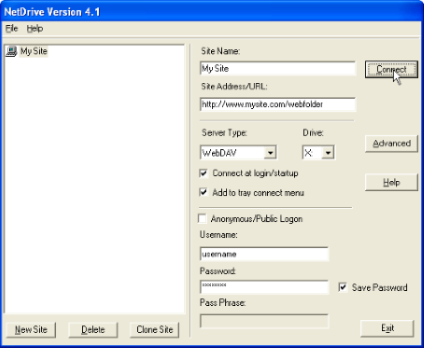
This section describes how to use EPiServer CMS WebDAV features from a third-party client, in this case exemplified with NetDrive.
NetDrive is a third-party WebDAV client, which is more compliant than the built-in Windows client. Download NetDrive and install it with the default options.
Last updated: Mar 25, 2013